
Content targeting for anonymous users with SharePoint Server 2010 (part 1 of 2)
SharePoint Server 2010 ships with the content targeting capability based on Audiences. Using this mechanism you can conditionally display content to groups of users based on their profiles. One shortcoming of this approach is that it needs user profiles which are not available on Internet-facing websites for anonymous users. However, using nothing more than the standard capabilities of the SharePoint framework and ASP.NET you can easily extend the standard content targeting mechanism to support targeting anonymous users.
What are ASP.NET Profiles?
ASP.NET Profiles are the mechanism that ASP.NET offers to store information about users. They are based on the same provider model as ASP.NET Memberships and Roles what means that they can be easily configured and you can even create your own if you want to.
Similarly to User Profiles in SharePoint Server 2010, ASP.NET Profiles allow you to store information about users. Although SharePoint Server 2010 User Profiles provide a richer set of functionality than ASP.NET Profiles, they have a serious shortcoming, as they cannot be used for storing information about anonymous users. Additionally at this moment there is the supported limit of 2,000,000 User Profiles per User Profile Service Application in SharePoint Server 2010, what can be easily exceeded on a publicly available Internet-facing website.
2,000,000 User Profiles per User Profile Service Application isn’t a hard limit. It’s just the number of profiles that SharePoint Server 2010 has been tested with. You can find more information about this boundary in the SharePoint Server 2010 capacity management: Software boundaries and limits article on TechNet.
Out of the box ASP.NET ships with a Profile Provider based on a SQL database (SqlProfileProvider). While you could create your own, the standard provider should be sufficient for the most common scenarios. In the next sections of this article you will see how you can configure this standard Profile Provider with SharePoint Server 2010 to store information about anonymous users.
Configuring ASP.NET Profiles with SharePoint Server 2010
Before you can start using ASP.NET profiles with SharePoint 2010, you have to do some configuration. If you want to use the default SQL-based Profile Provider shipped with ASP.NET you need to create a database that will store the profiles. On top of that you have to enable Profiles tracking on your Web Application.
Configuring the Profile Database
The first step in using the ASP.NET Profiles Provider is to configure the database that will keep the persisted user information. You can either create a separate database for that purpose or configure profiles with the existing one. The configuration can be done using the aspnet_regsql.exe tool using the following syntax:
aspnet_regsql.exe -S <sql instance> -E -A p -d <db name>You can find the aspnet_regsql.exe tool in C:\Windows\Microsoft.NET\Framework\v2.0.50727 on your server.
The –S switch specifies the SQL instance that you want to use for your profiles database. Using the –E switch you specify that you want to use the current account to connect to the database instance. Using the –A p switch you specify that you want to create only the tables required for storing profile information. If you were using the wizard it would automatically create tables for storing data for membership and role providers as well. Last but not least is the –d switch which specifies the database that you want to use. This can either be an existing or a new database. In my example I’m using the following command:
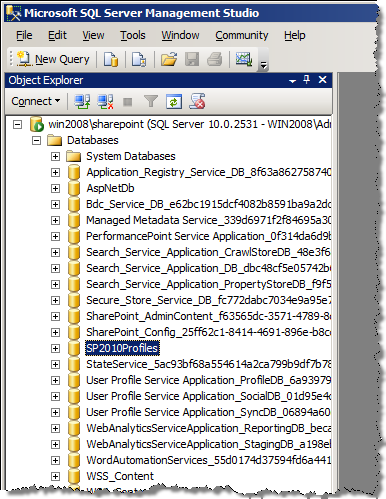
aspnet_regsql.exe -S win2008\sharepoint -E -A p -d SP2010Profileswin2008\sharepoint is my database instance and SP2010Profiles is the name of the new database that will be created for storing profile information. After running this command a new database is created in the specified SQL instance:
Before the database can be used by SharePoint 2010 to store information about anonymous visitors one more thing needs to be done. Because SharePoint Server 2010 will need to store information in the database, write permissions must be granted to the Application Pool account of your Web Application. To do that expand the database/Security/Users node in SQL Server Management Studio, click right mouse button on it, and from the menu choose New User.
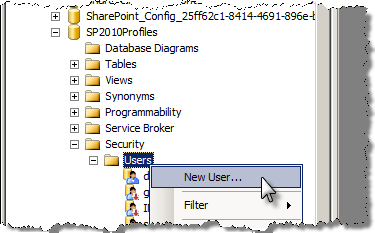
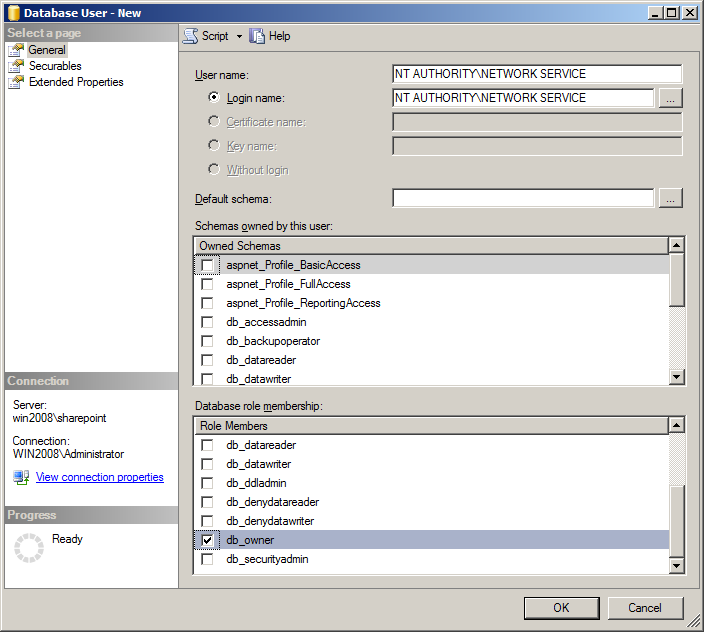
In the Login Name field, provide the name of the Application Pool account that runs your Web Application. As the Role Membership select db_owner.
This step completes the configuration of the database.
Configuring the Web Application
The next configuration step is to enable the ASP.NET profiles on the SharePoint 2010 Web Application. This can be done in the web.config of the specific Web Application. Depending on your scenario you can either do this manually, which is okay for the purpose of this walkthrough, or script it using a Web Application Feature with SPWebConfigModifications.
Configuring database connection
First of all let’s configure the connection to the ASP.NET Profiles database that we created before. While you could type the whole connection string manually there is an easier way to do this.
First of all create a new UDL file (test.udl in this sample).

When you double click it the Data Link Properties dialog will appear on the screen. Using this window you can easily configure the connection to your database. Provide the name of your database instance, choose the login method, and select your database.
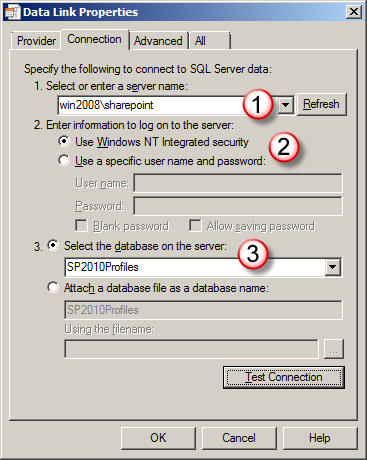
Finally click the Test Connection button to verify that all the provided information is correct and a connection with the database can be established.
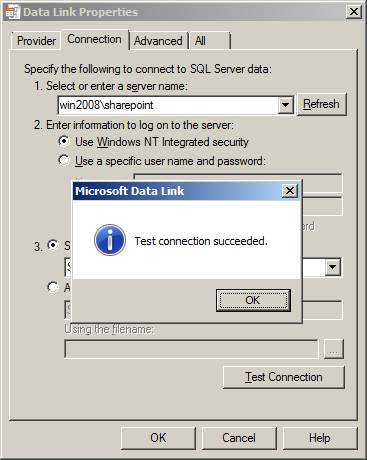
Now close the window by clicking the OK button and then open the UDL file with your favorite text editor. From there copy the generated connection string except for the Provider and Persist Security Info settings.

In the web.config of your Web Application in the configuration section add the following code snippet:
<connectionStrings>
  <add name="SP2010ProfilesDb" connectionString="Integrated Security=SSPI;Initial Catalog=SP2010Profiles;Data Source=win2008\sharepoint" />
</connectionStrings>
Registering the Profile Provider
The next step is to register the ASP.NET Profile Provider with the Web Application. You can do this by adding a profile entry in the system.web section of web.config.
<profile defaultProvider="AspNetSqlProfileProvider">
  <providers>
    <remove name="AspNetSqlProfileProvider" />
    <add name="AspNetSqlProfileProvider" connectionStringName="SP2010ProfilesDb" applicationName="SP2010Profiles" type="System.Web.Profile.SqlProfileProvider" />
  </providers>
  <properties>
    <add name="LikesXbox" allowAnonymous="true" type="System.Boolean" defaultValue="false" />
  </properties>
</profile>
By default there is a SQL Profile Provider already registered for Web Applications, so in order to remove duplication you need to replace the standard ASP.NET Profile Provider with your own. Although it’s still based on the standard ASP.NET SqlProfileProvider you have to redefine it to connect it to your custom profiles database. The connectionStringName attribute specifies the name of the connection string to the database that will store the user profiles data which we registered with the Web Application in the previous step. The applicationName attribute defines the name of your application which will allow ASP.NET to separate the profile information from other data should you choose for a shared database.
Additionally to registering the provider, there is the properties section which specifies which profile properties you will be storing. For every property there must be an entry telling what the name of that property is (name), what the type of the value of that property is (type), what the default value is (defaultValue; optional) and whether or not the property can be used for anonymous users (allowAnonymous). You can specify multiple properties using the add elements as shown in the code snippet above.
Enabling Profile Modules
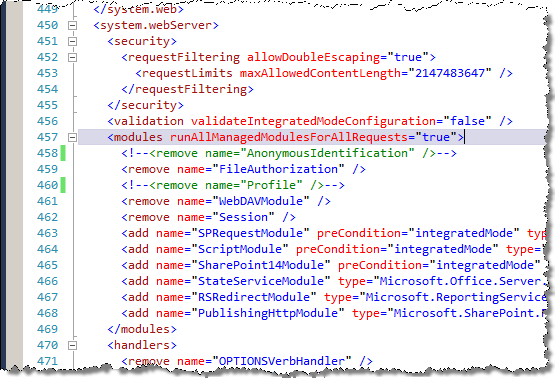
The ASP.NET Profiles depend on two HTTP Modules which are disabled by default for SharePoint 2010 sites. These modules are called AnonymousIdentification and Profiles and can be found in the system.webServer/modules section of web.config.
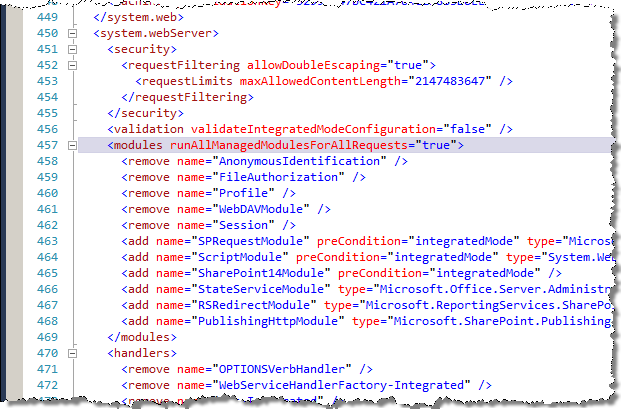
By default ASP.NET Profiles modules are disabled and in order to use ASP.NET Profiles with SharePoint 2010 you have to enable them. You can do this by either commenting out or removing the two remove nodes from the modules section.
Enabling tracking anonymous users
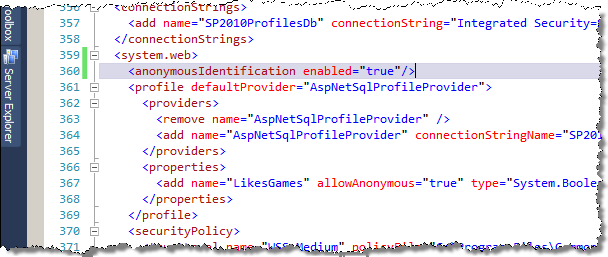
The reason we use ASP.NET Profiles is to track information about anonymous users. Although the ASP.NET Profile Providers are capable of storing information about anonymous users, they don’t do it by default. Tracking anonymous users has to be explicitly enabled in web.config.
You can enable tracking anonymous users by adding the anonymousIdentification entry to the system.web section of web.config and setting the enabled attribute to true.
This step completes the configuration process of ASP.NET Profiles with SharePoint 2010. At this point you should be able to store user information for anonymous users.
Testing the ASP.NET Profiles with SharePoint
In order to verify if the configuration has been done correctly, let’s create two Web Parts: one for writing the profile data and one for reading it. For this purpose we will create a new SharePoint 2010 project based on the Empty Project template and we will add two Web Parts to it.
In order to perform this test you will be needing a SharePoint 2010 Site Collection with Anonymous access enabled.
Writing data to ASP.NET Profiles for anonymous users
Let’s start off by adding a new Web Part to the Project. This Web Part will be responsible for setting the value of the LikesXbox property to true.
In your Web Part add the following code snippet:
[ToolboxItemAttribute(false)]
public class WriteProperty : WebPart
{
    private const string propertyName = "LikesXbox";
    private const object propertyValue = true;

    protected override void OnLoad(EventArgs e)
    {
        base.OnLoad(e);

        if (HttpContext.Current != null &&
            HttpContext.Current.Profile != null)
        {
            System.Web.Profile.ProfileBase profile = HttpContext.Current.Profile;
            profile.SetPropertyValue(propertyName, propertyValue);
        }
    }
}
The above code will check if the ASP.NET Profiles have been configured (line 12) and then will set the value of the LikesXbox property to true (line 15). The SqlProfileProvider will automatically persist the new value in the database.
Reading data from ASP.NET Profiles for anonymous users
In order to check if everything is working correctly we need to create another Web Part that will read the property from the ASP.NET profile. For this add another Web Part to your SharePoint project and add the following code snippet:
[ToolboxItemAttribute(false)]
public class ReadProperty : WebPart
{
    protected Literal Status;
    private const string propertyName = "LikesXbox";

    protected override void CreateChildControls()
    {
        base.CreateChildControls();

        Status = new Literal();
        Controls.Add(Status);

        ChildControlsCreated = true;
    }

    protected override void OnLoad(EventArgs e)
    {
        base.OnLoad(e);
        EnsureChildControls();

        if (HttpContext.Current != null &&
            HttpContext.Current.Profile != null)
        {
            System.Web.Profile.ProfileBase profile = HttpContext.Current.Profile;
            object propertyValue = profile.GetPropertyValue(propertyName);
            if (propertyValue == null)
            {
                Status.Text = "Property not set";
            }
            else
            {
                Status.Text = String.Format("Property set to: {0}", propertyValue.ToString());
            }
        }
        else
        {
            Status.Text = "Profiles not configured";
        }
    }
}
Similar to the Write Web Part the Read Web Part first checks if the ASP.NET Profiles have been configured and then retrieves the value of the property. Depending on the value of the property it sets the text in the Status Literal Control.
If you still remember while defining the LikesXbox property in web.config we specified the default value as false. This means that if the property hasn’t been set, the GetPropertyValue will return false as the value of the property. Although the last else clause will never get hit in our example it’s a good practice to always define it should you ever remove the default value for a profile property.
Preparing the test configuration
Now the Web Part are ready to use, let’s create two Publishing Pages called Read and Write and add corresponding Web Parts to them. When you first add the Read Web Part you should see False as the value of the LikesXbox property. While adding the Write Web Part you won’t see any response as it doesn’t have any UI. Before we proceed with the test publish both Publishing Pages to make them available to anonymous users.
Testing storing user information for anonymous users in SharePoint Server 2010 using ASP.NET Profiles
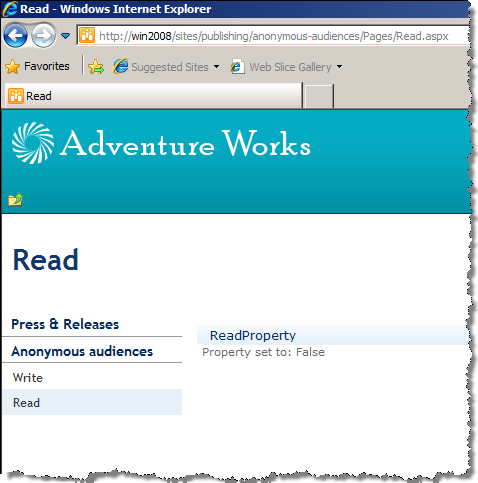
As the first step of the test go to the Read page without logging in. You should see the value of the LikesXbox property set to False.
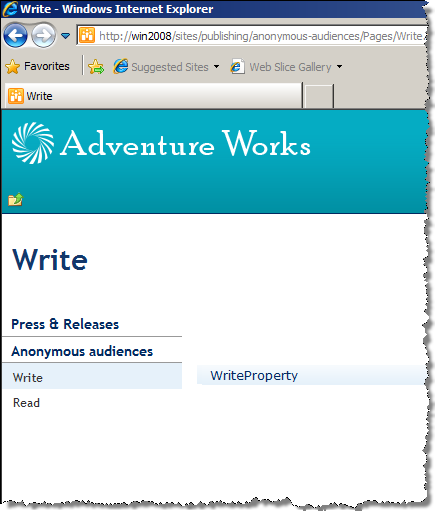
Next navigate to the Write page. As expected you won’t see anything except for the empty page with the Write Web Part on it.
However if you navigate to the Read page again, you should see that the LikesXbox property has changed its value and is now set to True.
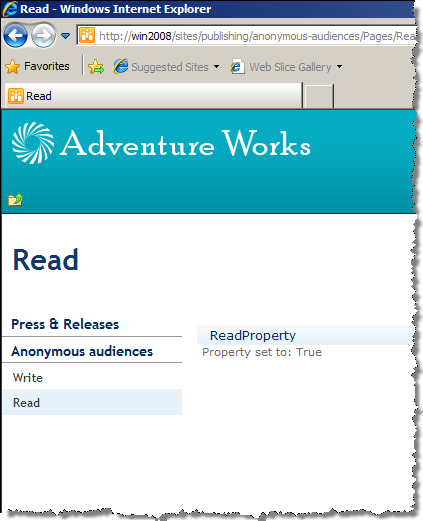
To be sure that the value has been persisted correctly in the database, close the browser, open it again and navigate to the Read page. The value of the LikesXbox property should still be set to True.
This test finishes the first part of the article proving that you can use ASP.NET Profiles with SharePoint Server 2010 to store data about anonymous users. In the next part of the article we will focus on extending the SharePoint Server 2010 content targeting capabilities with support for anonymous users.
Technorati Tags: SharePoint 2010,WCM