Filling forms using data from EntityPicker aka EntityPicker with Callback
 Windows SharePoint Services v3 ships with many controls that simplify entering data. One of such controls is the EntityPicker which allows users to search for data and then select the desired record(s). Not only is the EntityPicker very intuitive but also highly extensible. Did you know that you can extend the EntityPicker to make it fill the list form using the data from the entity that you picked?
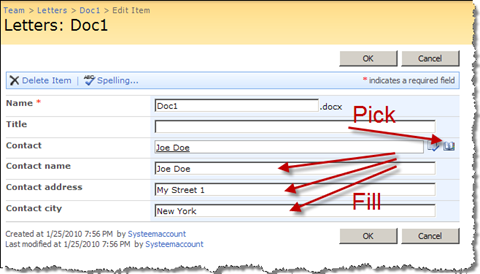
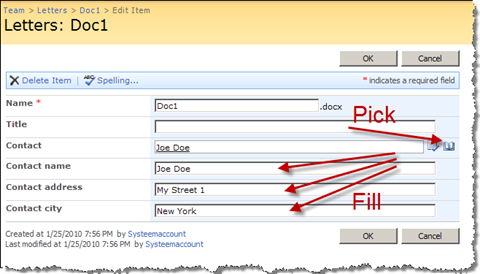
Imagine the following requirement: you have a document library that allows users to write letters. The contacts to whom the letters are being sent are stored in a CRM system. As soon as user finds the contact person and selects him/her, all the contact information should automatically fill the list form and appear in the Word document.
So let’s split the above requirement into smaller tasks. First of all we need to create a custom field type that will allow users to select the contacts from the CRM system. Probably the best way to do this is to utilize the EntityPicker control available with SharePoint. The EntityPicker allows users not only to pick an entity but also search through the list what is very convenient when dealing with a large number of data.
The EntityPicker has to retrieve the data from the CRM system, so we will probably be needing some kind of Web/WCF Service to get this done.
Finally, once the entity has been picked, we will use the data and fill the contact information in the document.
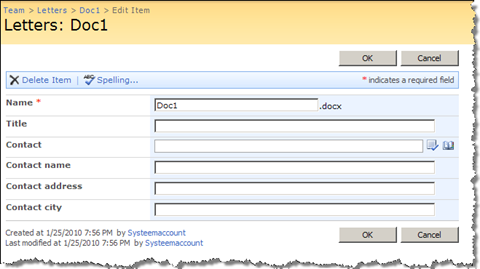
The Document Library used for storing the letters looks like this:
The first part of the assignment isn’t that difficult. There is a lot of resources on the Internet explaining how to utilize the EntityPicker control in custom fields. One of the most complete guides out there is the Creating a Windows SharePoint Services 3.0 Custom Field by Using the EntityPicker article by Wouter van Vugt published on MSDN.
The second part depends a lot on the CRM system that you are using. You might either need to write a piece of code that uses an existing Web/WCF Service of create your own. This part shouldn’t be that difficult as well.
Probably the most challenging piece is how to get the data out of the picker and fill other fields on the list form with it.
Anatomy of an EntityPicker with Callback
As I mentioned before the EntityPicker is a very flexible and highly extensible control. While the way it works might not be intuitive at the very first moment that you start working with it, eventually you can create some cool things with it.
One of the gems of the EntityPicker control is the AfterCallbackClientScript property which allows you to provide a name of a JavaScript function that will be executed after an entity has been chosen/resolved.
In your Field Control you could use the following code snippet to set the AfterCallbackClientScript property:
protected override void CreateChildControls()
{
    if (Field == null)
        return;

    base.CreateChildControls();

    if (ControlMode == SPControlMode.Display)
        return;

    EntityEditorWithPicker picker = new EntityEditorWithPicker();
    picker.AfterCallbackClientScript = "entityEditorCallback";

    Controls.Add(picker);
}
The JavaScript callback function accepts two arguments: sender id and data:
function entityEditorCallback(senderId, data) {
    // ...
}
The data is the XML representation of the entities selected in the picker. The XML contains the standard properties such as Key, DisplayText and Description, but what’s more important, it also contains the serialized value of the PickerEntity.EntityData property, which allows you to store additional data with your entity and pass all of that to JavaScript!
Let’s have a look at the GetEntity method of the query control used by the PickerDialog. In its basic form it is responsible for transforming a DataRow to a PickerEntity:
public override PickerEntity GetEntity(DataRow dr)
{
    PickerEntity entity = new PickerEntity()
    {
        DisplayText = dr["Name"] as string,
        Key = dr["Key"] as string,
        Description = dr["Description"] as string,
        IsResolved = true
    }

    return entity;
}
In the same method you can extend the PickerEntity instance with additional information using the EntityData property:
public override PickerEntity GetEntity(DataRow dr)
{
    PickerEntity entity = new PickerEntity()
    {
        DisplayText = dr["Name"] as string,
        Key = dr["Key"] as string,
        Description = dr["Description"] as string,

        EntityData = {
            { "Name", dr["Name"] as string },
            { "Address", dr["Address"] as string },
            { "City", dr["City"] as string }
        },

        IsResolved = true
    }

    return entity;
}
After resolving the entities the picker will pass the data, serialized to XML, to the JavaScript callback method. The XML will look like this:
<Entities Append="False" Error="" Separator=";" MaxHeight="3">
  <Entity Key="1" DisplayText="Joe Doe" IsResolved="True" Description="">
    <ExtraData>
      <ArrayOfDictionaryEntry xmlns:xsi="http://www.w3.org/2001/XMLSchema-instance" xmlns:xsd="http://www.w3.org/2001/XMLSchema">
        <DictionaryEntry>
          <Key xsi:type="xsd:string">Name</Key>
          <Value xsi:type="xsd:string">Joe Doe</Value>
        </DictionaryEntry>
        <DictionaryEntry>
          <Key xsi:type="xsd:string">Address</Key>
          <Value xsi:type="xsd:string">My Street 1</Value>
        </DictionaryEntry>
        <DictionaryEntry>
          <Key xsi:type="xsd:string">City</Key>
          <Value xsi:type="xsd:string">New York</Value>
        </DictionaryEntry>
      </ArrayOfDictionaryEntry>
    </ExtraData>
    <MultipleMatches />
  </Entity>
</Entities>
In order to get the data out of the XML you can use jQuery which makes the process really simple.
We start off with converting the data string into an XML document which makes it easier to work with (our callback method is called Imtech.resolveEntityData):
var Imtech = Imtech || {};

Imtech.createXMLDocument = function(string) {
    var browserName = navigator.appName;
    var doc;

    if (browserName == 'Microsoft Internet Explorer') {
        doc = new ActiveXObject('Microsoft.XMLDOM');
        doc.async = 'false'
        doc.loadXML(string);
    } else {
        doc = (new DOMParser()).parseFromString(string, 'text/xml');
    }

    return doc;
}

Imtech.resolveEntityData = function(senderId, data) {
    var xmlDoc = Imtech.createXMLDocument(data);
}
Once done, we can proceed and extract the data out of the XML document:
Imtech.getPropertyValue = function(xmlDoc, propertyName) {
    var value = null;

    var selector = "DictionaryEntry:has(Key:contains('" + propertyName + "')) Value";
    var values = $(xmlDoc).find(selector);

    if (values.length > 0) {
        value = $(values[0]).text();
    }

    return value;
}

Imtech.resolveEntityData = function(senderId, data) {
    var xmlDoc = Imtech.createXMLDocument(data);

    var name = Imtech.getPropertyValue(xmlDoc, "Name");
    var address = Imtech.getPropertyValue(xmlDoc, "Address");
    var city = Imtech.getPropertyValue(xmlDoc, "City");
}
To simplify retrieving the values from the XML document you can use the helper function called Imtech.getPropertyValue. This function accepts two arguments: a reference to the XML document and the name of the property of which the value should be retrieved.
The last part is to fill the fields on the list form using the retrieved information. We can do this using the following code snippet:
Imtech.setFieldValue = function(fieldName, value) {
    var selector = "tr:has(td.ms-formlabel:contains('" + fieldName + "')) td.ms-formbody input";

    var fields = $(selector, "table.ms-formtable");
    if (fields.length > 0) {
        $(fields[0]).val(value);
    }
}

Imtech.resolveEntityData = function(senderId, data) {
    var xmlDoc = Imtech.createXMLDocument(data);

    var name = Imtech.getPropertyValue(xmlDoc, "Name");
    var address = Imtech.getPropertyValue(xmlDoc, "Address");
    var city = Imtech.getPropertyValue(xmlDoc, "City");

    Imtech.setFieldValue("Contact name", name);
    Imtech.setFieldValue("Contact address", address);
    Imtech.setFieldValue("Contact city", city);
}
Once again we use a helper function which makes it easier to get a reference to the particular text field and set its value. Using the Imtech.setFieldValue you can retrieve the text field using its label and set the value of that text field.
The very last thing that needs to be done, before this all starts to work, is to hook the JavaScript up with the list form. If you need this functionality in a custom List Template you can go on and edit the contents of the EditForm.aspx in your Solution. For existing lists you can for example edit the list form using SharePoint Designer. All you need to do is to add two script tags (one for jQuery and one for your own script) just below the PlaceHolderMain:
<asp:Content ContentPlaceHolderId="PlaceHolderMain" runat="server">
<script type="text/javascript" src="/_layouts/Imtech/jquery-1.4.min.js"></script>
<script type="text/javascript" src="/_layouts/Imtech/documentTemplates.js"></script>
<!-- ... -->
</asp:Content>
After having it all hook up, let’s see how it works. If you’ve done everything correct, right after you select an entity and press OK, the fields on the list form will get filled with the information passed through the PickerEntity.EntityData property.
Technorati Tags: SharePoint,SharePoint 2007,WSS v3,MOSS 2007


