
Illustrating your app idea with Microsoft Project Siena (SPC14)
When having an idea for a companion app for your SharePoint 2013 website you can explain it to your boss or your customer on a napkin or you can quickly compose a prototype using Microsoft Project Siena.
This article accompanies my presentation from the SharePoint Conference 2014. The presentation video is available on Channel9 at http://channel9.msdn.com/Events/SharePoint-Conference/2014/SPC388.
What’s on your mind
Often, when having an idea for an app you have to explain it to your boss or your customer first, before you will get the approval to build it. In the past you might have either sketched something on a white-board or a piece of paper or you might have used a concept drawing tool to explain what you had in mind. Although you might have get your idea across eventually it was probably challenging to explain the interaction of the different pieces of the app. And while there are advanced prototyping tools available in the market, mastering them is nearly as easy as developing the app itself. Luckily there is a better way to illustrate your app idea nowadays.
An app to build apps
Recently Microsoft has released Project Siena: a Windows Store app to build apps. With Project Siena you can build Windows Store apps without any developer skills and submit them to the App Store. Although Project Siena is currently in beta and doesn’t allow you to fully leverage the power of the Windows Store app platform yet, it should be sufficient for you to quickly build a prototype of your app idea.
To illustrate how you can leverage Microsoft Project Siena to build a prototype of your app idea, we will walk through a simple scenario of building an app that shows an overview of everyone who works at Mavention.
For each person the corresponding bio will be displayed.
All the information will be retrieved using SharePoint 2013 Search REST API with anonymous access as discussed in more detail in the previous article.
Building a companion app for a SharePoint 2013 website using Microsoft Project Siena
After starting Project Siena you will see an empty canvas.

Configuring the data source
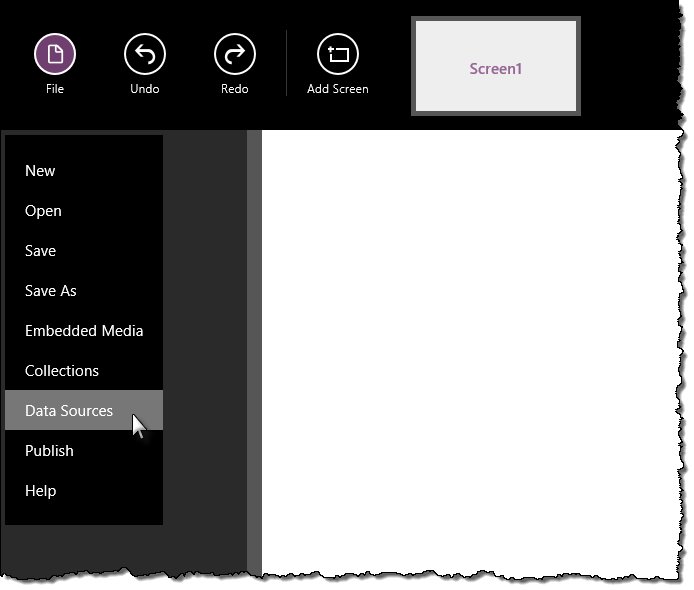
The first step is to add the data source. This is to be done from the File menu (the menu is toggled by clicking right button anywhere in Project Siena) by clicking the Data Sources option.
Even though Project Siena is in beta it already supports a number of different data sources. Because we will be using SharePoint 2013 Search REST API to get the data for the app we will choose REST as the data source type.
In the URL field we will provide a SharePoint 2013 Search REST API with anonymous access URL that retrieves a list of everyone who works at Mavention:
http://www.mavention.com/_api/search/query?queryText=%27size%3E0%27&SelectProperties=%27Title,PageDescription,PublishingPageContentOWSHTML,PublishingImage,SlugOWSTEXT%27&RowLimit=50&SourceID=%270f0d1c6c-d200-42c0-ab19-54669429e6e4%27&QueryTemplatePropertiesUrl=%27spfile://webroot/queryparametertemplate.xml%27Next, we will add the Accept header to retrieve data as JSON:
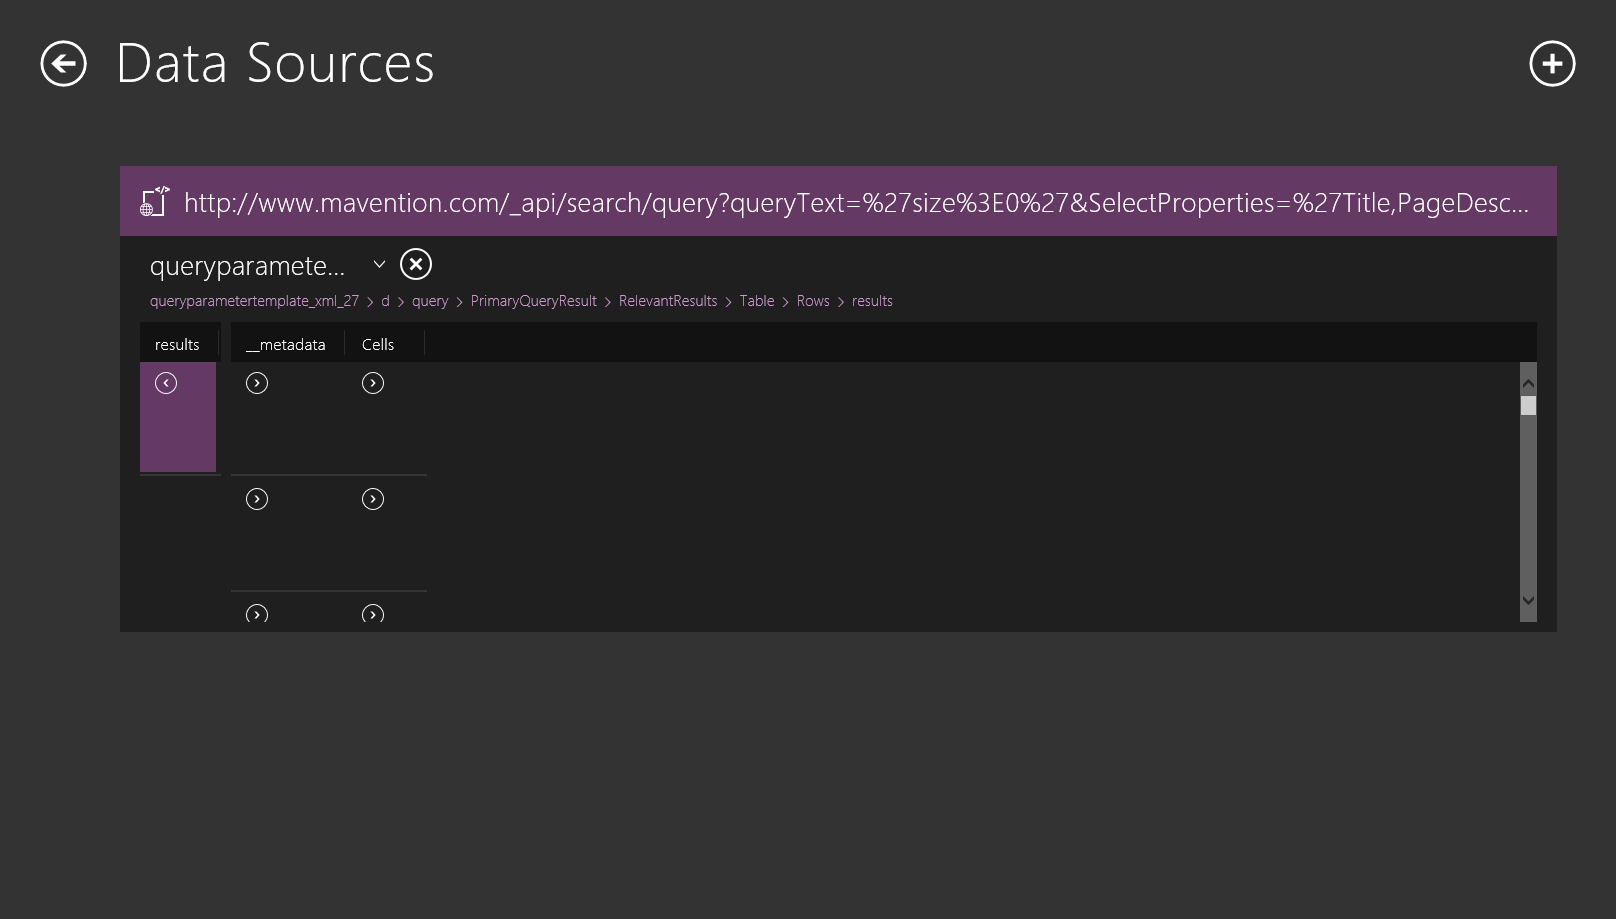
Accept: application/json;odata=verboseAfter clicking the Import data button we should see our data source added. By down drilling using the arrows we can confirm that Project Siena can retrieve our information from SharePoint 2013.
With the data source setup we can move back to the first screen and start building the UI of our app.
Building the overview screen
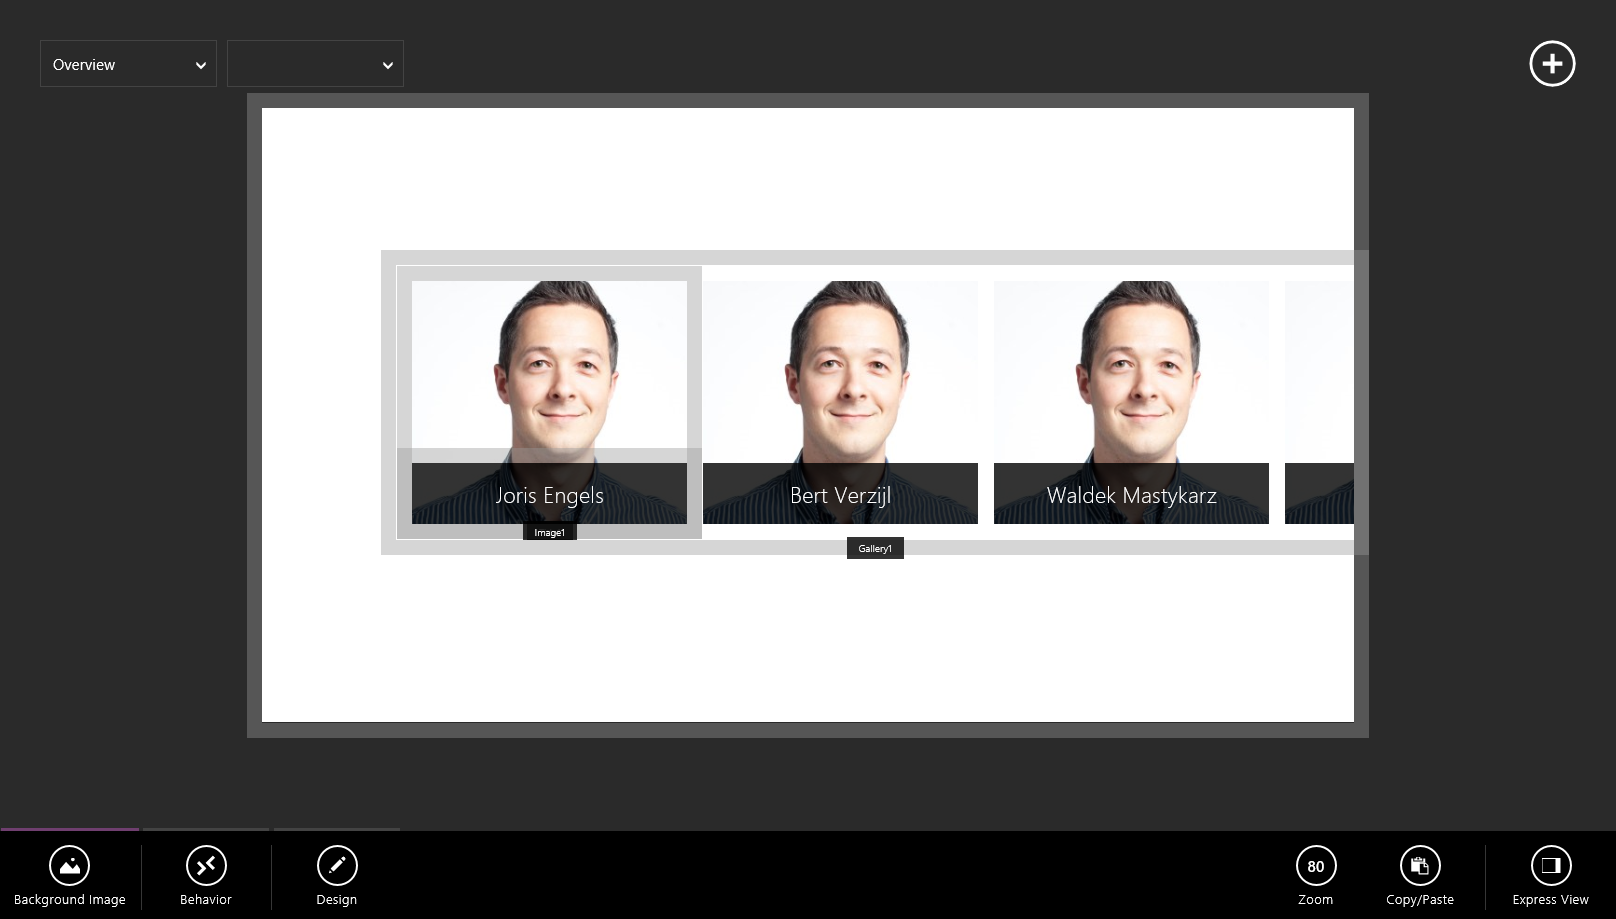
As we have seen in the example, our app consists of an overview screen, that shows everyone who works at Mavention, and a details screen that shows the bio information for the person selected on the overview screen. Let’s start with building the overview screen.
We begin by renaming the first screen to Overview.
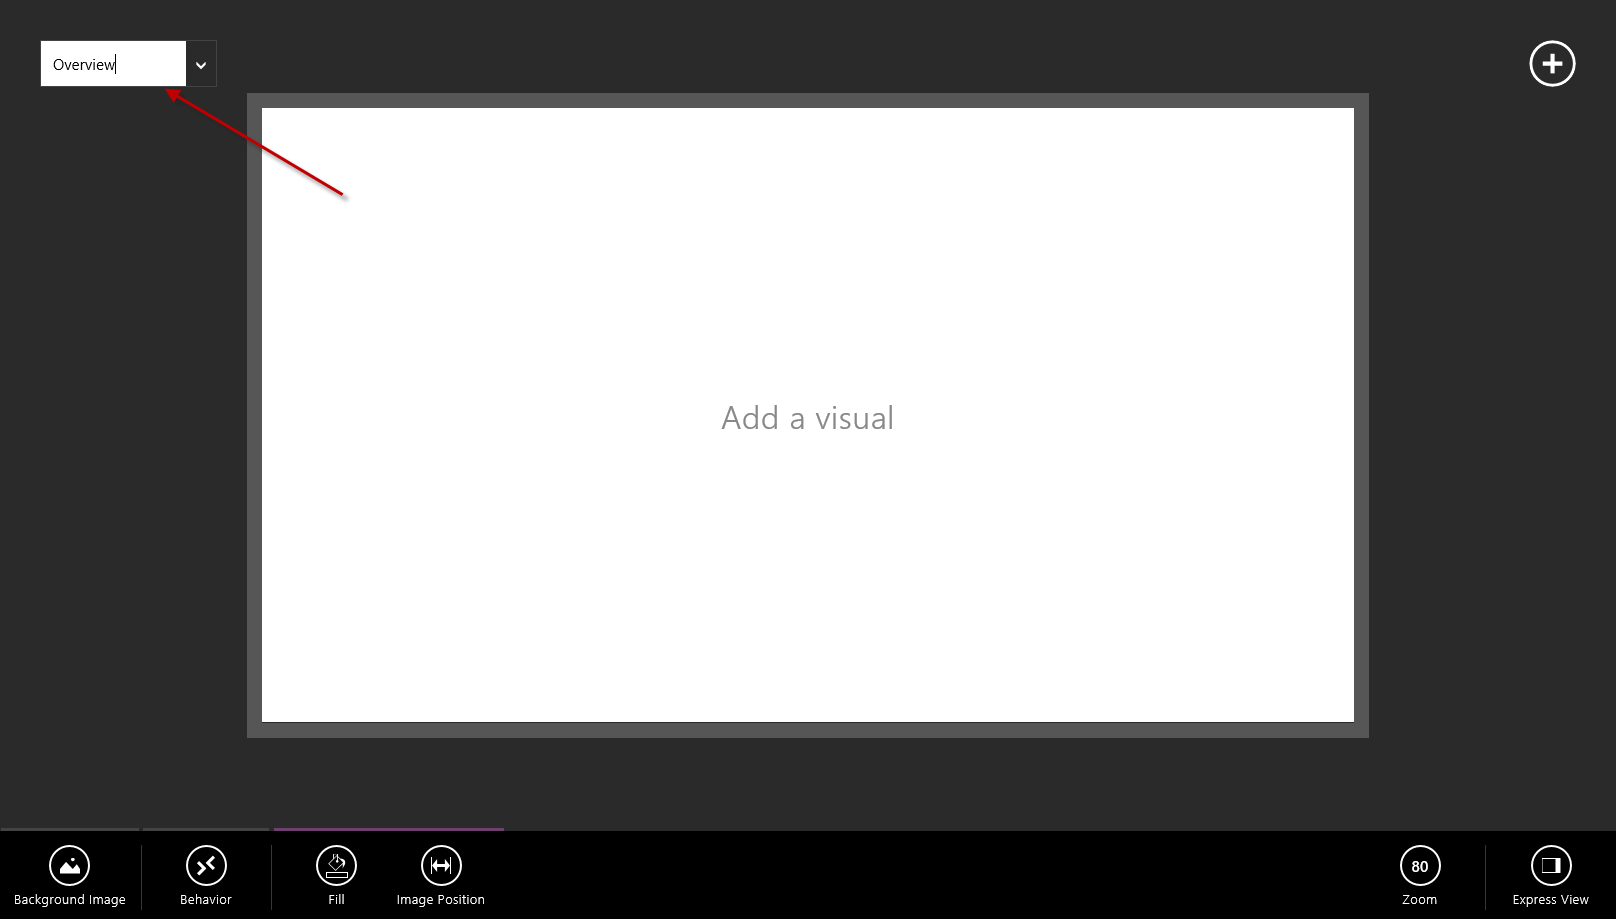
This will allow us to refer to our overview page more easily later on when we will be implementing navigation in the app.
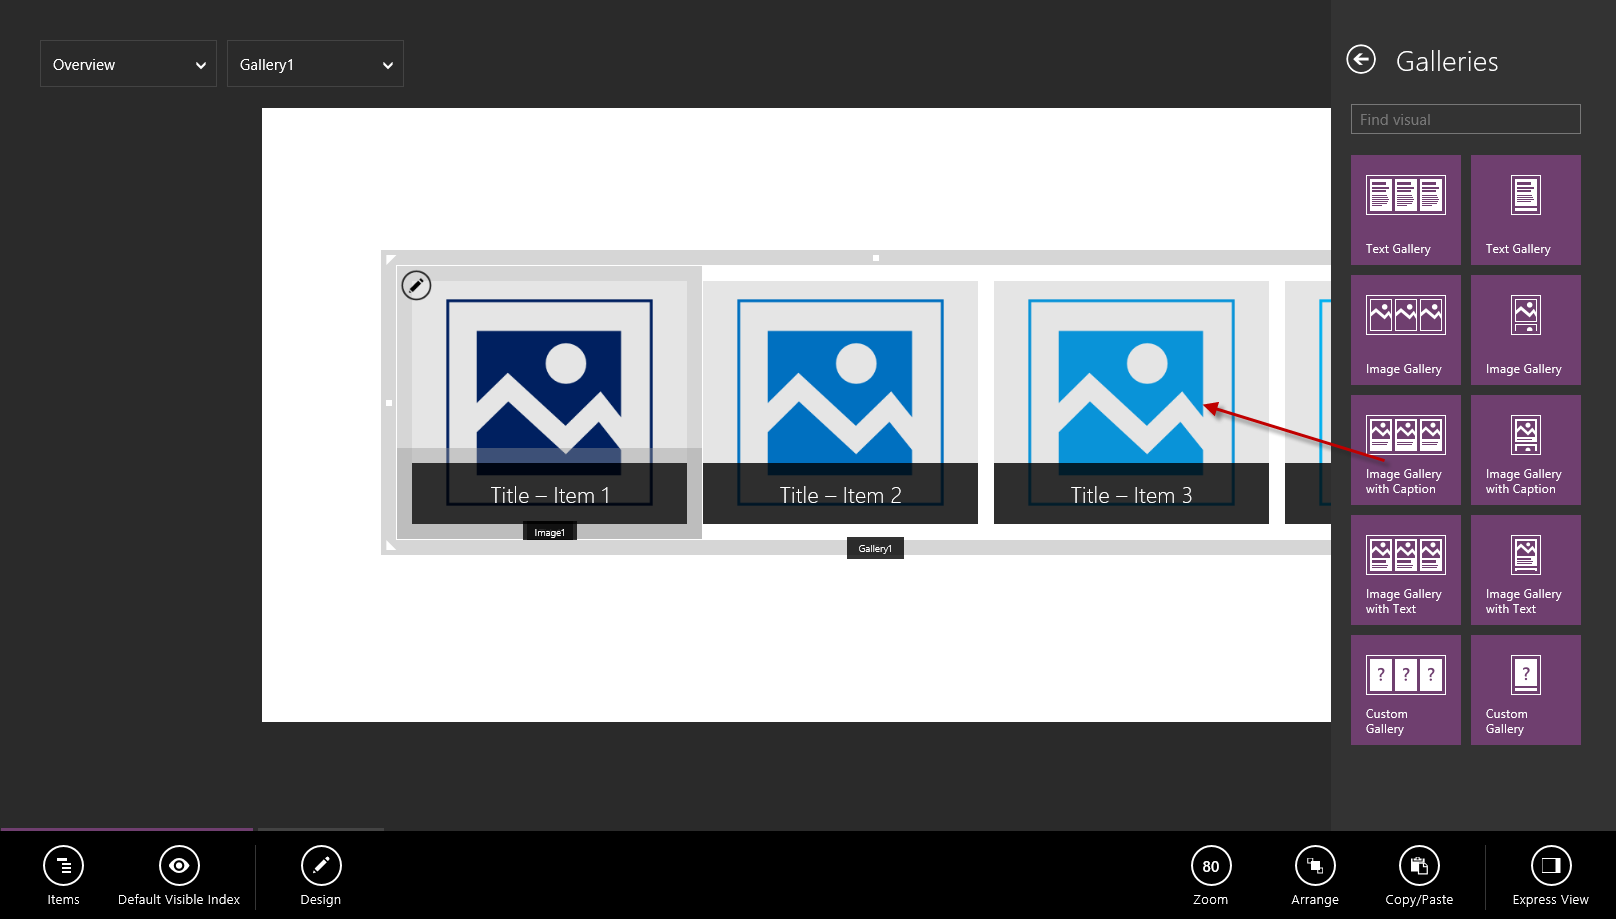
Next, click on the Add a visual text in the middle of the screen. This will open the Visuals bar on the right-hand side from which we will choose Galleries and then Image Gallery with Caption.
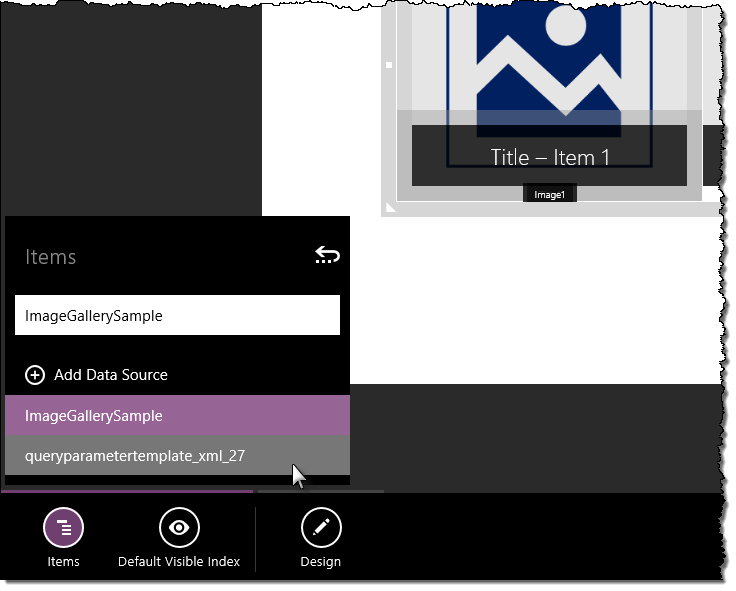
Then we need to bind the gallery to our data source. This can be done by clicking the Items button on the lower left-hand side and choosing our data source.
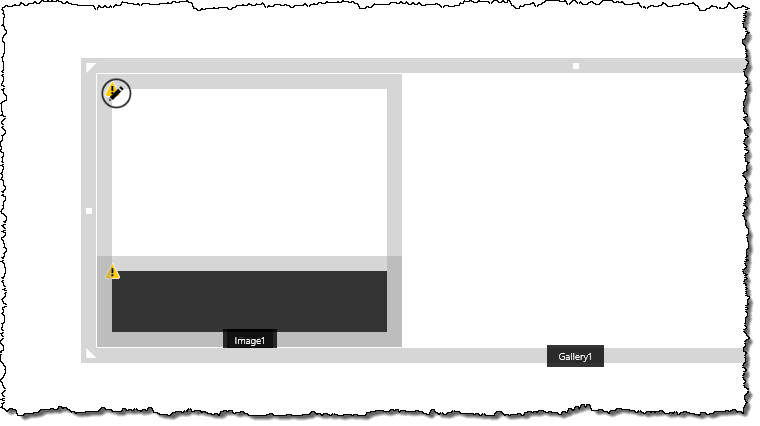
After this the sample data will disappear from the image gallery and you will see exclamation marks.
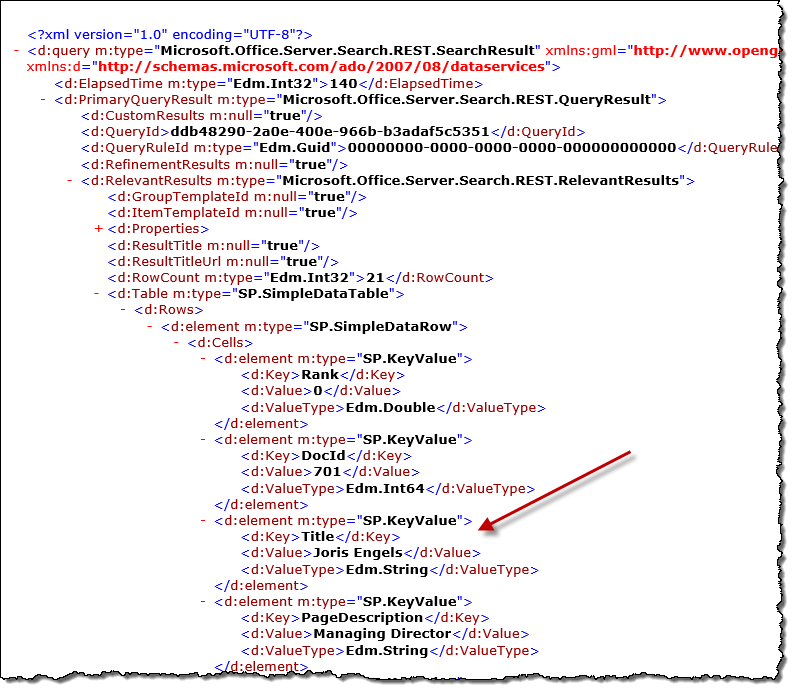
If you take a closer look at the Search REST API response you will see that the results are not located in the root of the response but are further down the hierarchy.
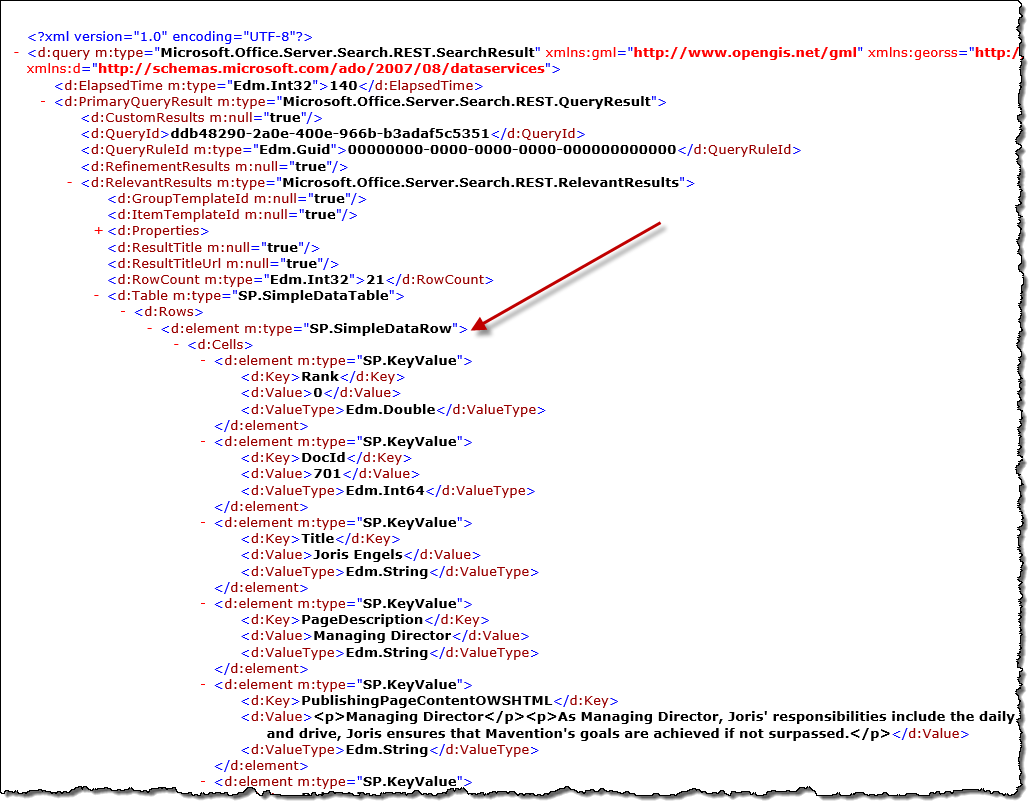
In order to have our data displayed in the image gallery we have to tell Project Siena where in the Search REST API response it should look for our data. To navigate through the data hierarchy Project Siena uses Excel-like notation using ! (exclamation mark) to separate the different levels of the data hierarchy. To simplify the process of finding the data, Project Siena offers suggestions as you navigate down the hierarchy.

Unfortunately, as soon as you move past the first level Project Siena will not display any more suggestions, just as if the data wasn’t there.

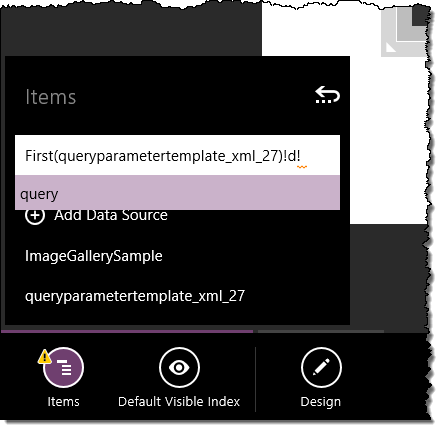
The fact that no suggestions are displayed has to do with the peculiar way in which Project Siena deals with collections. Whenever it stumbles upon a collection, it requires you to tell it with which element it should proceed. Because we are only at the first level and we have only one element in our “result collection”, we can easily work around this by selecting the first element using the First function:
First(queryparametertemplate_xml_27)!dWith this the suggestions for lower levels of the data hierarchy will be displayed just as expected:
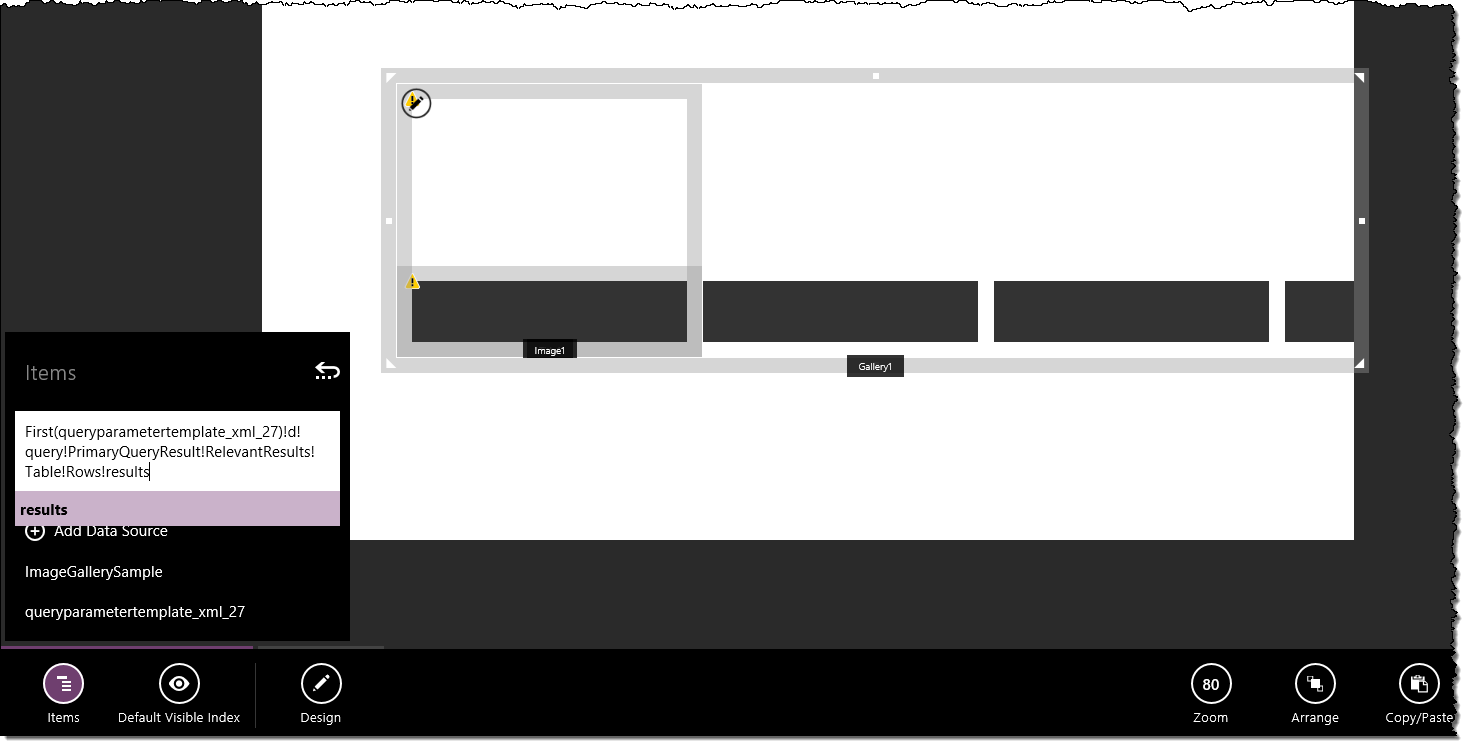
Since the data that we are interested in is located in the Table property we should have the following query as the data source for the image gallery:
First(queryparametertemplate_xml_27)!d!query!PrimaryQueryResult!RelevantResults!Table!Rows!resultsHaving entered this query Project Siena will automatically populate the image gallery with items. Even though no content is showed yet, it confirms that the gallery has correctly been bound to the data source.
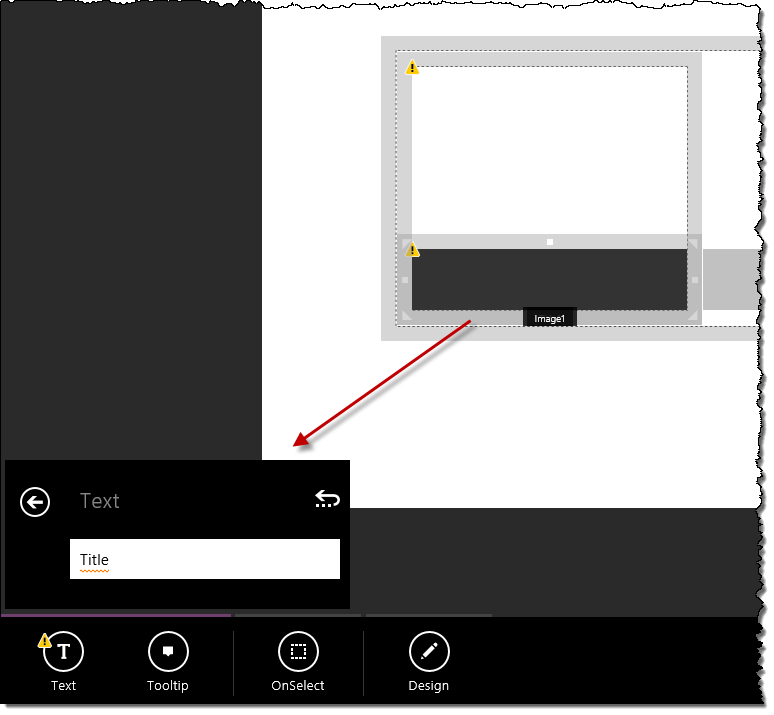
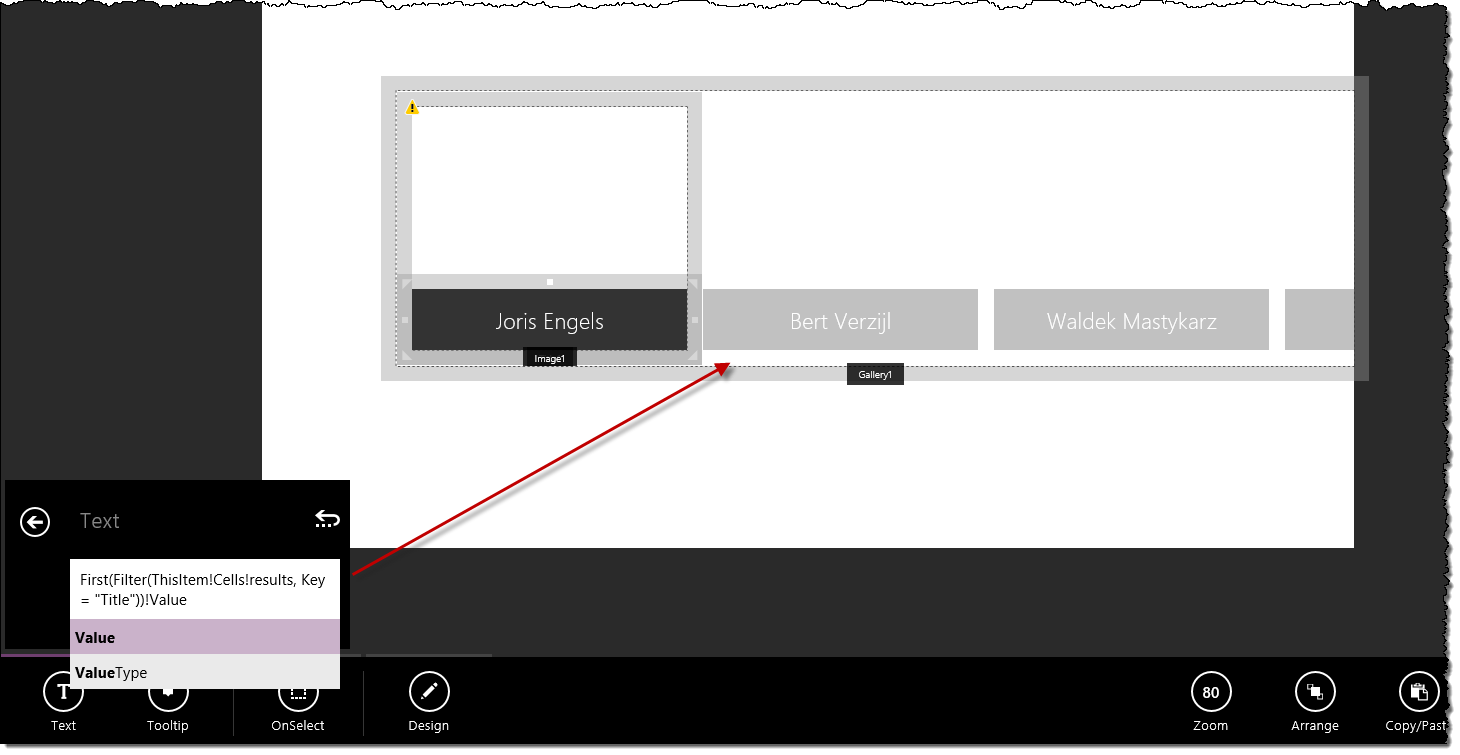
The next step is to get our data displayed in the gallery. Let’s start with showing the name of every person working at Mavention. For this select the caption in the gallery and in the lower left-hand side click the Text button.
Here we have to enter a query that will retrieve the person’s name. If you look at how the data is stored in the Search REST API response you will find a key-value pair for each Managed Property. To get the person’s name, from the list of all elements, we have to get the element with Key equals to Title and then for that element we need to get the value of the Value element.
We will need the following query to tell Project Siena to display the person’s name:
First(Filter(ThisItem!Cells!results, Key = "Title"))!ValueThe current element in the gallery is represented by the ThisItem object. All properties are stored in the Cells!results child item of each object. Using the Filter function we retrieve the property with the Key Title. Since a Filter returns a collection, and we are interested in a single item (which we get anyway since there is only one Managed Property called Title in the Search REST API response), we use the First function to get the first result from the filter. Finally when we have the right element, we get the value of the Value property.
With this query associated with the image label we should see everyone’s names in the image gallery:
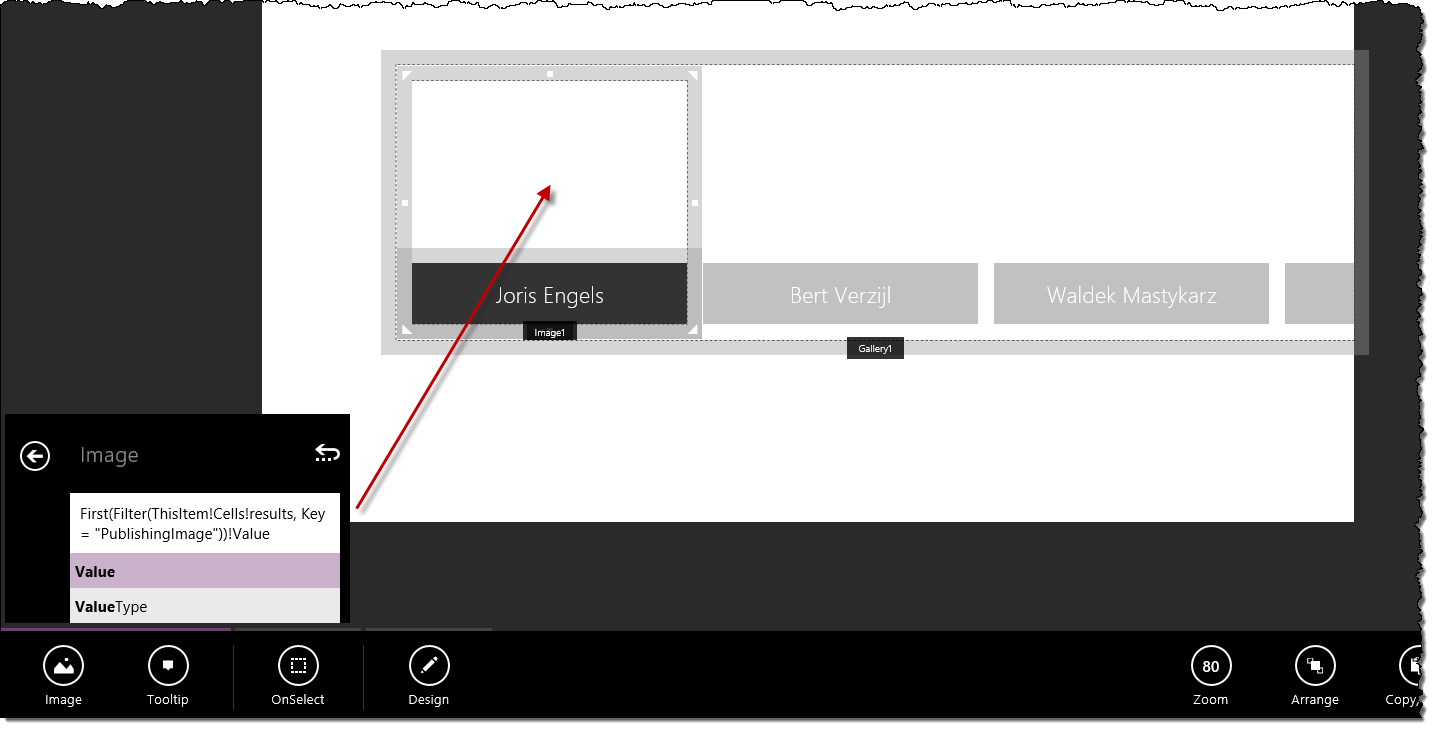
Similarly we will retrieve each person’s photo which is stored in the PublishingImage property in the Search REST API response.
Unfortunately having associated the right query we don’t see any image displayed, so what’s wrong?
The fact that this doesn’t work has to do with the fact that Project Siena is currently in beta and in its current state it requires the data to be in the exact format as supported by Project Siena. If you look at the Search REST API response you will find out that all images are provided as HTML IMG tags.
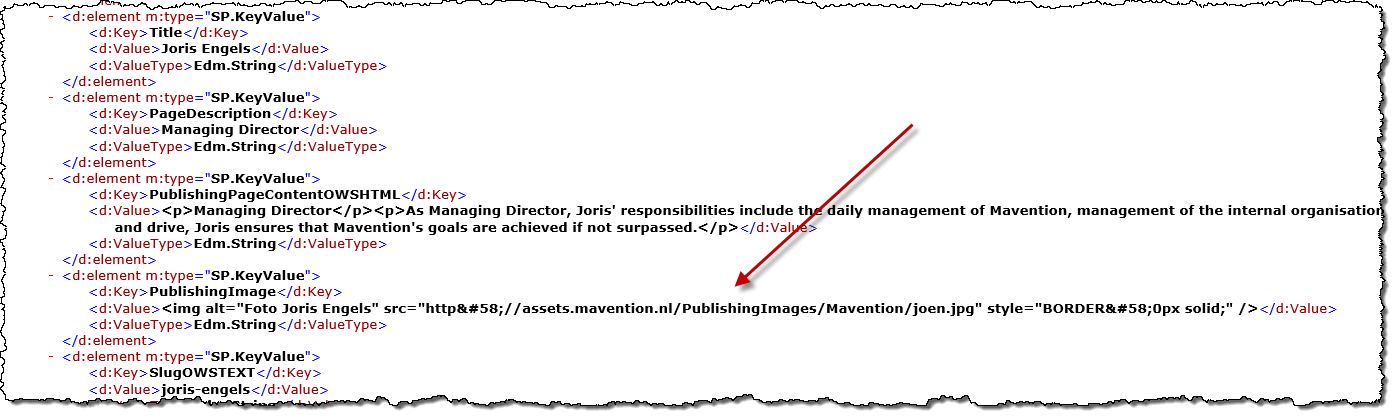
Project Siena on the other hand requires the URL to the image only. In its current release Project Siena has very limited string processing capabilities and since the image’s URL is preceded with the ALT tag, which varies in length, we cannot use any positional information to extract the image’s URL from the IMG tag. If we could following would be the result in our app:
While this would be acceptable to illustrate your idea, if you are interested in using Project Siena to build real apps to be submitted to the App Store, you should ensure that all of your data stored in SharePoint is provided to Siena in a way it can parse it.
With the overview screen nearly completed, let’s move on and build the details screen that we will use to display bio info for the selected person.
Building the details screen
Let’s start by adding a new screen to our app using the Add Screen button in the toolbar:

Let’s rename this screen to Details.
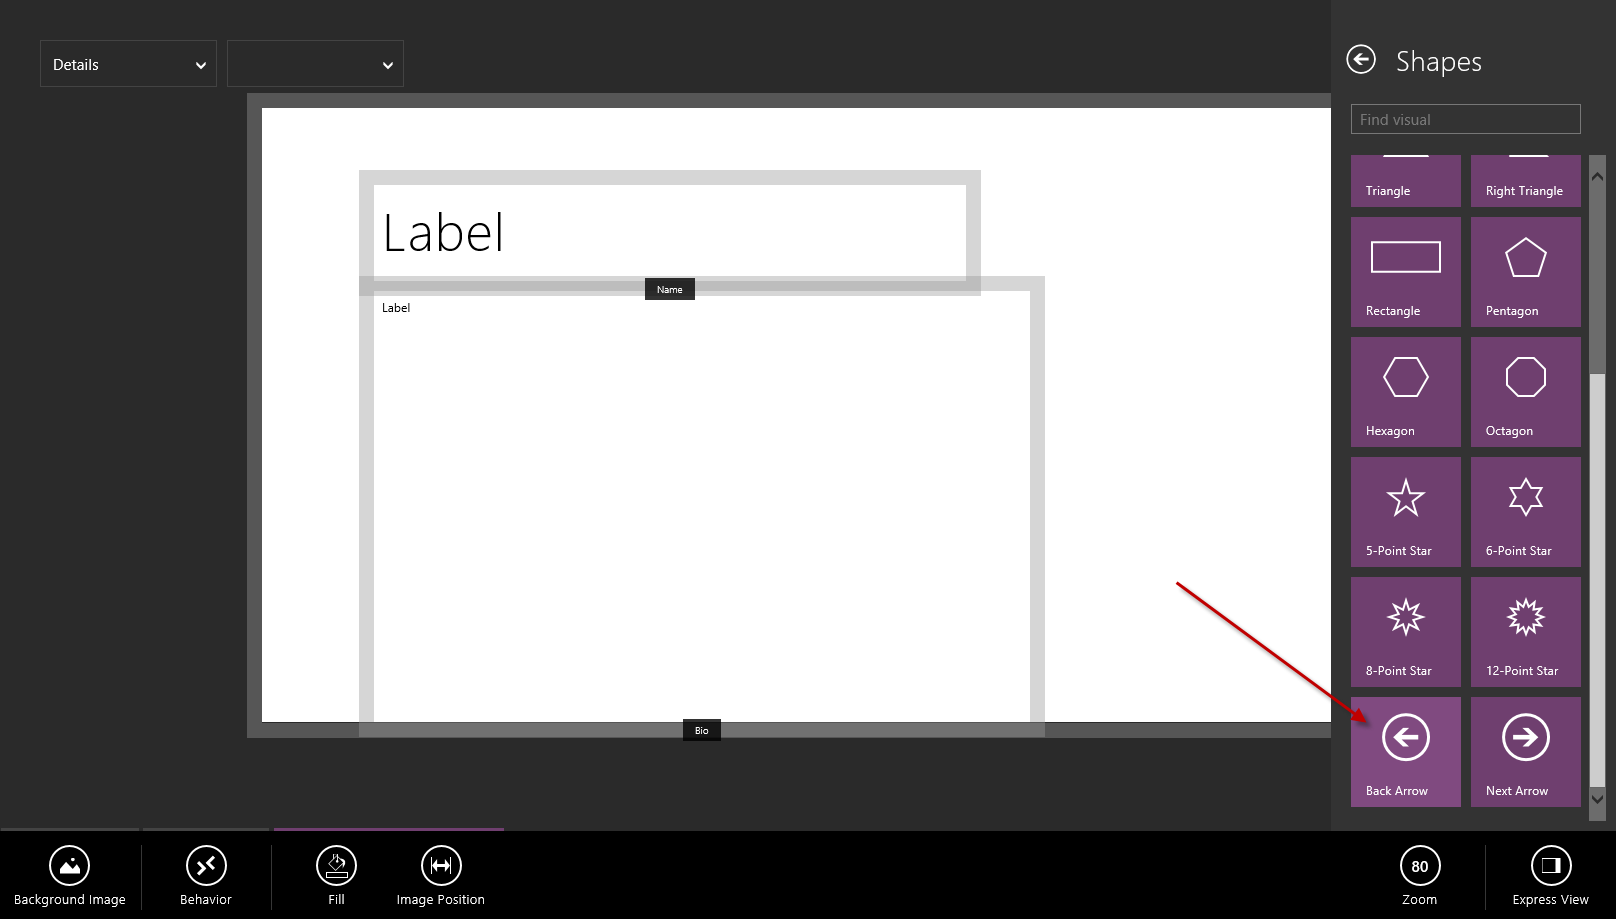
Next, from the Visuals Gallery let’s add two Labels: one to display the person’s name and the other to display his/her bio. Let’s call the first label Name and the other Bio. In the following screenshot the Name label has been styled using font-size 50 and Lighter font-style.

Once on the details page we would like to be able to go back to the overview screen. To allow this, let’s open the Visuals Gallery, choose Shapes and add the Back Arrow shape.
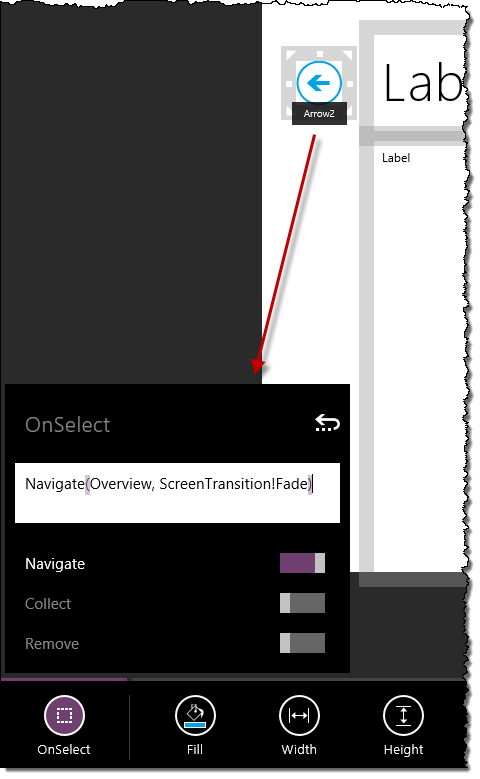
Resize the arrow to match the Name label. Whenever someone selects (a common name for mouse click or finger tap in Windows Store apps) it, the app should go back to the overview screen. To configure this behavior, select the back arrow and from the lower left-hand side click the OnSelect button.
In the event handler options choose the Navigate action and select the Overview screen.
Selecting person on the overview screen
The last part left for our application to work is to allow for selecting a person on the overview page and to display the details for the selected person on the details page.
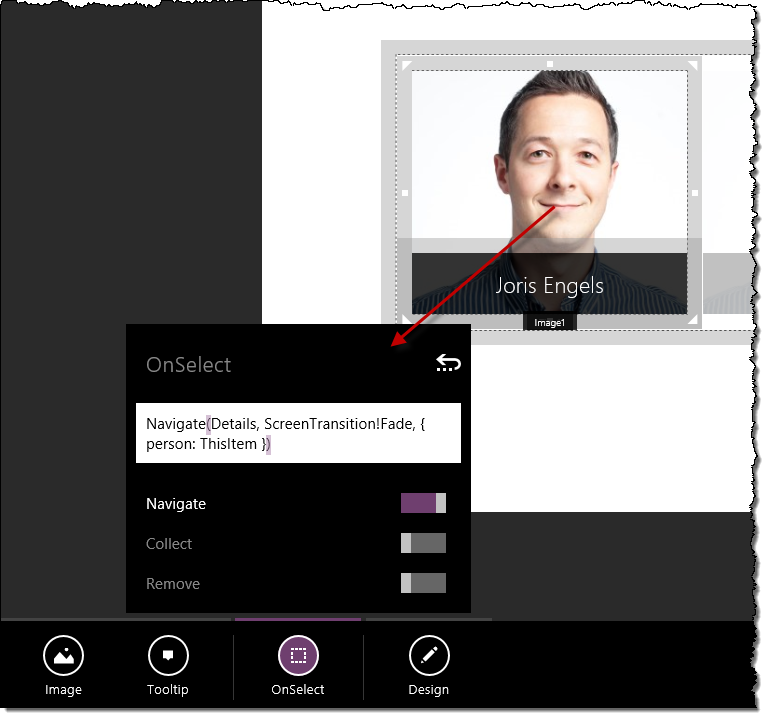
Let’s switch to the Overview page and select the person’s name. Similarly to what we have just done for the back arrow, let’s configure the OnSelect event handler to navigate to the Details screen. If we stopped here, the app would indeed switch to the Details screen, but the Details screen wouldn’t know which person has been selected. In order to provide that information we have to add a third parameter to the Navigate function that will contain our context object – the selected person. The context parameter must be provided using the JSON notation. Following is how the complete query on the OnSelect handler for the person’s name should look like:
Navigate(Details, ScreenTransition!Fade, { person: ThisItem })The context object that we pass is called person and it contains the complete object bound to the selected gallery item giving us access to all previously retrieved information about the particular person.
To simplify the navigation you can copy the query and set it on the person’s image as well so that no matter if someone selects the person’s name or picture the app will open the details page.
Displaying selected person’s details
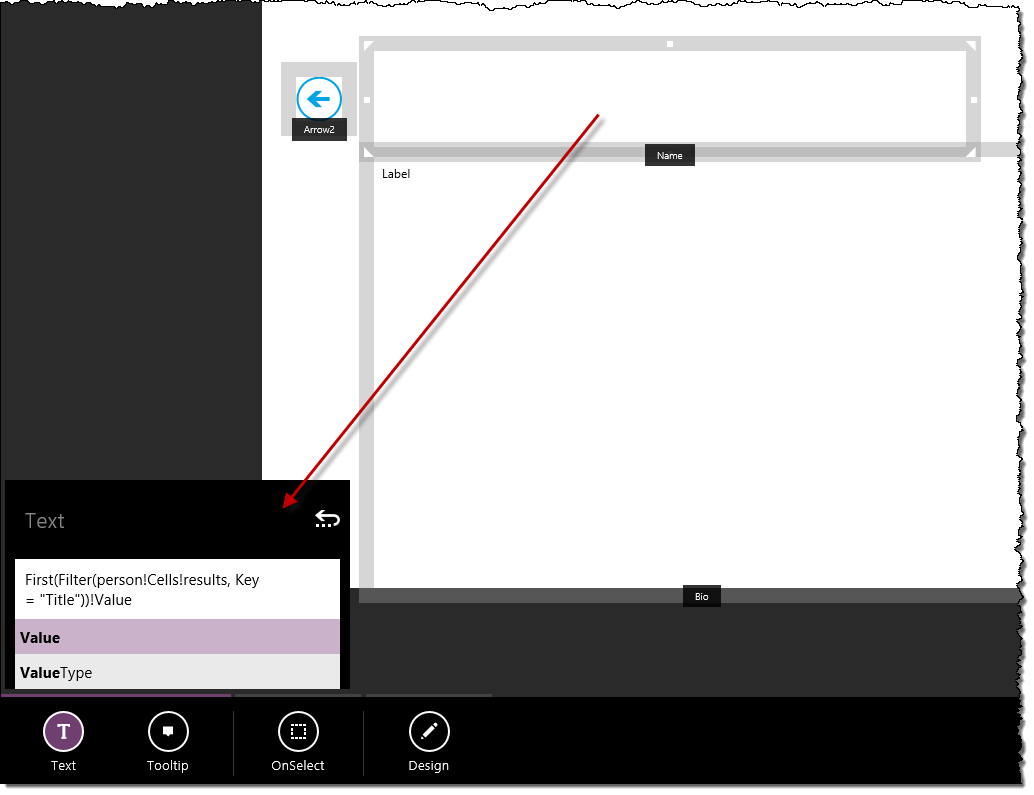
The last thing to do is to display the information of the selected person on the Details page. For this, let’s switch to the Details page, select the Name label and from the lower left-hand side and click the Text button. Set the following query:
First(Filter(person!Cells!results, Key = "Title"))!ValueBecause we passed the whole object as the context object in the navigation action in the gallery, we need to use the same query as we did previously in the gallery to display the person’s name. The only difference is that the previously used ThisItem reference is replaced by person which is the name of the context object we have passed as a part of the Navigate function.
Similarly, in order to display the selected person’s bio, we need to bind the following query to the Bio label:
First(Filter(person!Cells!results, Key = "PublishingPageContentOWSHTML"))!ValueThis step concludes the composition process of the app which is now ready to test by pressing F5 (be sure you switch to the Overview page first).
Testing the app
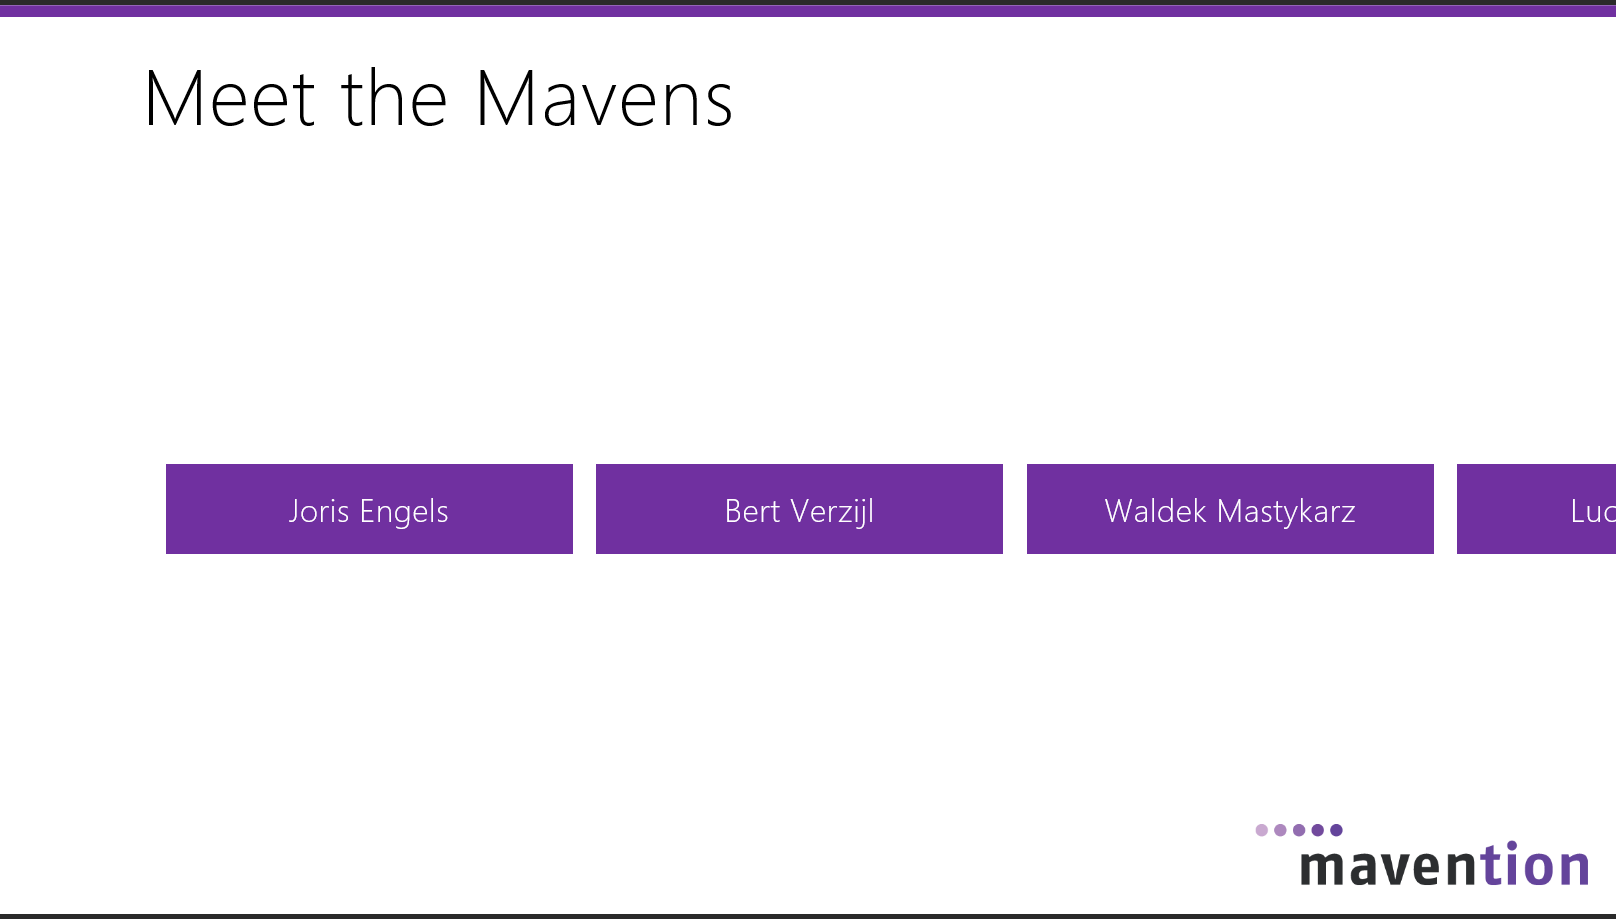
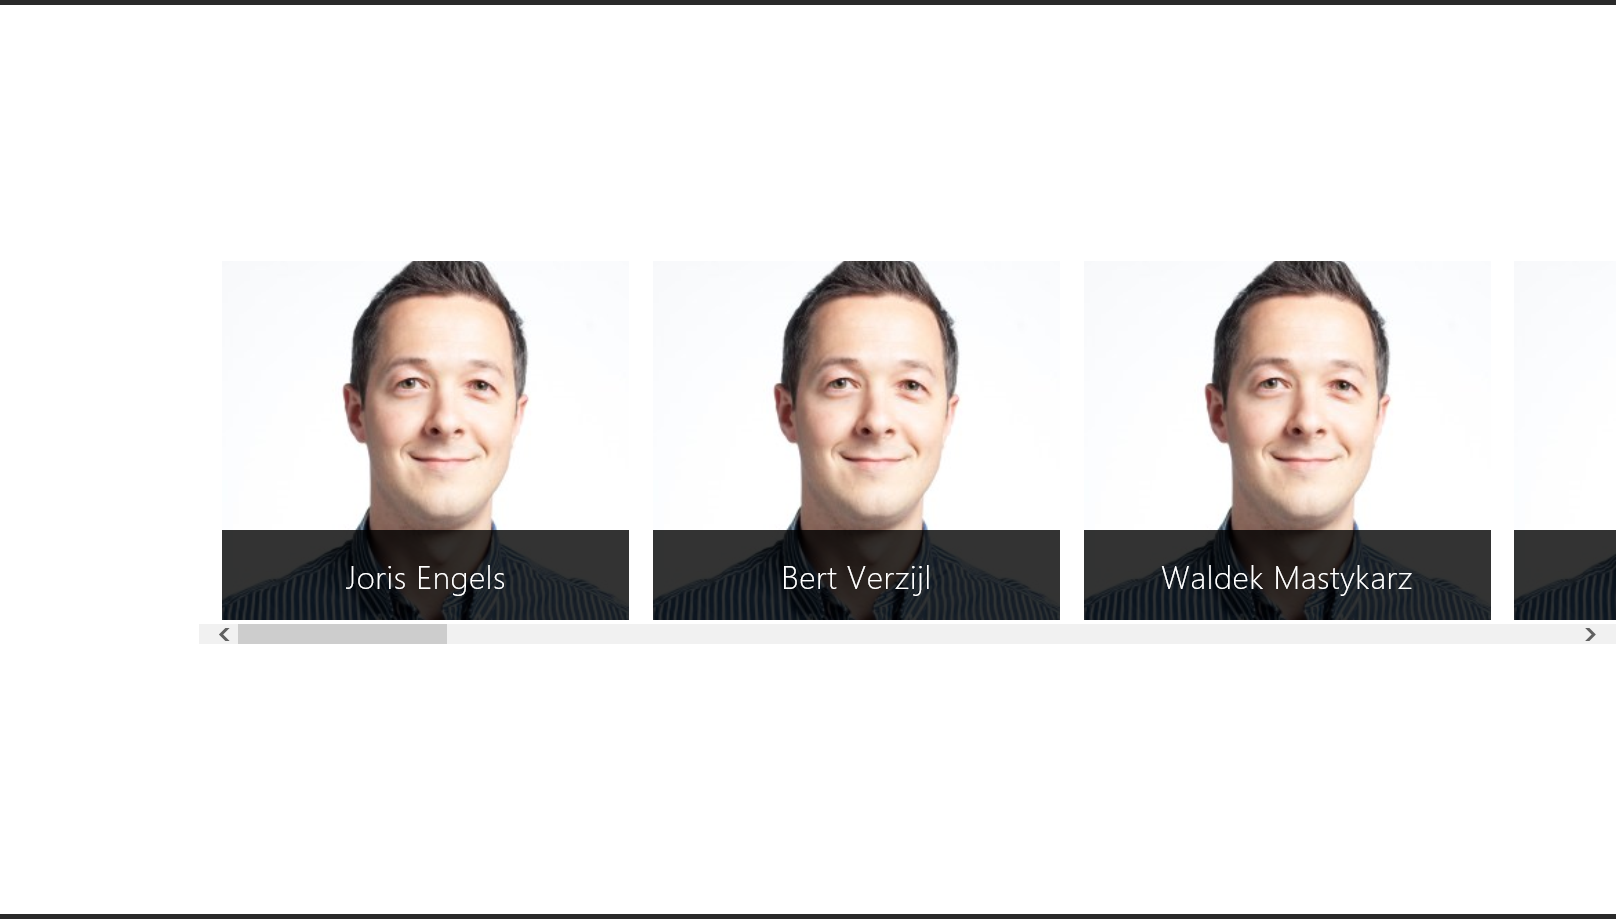
When the app starts the overview of all people working at Mavention will be displayed.
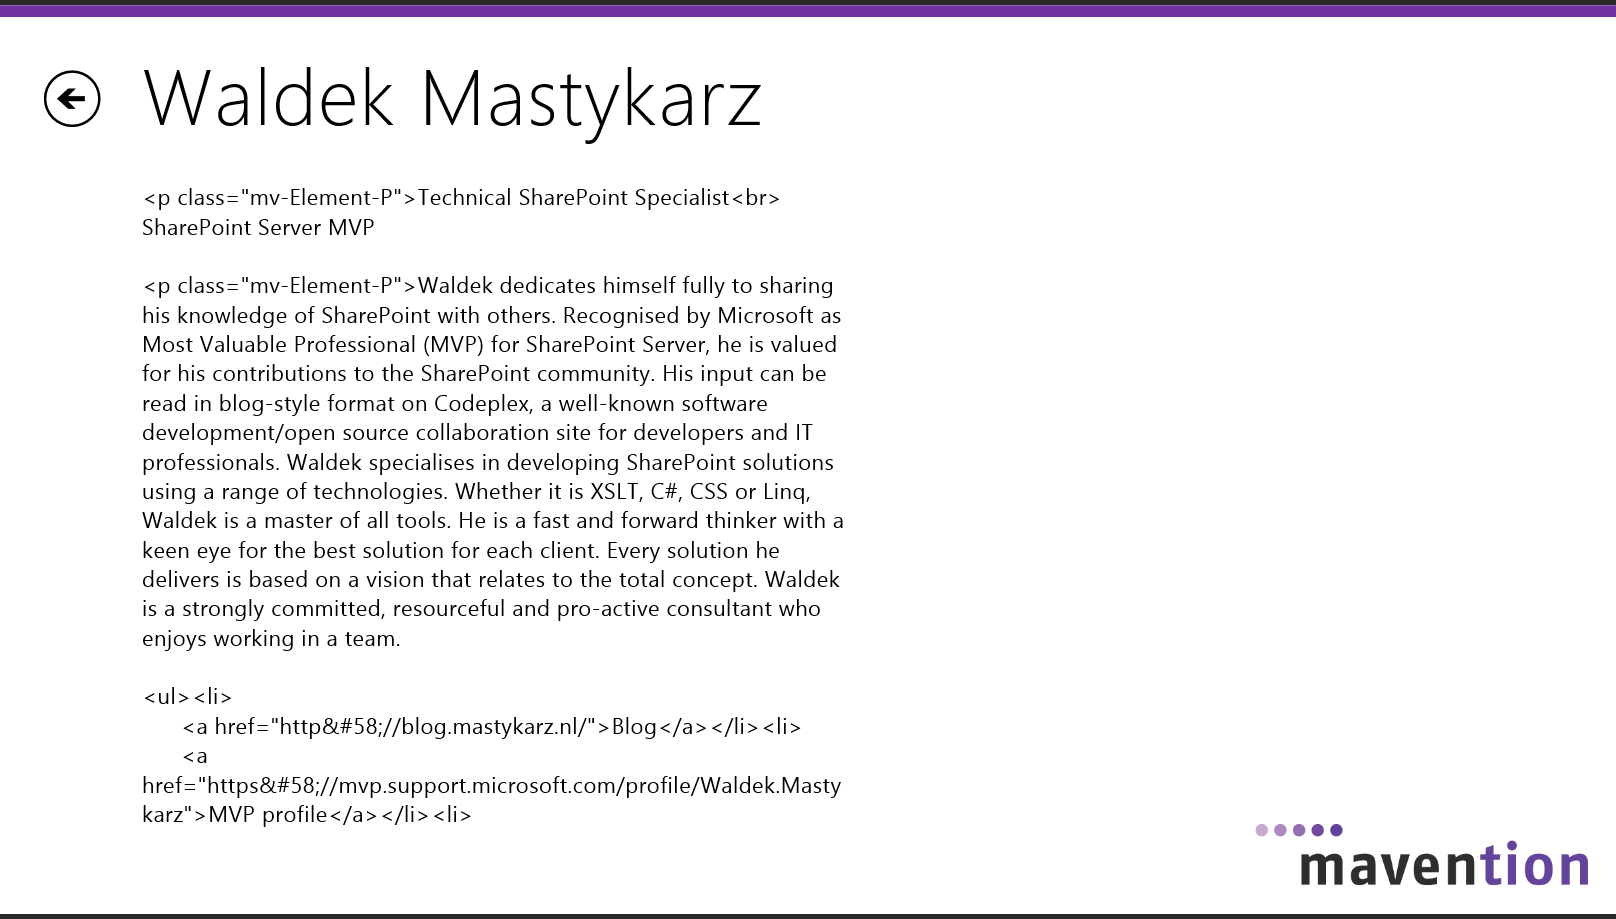
After you select a person, his/her detail information will be displayed.
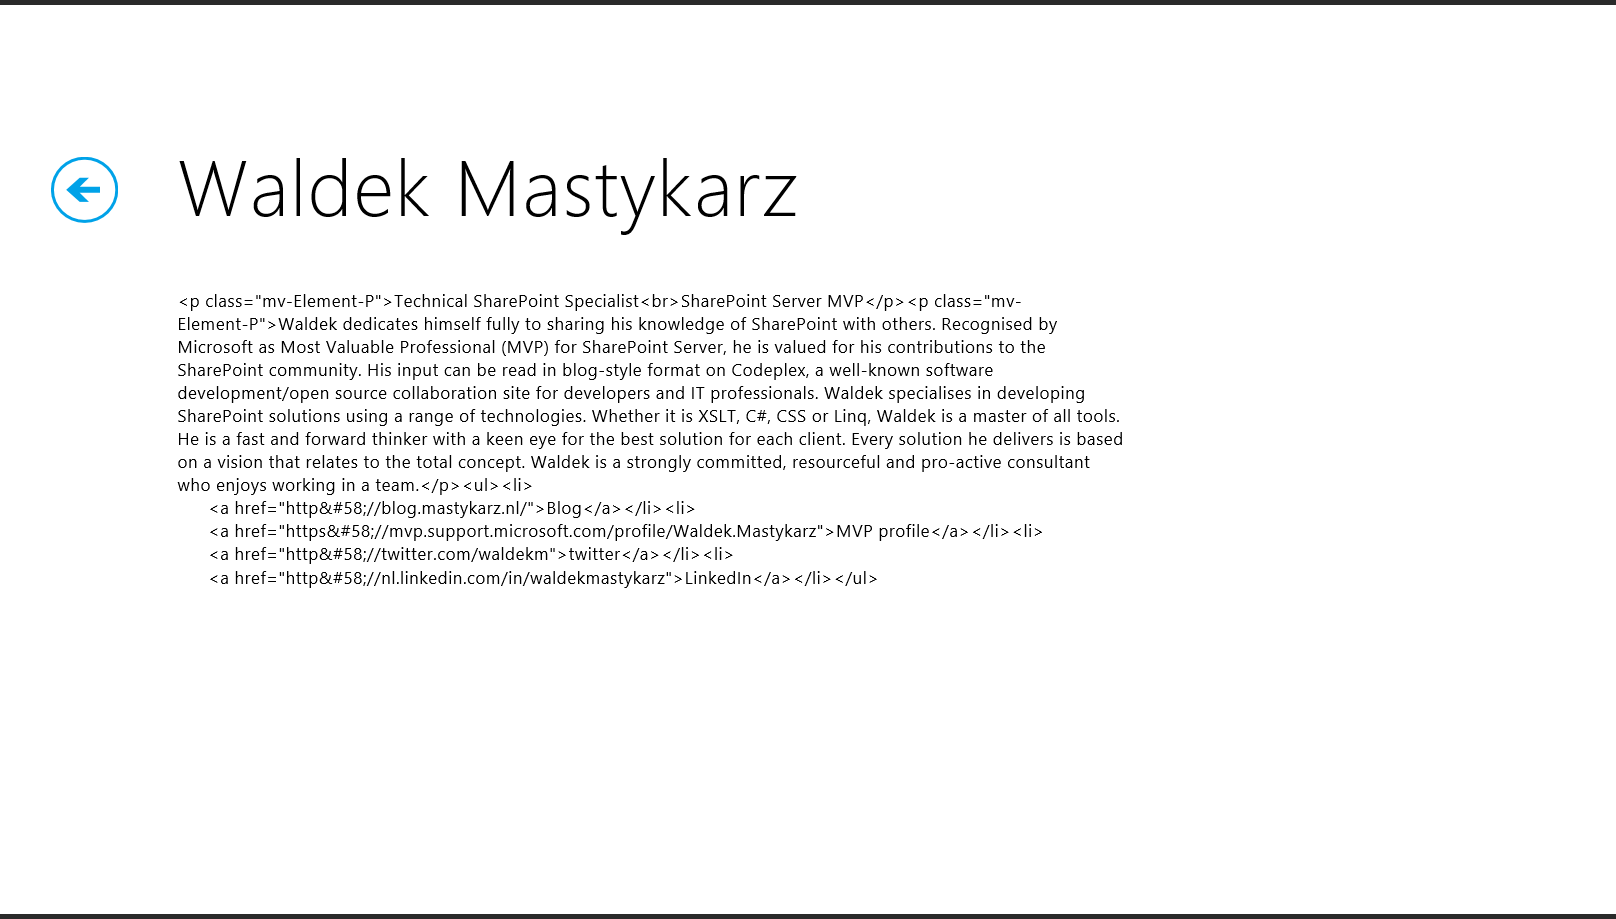
You might have noticed that the bio contains raw HTML. As mentioned before, Project Siena is still in beta and currently it neither parses HTML nor provides a mechanism to remove it before showing the content in the app.
Summary
Microsoft Project Siena is a Windows Store app for building apps without any developer skills. Although it’s currently in beta it already allows you to leverage different types of data sources in your app. Even though using the current release of Project Siena you won’t be leverage the full potential of SharePoint 2013 Search REST API and Windows Store app framework you might find it useful for illustrating your app ideas.
This was the second article accompanying my presentation on the SharePoint Conference 2014. In the next, and the last, part we will walk step-by-step through the process of building a Windows Store app backed by SharePoint 2013 Search REST API with anonymous access using Visual Studio 2013.
Download: Meet the Mavens Project Siena app (15KB, .siena)