Including additional assemblies in the WSP with Visual Studio SharePoint development tools
The new Visual Studio SharePoint development tools simplify work for SharePoint developers. Out-of-the-box the tools have some great functionality and knowing about these gems allows you to fully benefit of the power of the new tools. One of such gems can be used to make the process of provisioning multiple assemblies with a simple SharePoint Solution (WSP) easier.
How many times did you have to manually write the contents of the Manifest.xml file? Whenever you wanted to deploy an assembly with a WSP package, you had to figure out its fully qualified (4-part) name and include it in the Manifest.xml file. At some point the process got simplified thanks to tools like WSPBuilder but before that, you had to do everything manually.
The whole development story of SharePoint solutions has changed with the new Visual Studio SharePoint development tools. Using the new tools you can deploy additional assemblies with just a few mouse clicks.
Taking you there…
Let’s assume that you have the following projects: MySharePointProject which contains some SharePoint artifacts and MySharePointProject.Controls which is an ordinary Class Library that contains only the code of some controls.
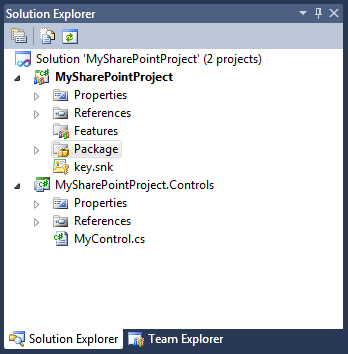
Using the MySharePointProject you would like to package the Controls project including the SafeControls entries.
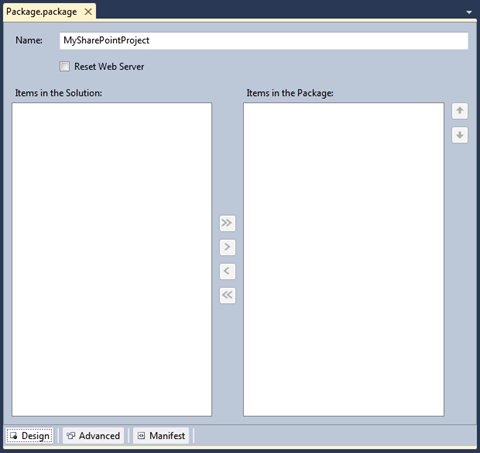
What you need to do is to double click on the Package **** project item: the Package Designer will open.
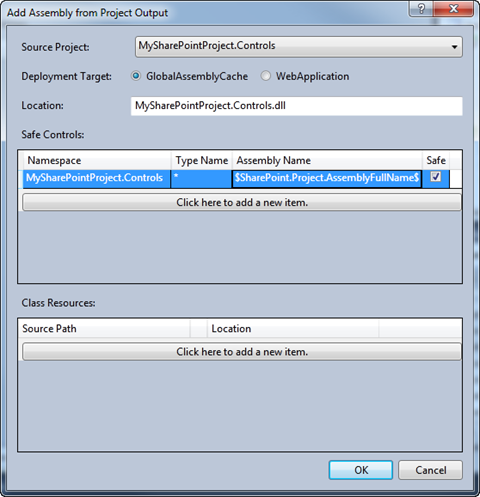
In the Package Designer you click the Advanced button. In the Advanced view you click the Add button and choose the Add Assembly from Project Output… menu option.
From the Source Project dropdown list you choose MySharePointProject.Controls project.
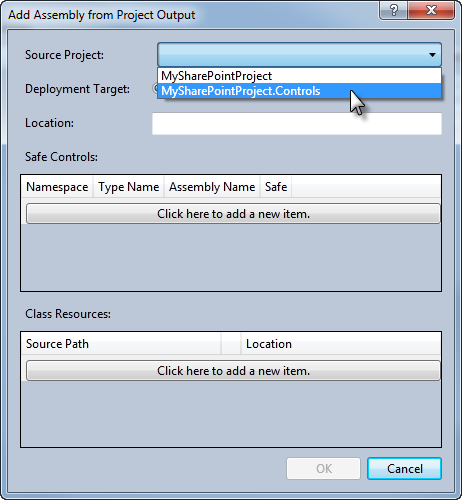
Then in the Safe Controls section, you click the Click here to add a new item button to add a new Safe Controls entry. And here’s where the magic happens.
…almost all the way.
In the Namespace column you enter MySharePointProject.Control – the namespace where your controls are located. The Assembly Name column can be used to provide the name of your assembly (fully qualified if the assembly will be deployed to GAC).
If it’s not the first time that you’re reading about the Visual Studio SharePoint development tools, the odds are high that you have heard about the Replaceable Parameters: tokens that are being replaced with something else during the build process. The list of out-of-the-box available tokens is really impressive, but in this scenario, one of them takes the attention in particular. Using the $SharePoint.Project.AssemblyFullName$ token you can specify that you want to include the fully qualified name of your assembly. During the build process, the Visual Studio SharePoint development tools will find this token and replace it with the actual fully qualified name of the assembly. There is however one challenge when dealing with additional assemblies.
The way the Visual Studio SharePoint development tools work at the moment is, that they use the context information from the project being built and use it to provide the replace value for the Replaceable Parameters. While it works in the most scenarios it gives you not the desired results here. If you use the $SharePoint.Project.AssemblyFullName$ token as the value for the Assembly Name column in a Safe Control entry, the generated Manifest.xml will contain the fully qualified name of the MySharePointProject assembly instead of the MySharePointProject.Controls assembly that we used in the reference. Does this mean that we cannot make use of the tokens and go back in time to the 2007 era when we had to do things manually? Not quite…
In my previous article I wrote about extending the packaging process of the Visual Studio SharePoint development tools. This is one of the scenarios when being able to extend the packaging process saves you a lot of time and keeps you productive! By using a custom Replaceable Parameter you can use a token in the Safe Control Assembly Name column and replace it with the actual fully qualified name of the referenced assembly just before the Manifest.xml file will be packaged.
Extensibility to the rescue: Introducing Imtech.VisualStudio.SharePoint.Tasks
To get the job done we need a couple of things. First of all we need a custom MSBuild task that will translate our custom Replaceable Parameter with the name of the referenced assembly. This is being done by the Imtech.VisualStudio.SharePoint.Tasks assembly. The assembly contains a custom MSBuild task that reads the contents of Manifest.xml, retrieves all Assembly elements, and replaces the $Imtech.SharePoint.AssemblyFullName$ tokens with the full name of the assembly referenced in the Assembly tag.
The next thing that we need to do, is to create a custom targets file. This does two things. It registers our custom task responsible for replacing the tokens and hooks it up with the packaging process of the Visual Studio SharePoint development tools. The targets file should contain the following contents:
<Project xmlns="http://schemas.microsoft.com/developer/msbuild/2003">
  <UsingTask AssemblyFile="Imtech.VisualStudio.SharePoint.Tasks.dll" TaskName="ParseTokens" />
  <Target Name="AfterLayout">
    <ParseTokens LayoutPath="$(LayoutPath)%(EnumeratedFiles.Package)\" />
  </Target>
</Project>
We override the AfterLayout target what allows us to easily open the assemblies referenced in Manifest.xml. Additionally we are sure that our tokens are being translated before the Manifest.xml gets packaged in the WSP.
The next step is to hook up the custom targets file with the project file so that it will be used by the build process. You can do this by adding an Import element right under the one that contains a reference to Microsoft.VisualStudio.SharePoint.targets.
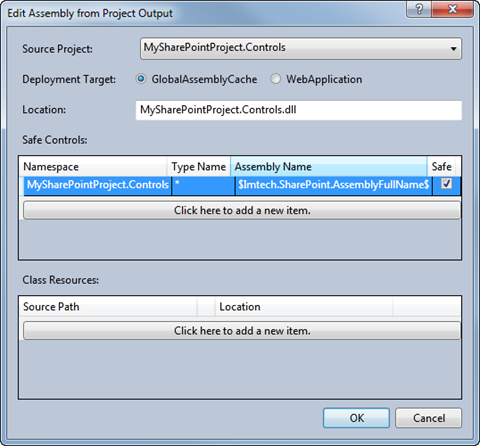
The last thing to do is to go to the Safe Controls dialog, add a new Safe Controls entry and use the $Imtech.SharePoint.AssemblyFullName$ token in the Assembly Name column.
If you’ve done everything right and choose Package, you should see the $Imtech.SharePoint.AssemblyFullName$ token properly replaced with the fully qualified name of the MySharePointProject.Controls assembly. You can see the Manifest.xml file used in the WSP package in the pkg\Debug\MySharePointProject directory under the MySharePointProject project.
Summary
Visual Studio SharePoint development tools provide you out-of-the-box not only with a great set of tools, that help you do your job as a SharePoint developer easier and faster, but also a very powerful extensibility framework that allows you to tailor the tools to fit your specific needs.
Download: Imtech.VisualStudio.SharePoint.Tasks (7KB, ZIP)
Technorati Tags: SharePoint 2010,Visual Studio 2010
