
Mavention.nl v3: How we did it?–the publishing site: implementing user experience
In the previous articles of the Mavention.nl v3: How we did it? series I showed you how we built the authoring site that we use for managing content on mavention.nl and mavention.com. Starting with this article we will move towards the publishing site and I will tell you more about the functionality behind the public-part of our new website.
It is SharePoint all right
While planning for our new website we wanted to have a website that on one hand would show the new capabilities of the SharePoint 2013 platform and on the other hand would prove our Web Content Management skills. Most of all we want to prove that awesome websites can be built using SharePoint 2013.
Shortly after we launched our new website we received some great feedback about the results. A few that we enjoyed the most were ones saying that our website is nothing more than a marketing stunt and that there is no chance it has been built with SharePoint 2013. This is probably the best compliment we could have ever wished for! So what did we do exactly to make our new website built with SharePoint 2013 not resemble SharePoint at all?
Building awesome SharePoint websites yesterday
The idea of building awesome public-facing websites on the SharePoint platform is not new and we’ve been practicing it for quite some time now here at Mavention. Started with SharePoint 2010 we’ve been looking for ways to optimize websites for the Internet: making them accessible, optimized for search engines and don’t force the visitors to load anything that they don’t need.
As you can imagine it’s not that difficult to get rid of everything that stands in your way to achieve great results. After all the Ribbon or the <form runat=”server”> tag are at the end of the day nothing more than markup that you could choose to remove from your Master Pages. When working with SharePoint the trick is however not to lose any of the web content management capabilities that the platform offers and which is beneficial for content authors.
So in order to build awesome websites on the SharePoint 2010 and at the same time keep all of the WCM capabilities intact we though of solutions such as Mavention Flex Layout that allows you to separate the authoring experience from the public website and with that get the best of both worlds. Using Flex Layout seems like a trickery to many SharePoint enthusiasts but we’ve been using it for quite a while with great success with SharePoint 2010.
Building awesome SharePoint websites today
SharePoint 2013 contains a variety of improvements and new capabilities that allow us to build rich public-facing websites. One of those new capabilities that form the foundation of what you see on our new website are Device Channels. While in SharePoint 2010 we needed a custom solution, in SharePoint 2013 we can use the standard Device Channels to achieve similar results.
One word about Device Channels
Device Channels have been originally designed to help you optimize user experience for different devices. Using Device Channels for separating the authoring experience from the public piece of the website is not the original intent of why Device Channels have been introduced in SharePoint 2013 and, depending on what you are trying to achieve, you might stumble upon some things that don’t work the way you would expect them to. The bottom line here is that, if you decide to use Device Channels the way we do on our new website, you are in a kind of manual mode where you have to pay extra attention that you don’t break any of the standard functionality.
Planning for separation
When planning for using the new Cross-Site Publishing capability in SharePoint 2013 it might be tempting to assume that the only site on which you will login is the authoring site. After all this is the site where all of the content is authored and the publishing site is meant to only display the content, right?
Unfortunately that’s not completely the truth. Content published using the Cross-Site Publishing capability is published using search. As you can imagine search index contains only the content. Things like Web Parts are not included in the search index so should you want for example to have a content form Web Part somewhere on your website you would have to add it directly to the publishing site. This scenario as well as the fact that the publishing site is also a site that you have to build and maintain once in a while proves that also the publishing site has to support the full-featured authoring mode.
Designing for optimization
To support content authoring as well as having the website optimized for anonymous visitors we decided to use the Device Channels capability to create two channels: one for the authoring and one for the public site of our website.
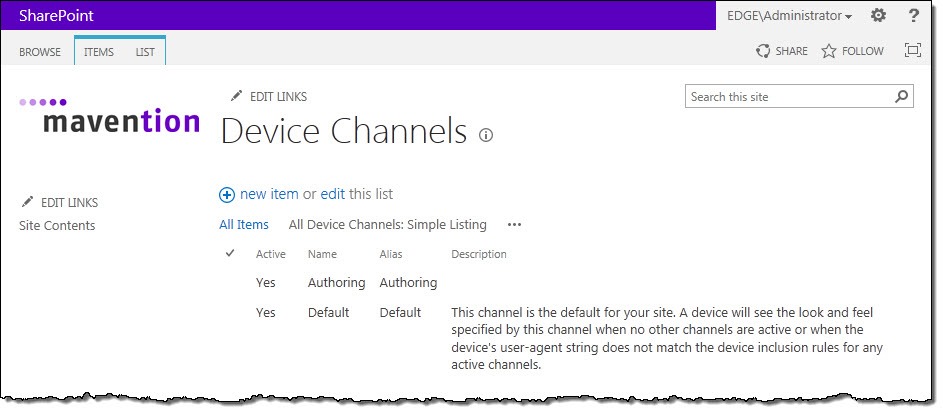
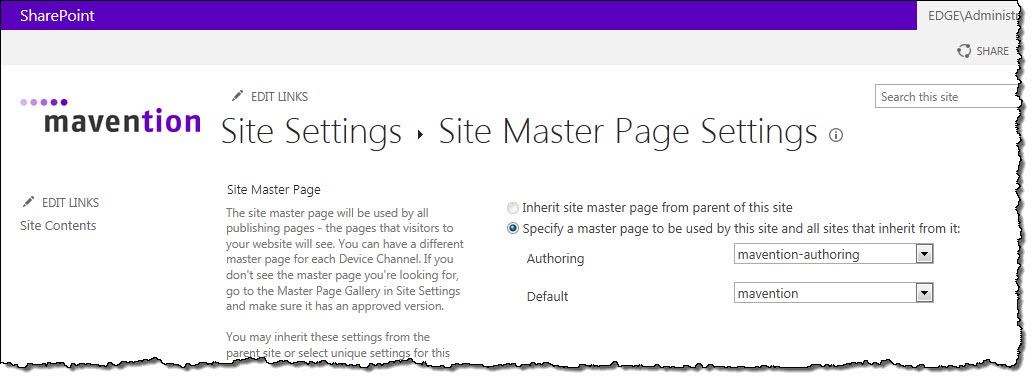
As opposite to our authoring site the Default channel on our publishing site is mapped to the public Master Page while the Authoring channel is mapped to the authoring Master Page which is a copy of the standard seattle.master.
Because the majority of traffic on our public site comes from anonymous visitors we decided to have a separate channel for the authoring experience and associate the public experience with the Default channel.
Building for optimization
As I mentioned before the authoring Master Page is a copy of the standard seattle.master Master Page with just a few Content Place Holders added to match the public Master Page. The real work started with build the public Master Page.
Build the public Master Page
When building our public Master Page we started from an empty Master Page and added only the things that we needed for our site. Thanks to the separation of the authoring and the public experience and the fact that all of the content on our website is read-only for the visitors we were able to remove all kind of controls such as the Ribbon, script links or even the SharePointForm control, which renders the, so typical for ASP.NET applications, page-wide form tag. As a result we got nearly 100% control of the generated HTML output, which is great for many reasons such as Search Engine Optimization but also accessibility and implementing custom user experiences in general.
Such approach is not new to us here at Mavention and we’ve been using it with quite some success for a few years now with SharePoint 2010. The biggest change with SharePoint 2013 is that now using separate Master Pages is supported natively by the platform what minimizes the amount of custom code required to get this concept to work. And even though Device Channels haven’t been designed for separating the authoring experience from the public part of the website great results can be achieved.
Building Page Layouts
On our new website we’re using the Cross-Site Publishing (XSP) capability that allows us to publish content from the authoring site to publishing sites using search. Using XSP has consequences with regard to how the content is displayed on the site.
With “traditional” Publishing Sites such as the one that we used to build with SharePoint 2007 and SharePoint 2010 and such as our authoring site we used Page Layouts which were referenced by many Publishing Pages. Page Layouts contained field controls that were responsible for retrieving content from the particular Publishing Page and showing it to the users. When working with XSP things look a little differently as there are no physical Publishing Pages. All of the content is located in the search index and is retrieved dynamically using catalog URLs. With such shift it is not that rare that you might create a Page Layout which is used by one Publishing Page only which is then used by Managed Navigation as a Template Page to display some dynamic content surfaced from search.
When building our new website we have created a few Page Layouts to display all the different kinds of content that we have on our website. Comparing with “traditional” Page Layouts, we used Catalog Item Reuse Web Parts instead of publishing field controls to display our content published using XSP.
Building Page Layouts using Catalog Item Reuse Web Parts instead of publishing field controls is new in SharePoint 2013. Exploring Page Layouts that are created automatically by SharePoint after connecting to a Catalog is a good starting point to see how the new capabilities can be used.
Building Rollup Pages
One of the few places where you have to implement your custom user experience when building public-facing websites on the SharePoint platform are rollup pages. In SharePoint 2007 and 2010 we used Content Query Web Parts (CQWP) for generating content rollups. As you know CQWP uses XSLT for rendering its output. In SharePoint 2013 you can still use the CQWP and XSLT but if you’re using Cross-Site Publishing, as we do on our new website, you have to use the Content By Search Web Part (CBS) instead.
You might have noticed that all of the CBS (and other search-related Web Parts) rendering is done using JavaScript-based Item Templates. While it lowers the load on the server and simplifies implementing custom experiences, it also introduces a few challenges when it comes to building public-facing websites. Because by default all of the CBS rendering relies on JavaScript, which still is optional technology that can be disabled, should the visitor have JavaScript disabled he would see an empty page! Even though there are not that many visitors who have JavaScript disabled, dependency on JavaScript introduces accessibility risks. Additionally search engines have limited JavaScript support and depending on how you are using JavaScript you might have the risk that not all of your content will be indexed.
Although it’s not obvious in the UI, the Content By Search Web Part allows you to choose which rendering mode would you like to use. By default it uses the JavaScript-based rendering but if you set the hidden AlwaysRenderOnServer property to true, the CBS will use the server-side XSLT-based rendering instead. By default the server-side rendering mode is used for search bots only but using the AlwaysRenderOnServer property you can force the CBS to render the same content for both visitors and search bots.
Because we wanted our website to be accessible and optimized for search engines we decided to use server-side rendering in all instances of the CBS. This is why, should you examine the HTML source of our site, you won’t find the standard JSON strings rendering by CBS for client-side rendering purposes.
Summary
In this part of the Mavention.nl v3: How we did it? series I showed you which choices did we make when designing our website and how we built its foundation. In the upcoming articles we will focus more on specific functionality such as the language switch, RSS feeds or Search Engine Optimization. Stay tuned!