Build multi-page SharePoint Framework client-side web parts with Angular v1.x
When building SharePoint Framework web parts using Angular you might need to implement multiple views. Here is how to do it without breaking other web parts on the page.
One web part, multiple views
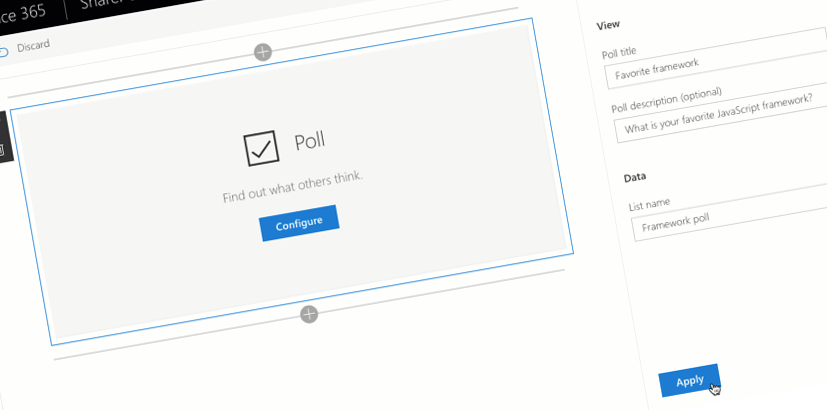
When building web parts you might need to implement multiple views and switch between them depending on the user’s interaction. Consider a poll web part based on a SharePoint list. First, when the web part is added to the page, it needs some configuration like the name of the list where its data is stored. Then, when users arrive to the page, the web part would first show the list of options for them to vote. Once the user casted her vote, the web part would display the results.
Sometimes, in this context the view displayed in the web part is referred to as a page because there is more to it than only its display layer (view). Each view is driven by a controller responsible for loading the data and managing the state of that particular view.
While you could build your web part in such a way, that the different views are implemented in a single page with some switch statements to control what’s displayed on the screen, breaking it apart allows you to simplify the code and makes it possible for multiple developers to work on the web part in parallel.
Routing in single page applications
Technology used for building SharePoint Framework client-side web parts is similar to that used for building single page applications (SPA). In fact, when using Angular v1.x to build SharePoint Framework web parts, the approach is very close to building a SPA: you specify the template, define the application configuration, its components, controllers, services and views, and bootstrap it in the DOM.
If you’ve built single page applications in Angular in the past, the chances are, that you used routing with the Angular’s ngRoute module to switch between the different pages in your application. Each page would be described as a route consisting of a template and a controller. The great benefit of using the ngRoute module was, that it enables deep linking automatically updating the URL in the browser’s address bar. And this is exactly the problem if you would try and use the same approach in SharePoint Framework web parts.
Web parts are not single page applications
Single page applications own the whole page. They are the only piece of code living at the given URL. Developers who build the SPA define which elements are on the page and how they communicate with each other. Web parts on the contrary, are added to the page by end-users and can coexist with a dozen other web parts. Developers building web parts cannot make any assumptions about what other elements will be present on the page.
When using routing using the Angular ngRoute module, the current route is persisted in the browser’s URL. If you would use the same approach in a SharePoint Framework web part, it could happen, that interacting with one web part would change the state in other web parts on the page as well, which for users would be confusing to say the least! So while it’s highly desirable when building single page applications, when building web parts you need something else than the ngRoute module.
Implementing routing in SharePoint Framework web parts built using Angular v1.x
An alternative way of implementing routing in Angular application is using the UI Router. In contrary to the ngRoute module, the UI Router manages routing using state and doesn’t change the browser’s URL, which is exactly what you need when building SharePoint Framework web parts.
Recently, Microsoft published on GitHub a sample SharePoint Framework client-side web part built using Angular v1.x and using the UI Router to switch between the different views. Vesa Juvonen and I discussed the sample in a PnP webcast. Here are the key points that you should pay extra attention to.
Angular UI Router States: the essentials
When using the UI Router, the different pages or views are referred to as states. Similarly to an Angular route, each state consists of a template and a controller. Just as when using routes, you can pass parameters into states and it is also possible to nest states to reuse functionality across multiple states.
Take a look at the code from the sample published by Microsoft:
import * as angular from 'angular';

angular
  .module('poll')
  .config(uiRouterConfigurator);

uiRouterConfigurator.$inject = ['$stateProvider', '$urlRouterProvider'];

function uiRouterConfigurator($stateProvider: ng.ui.IStateProvider, $urlRouterProvider: ng.ui.IUrlRouterProvider): void {
  $stateProvider
    .state('config', {
      template: require('./config/config.html'),
      params: {
        displayMode: undefined
      },
      controller: 'configController',
      controllerAs: 'vm'
    })
    .state('poll', {
      template: require('./poll/poll.html'),
      params: {
        title: undefined,
        description: undefined
      },
      controller: 'pollController',
      controllerAs: 'vm'
    })
    .state('poll.vote', {
      template: require('./poll/vote/vote.html'),
      params: {
        listName: undefined,
        sharePointApiUrl: undefined
      },
      controller: 'voteController',
      controllerAs: 'vm'
    })
    .state('poll.results', {
      template: require('./poll/results/results.html'),
      params: {
        listName: undefined,
        sharePointApiUrl: undefined
      },
      controller: 'resultsController',
      controllerAs: 'vm'
    });
}Each state is defined very similarly to how you would typically define a route in an Angular application, specifying things like template, controller and even an alias for the controller using the controllerAs property. While defining states using the Angular UI Router you can specify a URL for each state, it is essential that you don’t do it. If you would define a URL for a particular state, switching to that state, the UI Router would update the URL in the browser’s address bar, which could potentially collide with the state of other elements on the page and which is exactly what you want to avoid.
Nested states
The sample uses 4 states (config, poll, poll.vote and poll.results). poll.vote and poll.results are both nested beneath the poll state which is indicated by their names beginning with poll.. Following this naming convention, the UI Router will know, that when switching to the poll.vote or the poll.results state it should apply the configuration of the poll state first and then apply the selected state (poll.vote or poll.results) to it.
When using nested states it’s essential that the template of the parent state (poll) contains the ui-view directive or the UI Router will not be able to apply the template for the child state.
<div class="ms-font-xl">{{::vm.title}}</div>
<div class="ms-font-m-plus">{{::vm.description}}</div>
<br />
<div ui-view></div>When switching to the poll.vote state for example, the UI Router will first apply the template specified in the configuration of the poll state and execute the code of its controller. Additionally, the parameters defined on the poll state (title and description) are also available in the poll.vote state so, when switching to that state in the application, you can specify both parameters defined specifically on the poll.vote state as well as parameters from the parent poll state:
export class AppController implements IAppControllerState {
  // ...
  private init(listName: string, sharePointApiUrl: string, title: string, description: string, displayMode: DisplayMode): void {
    // ...
    this.$state.go('poll.vote', <IConfigurationChanged>{
      title: title,
      description: description,
      listName: listName,
      sharePointApiUrl: sharePointApiUrl
    });
  }
}Initial state and switching between states
When launching your web part, you have to tell the UI Router which state it is in. When using the ngRoute module, you typically do this by defining a catch-all route at the end using / (single forward slash) as the URL. While many examples related to using the UI Router show doing the same, the downside is that it modifies the URL in the browser’s address bar, which is exactly what you’re trying to avoid when building web parts.
Instead of using the catch-all route, you can specify the initial state of your application by calling the go method of the Angular UI Router State Service in the main controller of your application:
export class AppController implements IAppControllerState {
  public static $inject: string[] = ['$rootScope', '$state'];

  constructor($rootScope: angular.IRootScopeService, private $state: angular.ui.IStateService) {
    // ...
  }

  private init(listName: string, sharePointApiUrl: string, title: string, description: string, displayMode: DisplayMode): void {
    if (!listName || listName.trim().length === 0) {
      this.$state.go('config', {
        displayMode: displayMode
      });
    }
    else {
      this.$state.go('poll.vote', <IConfigurationChanged>{
        title: title,
        description: description,
        listName: listName,
        sharePointApiUrl: sharePointApiUrl
      });
    }
}The first argument of the go method specifies the name of the state to which you want to switch. Using the second argument you can pass any parameters supported by that state. For the parameters to be accepted by the given state, it must list these parameters in its configuration, when being defined on the Angular UI Router’s StateProvider.
In the sample published by Microsoft the AppController is executed whenever the web part loads on the page. The init method is called directly from the constructor which ensures that the code is loaded before any other part of the application. If the web part has been configured, the code will present the user with the list of options to vote on. Otherwise the user will be prompted to configure the web part.
Parameters passed into a state can be retrieved using the StateParamsService:
export class ConfigController implements IConfigControllerState {
  public static $inject: string[] = ['$stateParams', '$rootScope'];

  // ...

  constructor($stateParams: angular.ui.IStateParamsService, private $rootScope: angular.IRootScopeService) {
    this.init($stateParams['displayMode']);
  }

  private init(displayMode: DisplayMode): void {
    // ...
  }

  // ...
}Summary
When building SharePoint Framework web parts you might need to implement multiple views in your web part. When switching between the different views it is essential that you don’t modify the URL in the browser’s address bar which could render undesired behavior in other components present on the page. When building web parts using Angular one way to implement multiple views in a web part is by using the Angular UI Router. Recently Microsoft published a code sample illustrating how to do this. The code sample is available on GitHub at https://github.com/SharePoint/sp-dev-fx-webparts/tree/master/samples/angular-multipage.