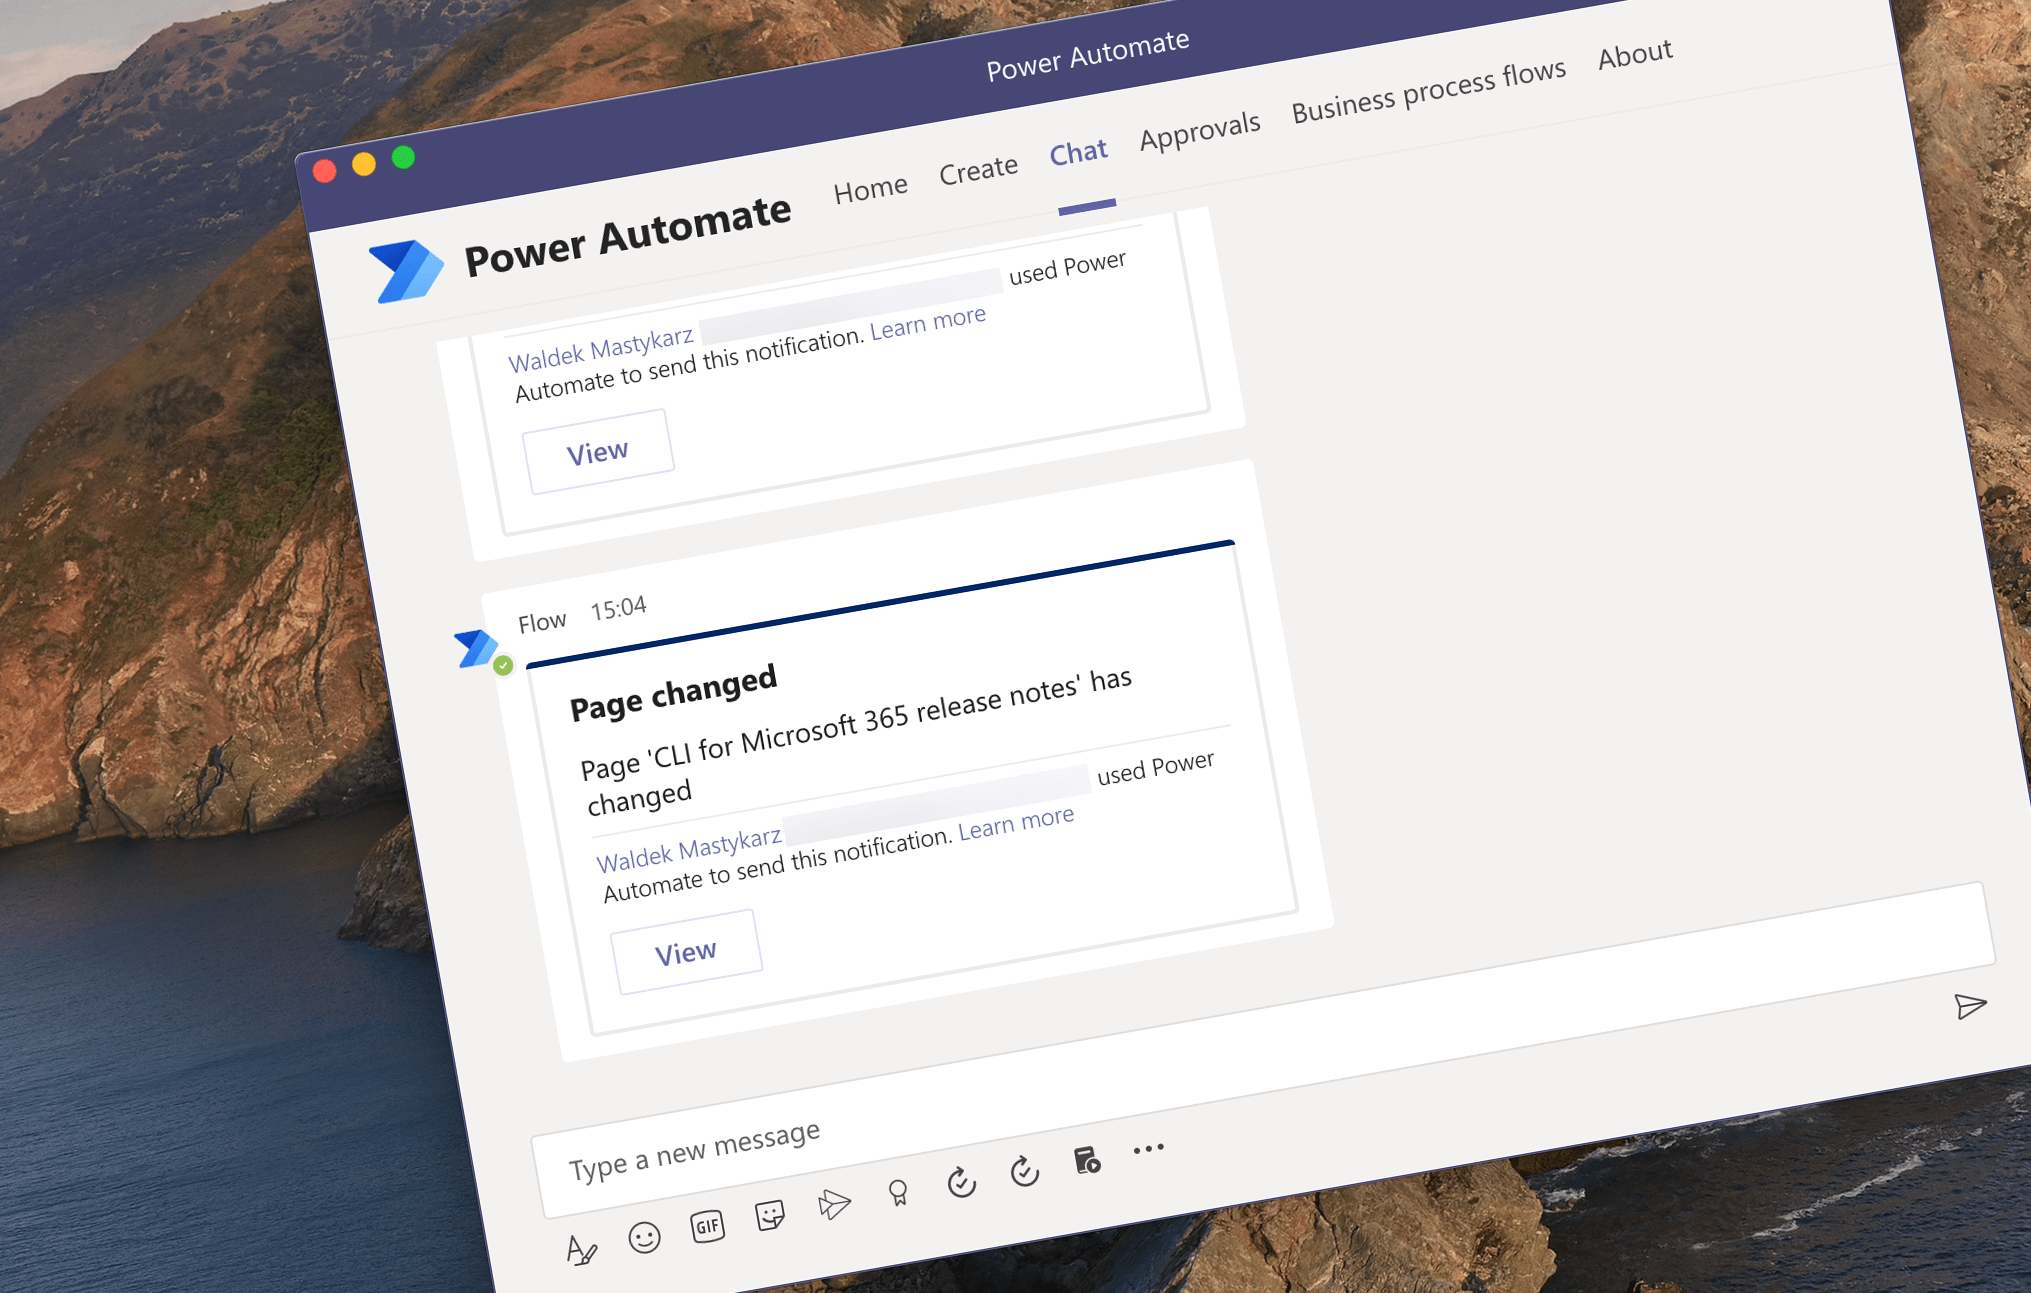
Get notified when a file on GitHub has changed
With more and more content being hosted on GitHub it’s a shame that you can’t get notified when a particular file has changed. At least not by GitHub, that is. But you can build your own notification service. Here is how.
More than source control
GitHub is more than just the place where developers post their code. Over the last few years, it evolved also into a huge repository of content published through blogs and docs. For many, it’s the go-to place to stay up-to-date on what’s new.
While GitHub offers us a way to get notified of changes to repos, the notifications options are limited. You can get notified of new releases or pull requests, but you can’t get notified when a particular file has changed. With many devs using specific pages for announcing releases or keeping their changelog, being able to get notified of changes to these specific files, allows you to stay up-to-date on what’s new and what’s coming.
Build your own GitHub file changes notifier
To build your own GitHub file changes notifier, all you need is an Azure subscription. In the subscription, you will create a function app, a storage account and a logic app. Here is the high-level of the solution architecture:
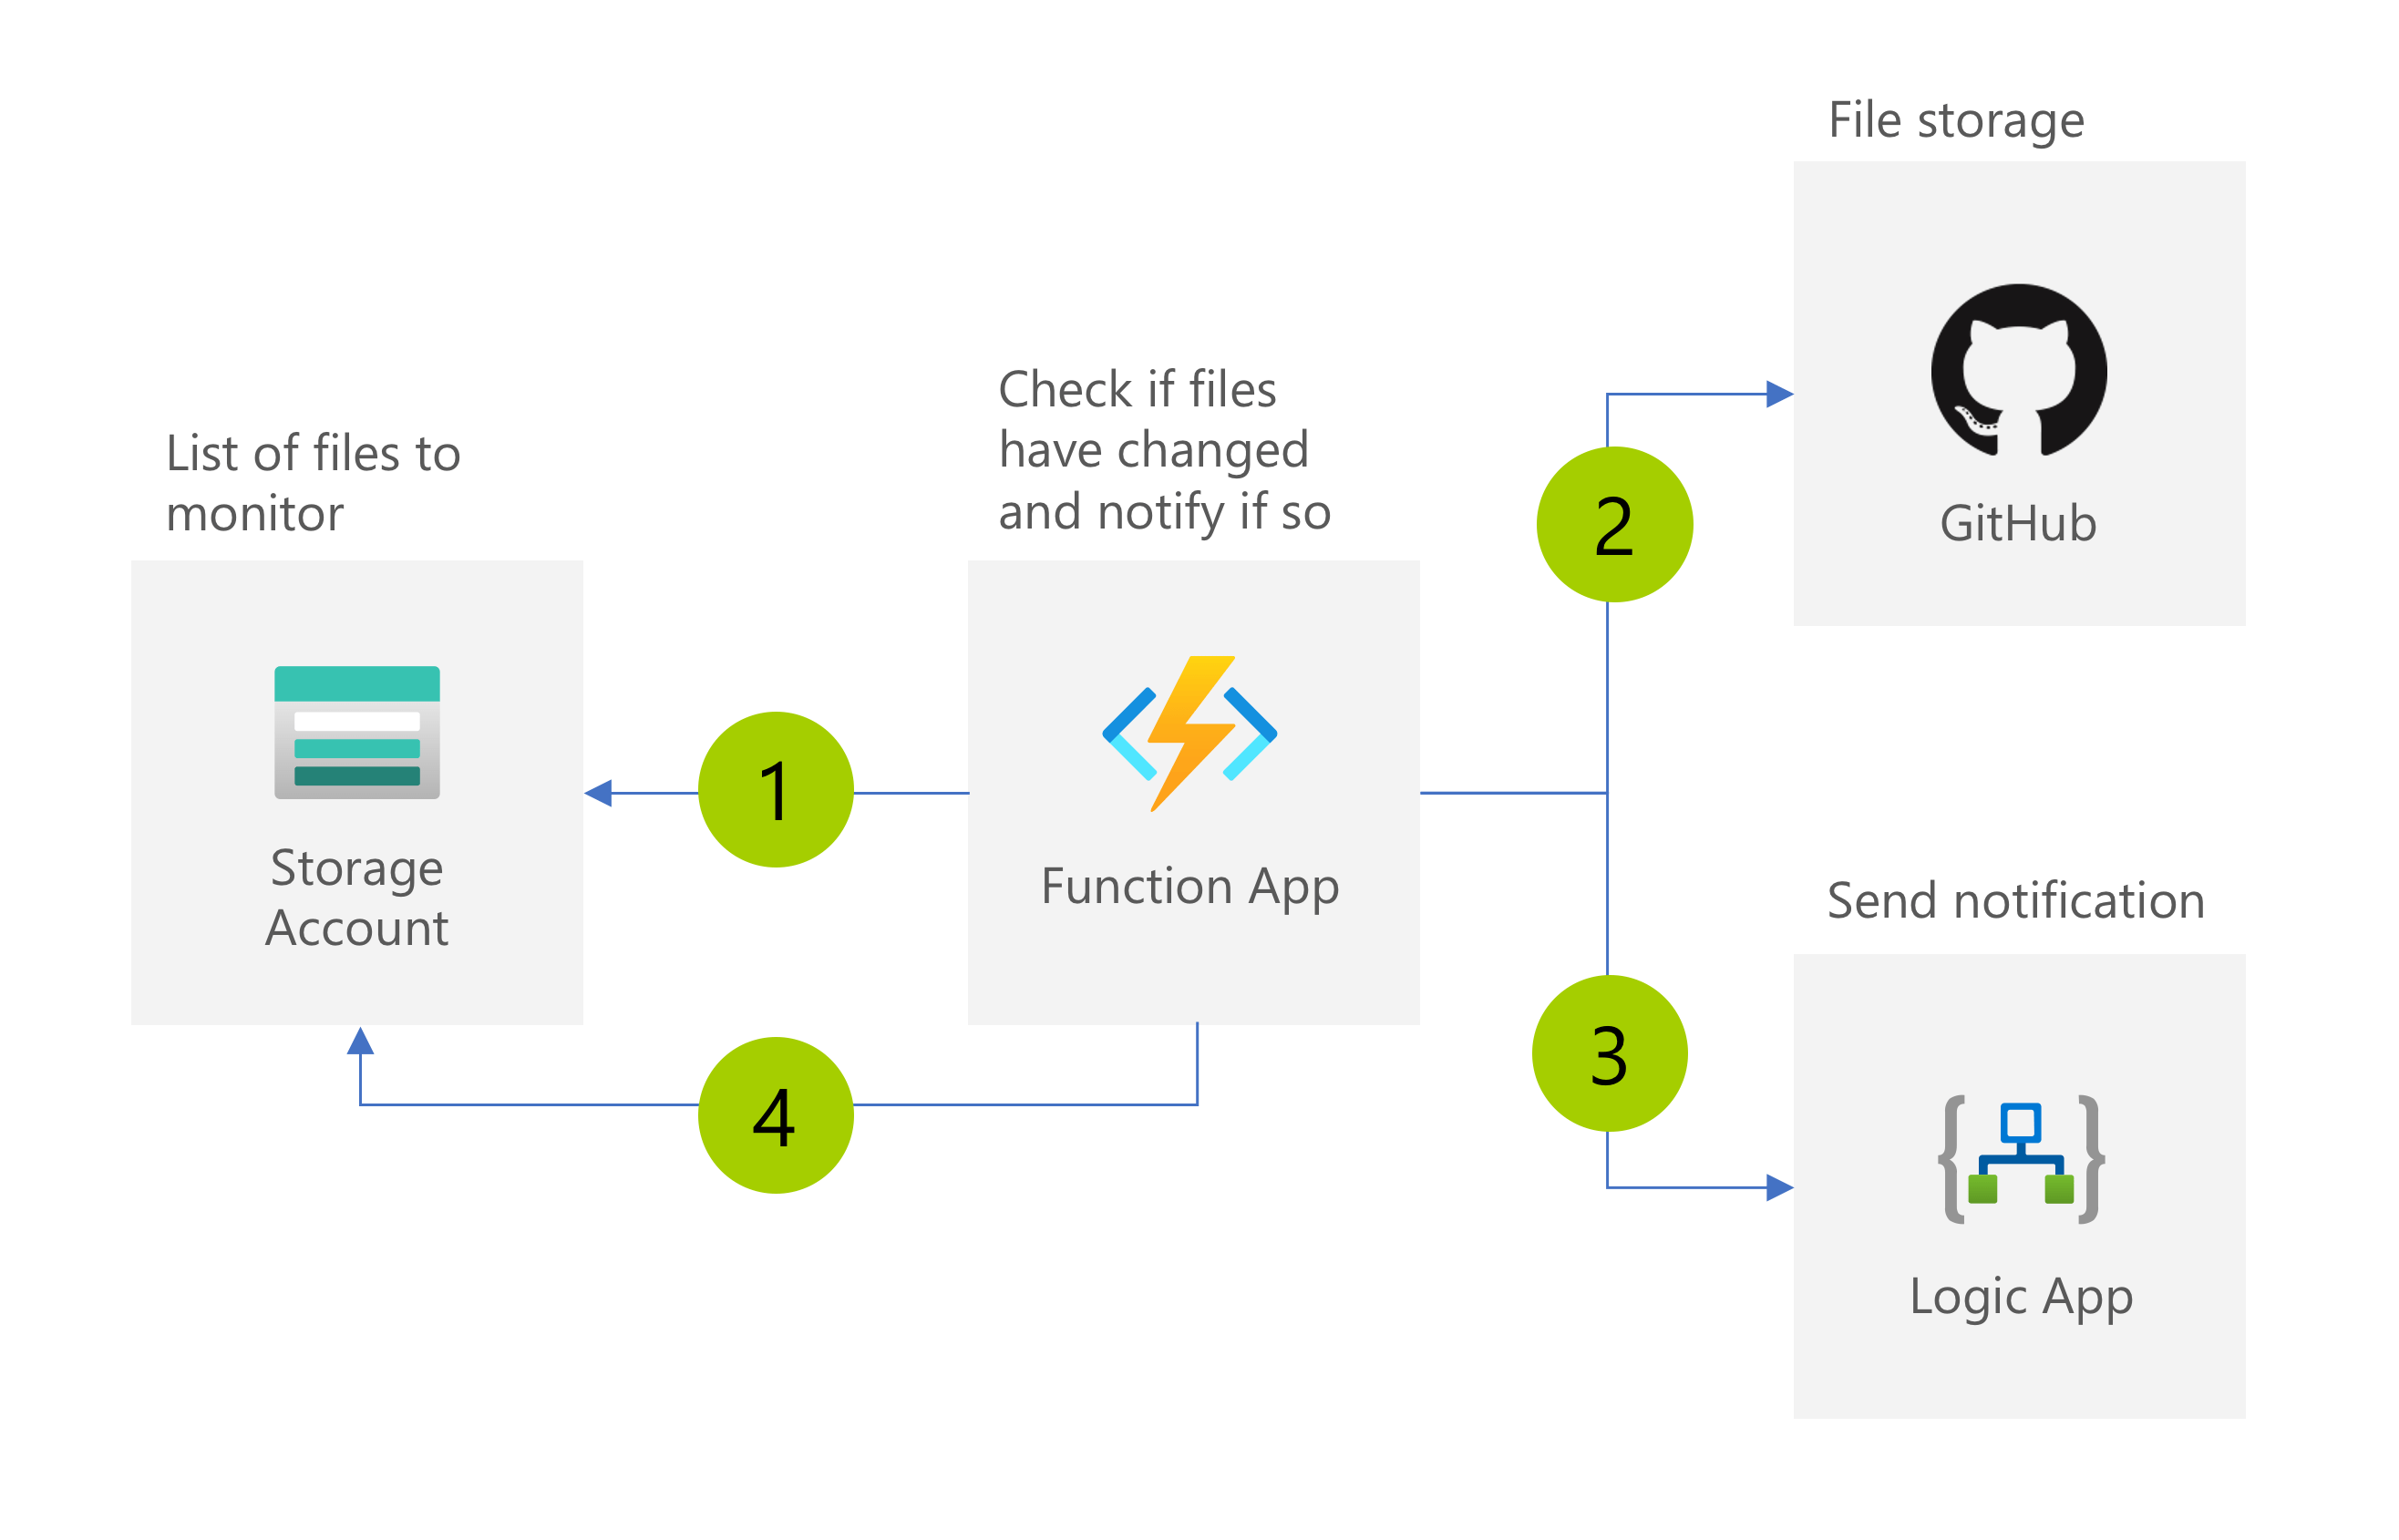
The storage account holds the list of files to check for changes. For each file, you will store its URL, title - for use with notifications, and a hash of its contents used to determine if the file has changed since the last time.
The function app hosts the scheduled process that at the specified time retrieves the list of files from the storage account (1), iterates through them, for each (2) one checks if it changed and sends a notification if it did (3). If the file has changed, the function app also updates the file hash in the storage account (4).
While there are unlimited ways to send a notification, I find using logic apps the easiest. Logic apps are extremely versatile and with just a few clicks you can set them up to receive notifications on Teams, via email, or on your phone, without having to deal with authentication, response handling, etc.
Set up a storage account
Start, by creating a storage account in your resource group. In the storage account, create a table named files. For each file that you want to track, insert an item to the table including its title and url.
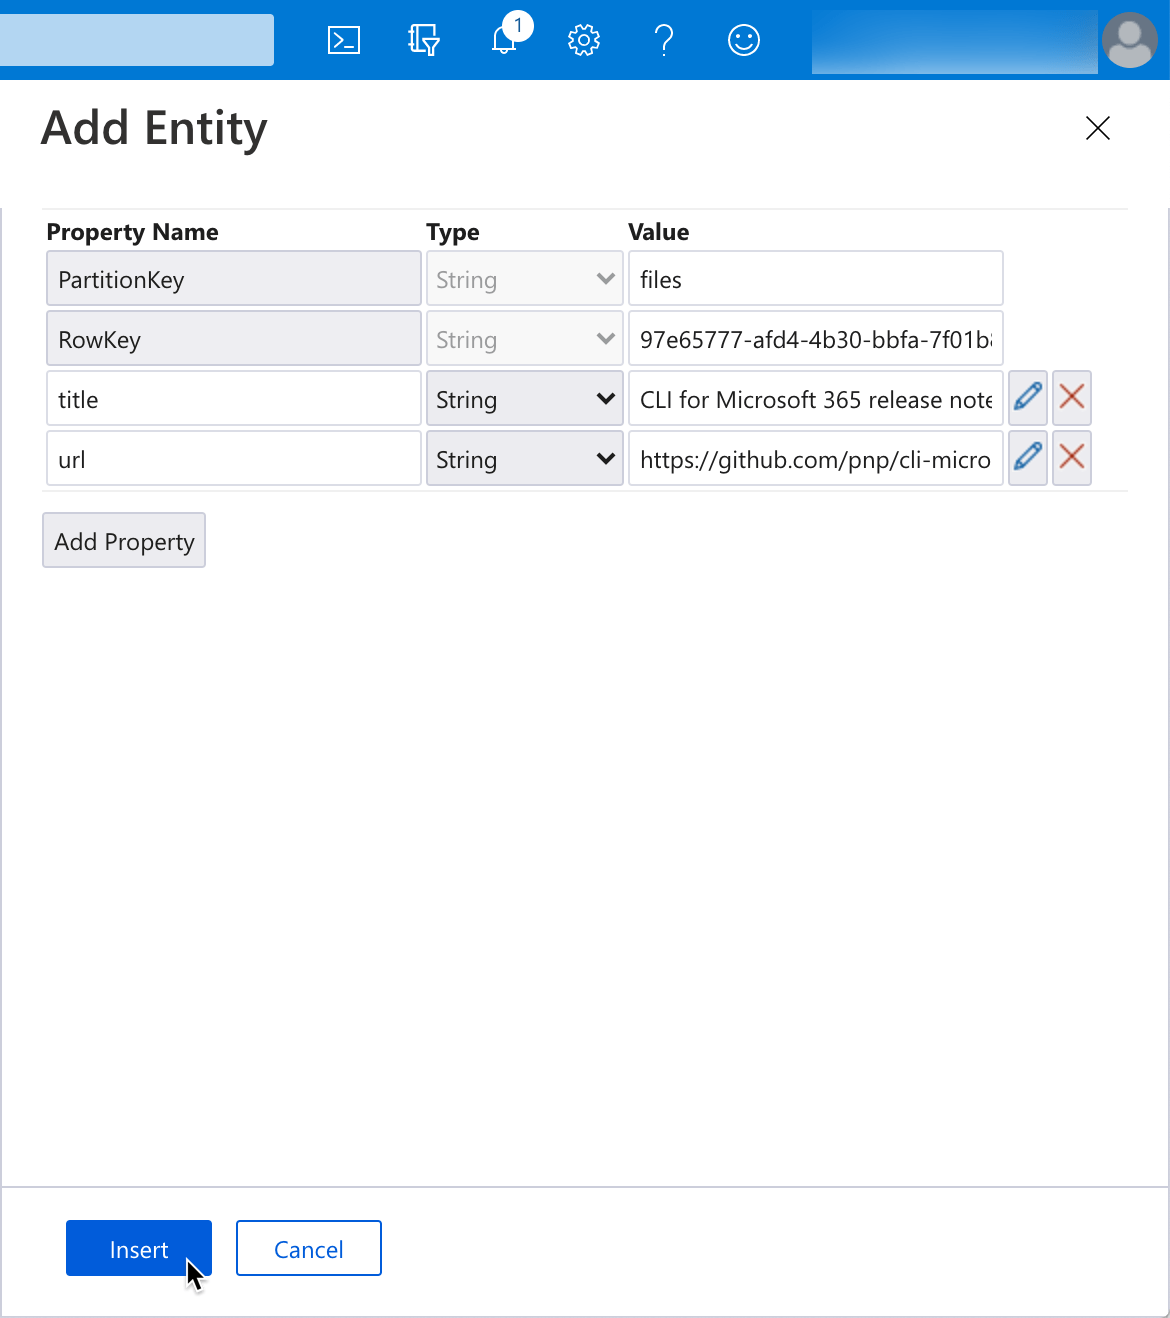
For each file, use the same partition key and a unique row key.
Create a logic app for sending notifications
In this example, we’ll create a logic app that sends a notification to the user on Microsoft Teams.
In your resource group, create a logic app. Use the When a HTTP request is received trigger. As a sample payload, to generate the request schema specify:
{
  "title": "abc",
  "url": "def"
}
Then, add the Post your own adaptive card as the Flow bot to a user action. Specify your email as the recipient. Choose two parameters: Message and Headline. In the Message parameter, enter:
{
  "type": "AdaptiveCard",
  "body": [
    {
      "type": "TextBlock",
      "size": "Medium",
      "weight": "Bolder",
      "text": "File changed"
    },
    {
      "type": "TextBlock",
      "text": "File '@{triggerBody()?['title']}' has changed",
      "wrap": true
    }
  ],
  "actions": [
    {
      "type": "Action.OpenUrl",
      "title": "View",
      "url": "@{triggerBody()?['url']}"
    }
  ],
  "$schema": "http://adaptivecards.io/schemas/adaptive-card.json",
  "version": "1.2"
}
In the Headline parameter enter:
File '@{triggerBody()?['title']}' has changedSave the logic app, and from the trigger, copy the URL which you will need to call to trigger the notification.
Set up function app
Next, create a function app running Node.js. In the app, create a new Timer-triggered function. Adjust the schedule so that the function runs as frequently as you want to check for changes in files.
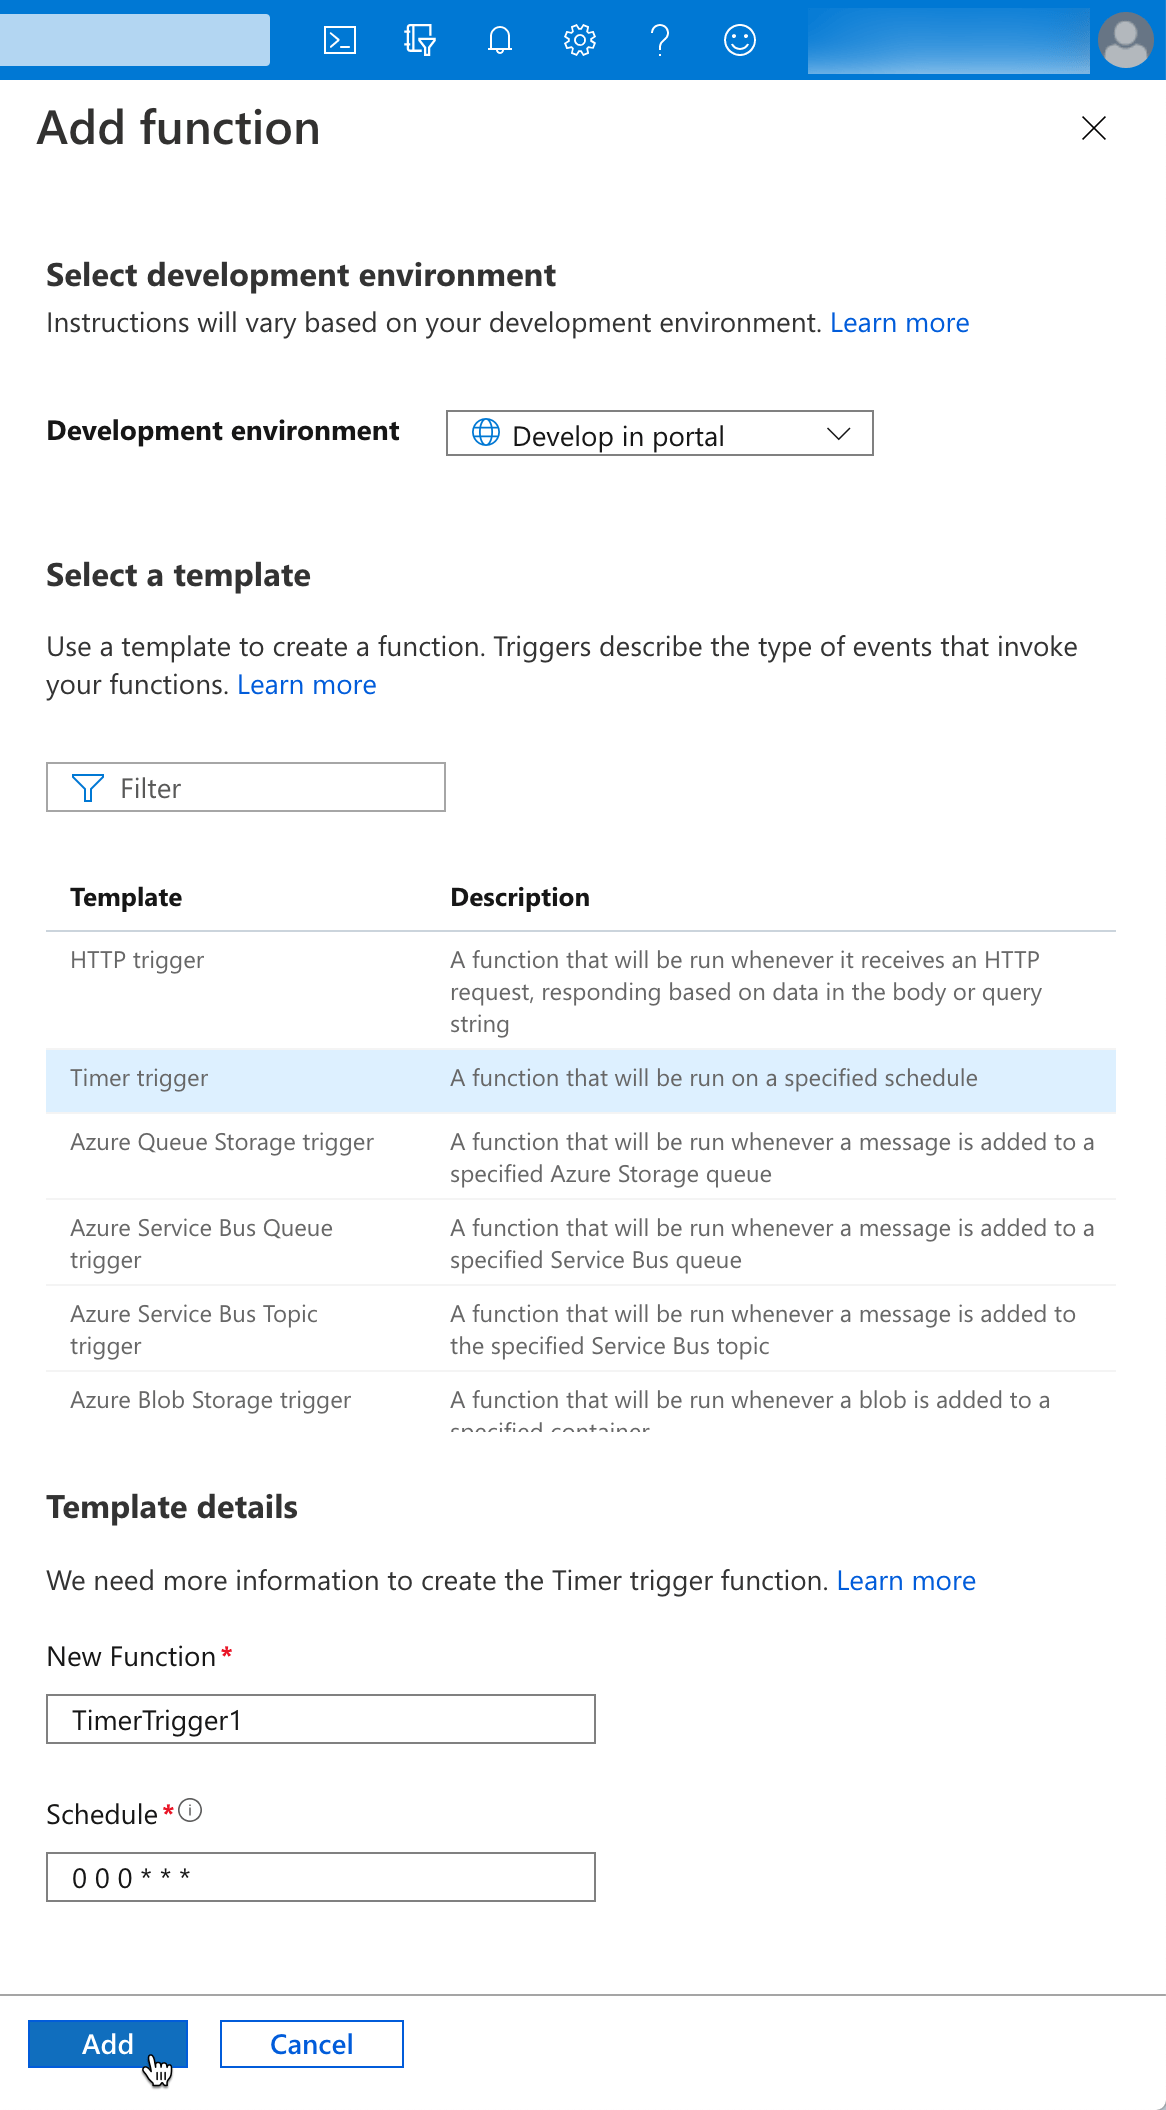
Add Azure Table Storage binding
In your function’s integration options, add a new Azure Table Storage input binding pointing to your storage account and the file table. In the partition key property, specify the name of the partition key that you used when entering files to track in the table. Take note of the Table parameter name and the Storage account connection values as you will need them later, in your code.
Store logic app trigger URL
Next, in your function’s configuration settings, add a new application setting named NotificationUrl and use the previously copied logic app trigger URL as its value.
Add function’s code
Then, add the function’s code:
const axios = require('axios').default;
const crypto = require('crypto');

module.exports = async function (context, timer, inFilesTable) {
  const timeStamp = new Date().toISOString();
  context.log('Checking for file changes...', timeStamp, context.invocationId);

  // array of files that have changed
  const modifiedFiles = [];
  // array of notifications
  const modifiedFilesNotifications = [];

  // retrieve file contents
  const requests = inFilesTable.map(file => {
    // if it's a github URL, make it point to the raw file to avoid comparing github UI changes
    file.rawUrl = file.url
      .replace('//github.com/', '//raw.githubusercontent.com/')
      .replace('/blob/', '/');
    return axios.get(file.rawUrl);
  });
  const results = await Promise.allSettled(requests);

  results.forEach(result => {
    if (result.status !== 'fulfilled') {
      context.log.error(result.reason.message, result.reason.config.url, context.invocationId);
      return;
    }

    const requestedUrlPath = result.value.request.path;
    const matchingFile = inPagesTable.find(page => page.rawUrl.indexOf(requestedUrlPath) > -1);
    if (!matchingFile) {
        context.log.error('Matching file not found in database', requestedUrlPath, context.invocationId);
        return;
    }

    const hash = crypto.createHash('sha512');
    hash.update(result.value.data);
    const currentHash = hash.digest('hex');

    context.log.verbose('Comparing file hash', requestedUrlPath, context.invocationId)
    context.log.verbose('Old hash', matchingFile.hash, context.invocationId);
    context.log.verbose('Current hash', currentHash, context.invocationId);
    if (matchingFile.hash !== currentHash) {
      if (typeof matchingFile.hash !== 'undefined') {
        context.log('File has changed', matchingFile.url, context.invocationId);
        modifiedFilesNotifications.push(matchingFile);
      }
      else {
        context.log('Initial hash retrieved', matchingFile.url, context.invocationId);
      }

      matchingFile.hash = currentHash;
      modifiedFiles.push(matchingFile);
    }
    else {
      context.log('File not changed', matchingFile.url, context.invocationId);
    }
  });

  // send notifications for changed files
  const notificationUrl = process.env.NotificationUrl;
  const notificationRequests = modifiedFilesNotifications.map(file => axios.post(notificationUrl, {
    title: file.title,
    url: file.url
  }));

  const notificationResults = await Promise.allSettled(notificationRequests);
  notificationResults.forEach(result => {
    if (result.status !== 'fulfilled') {
      let fileChangedUrl;
      try {
        fileChangedUrl = JSON.parse(result.reason.config.data).url;
      }
      catch { }
      context.log.error(result.reason.message, result.reason.config.url, fileChangedUrl, context.invocationId);
      return;
    }
  });

  // update modified files in the database
  if (modifiedFiles.length > 0) {
    const azure = require('azure-storage');
    const tableSvc = azure.createTableService(process.env.filetracker_STORAGE);
    const batch = new azure.TableBatch();
    modifiedFiles.forEach(file => {
      batch.mergeEntity({
        PartitionKey: { _: file.PartitionKey },
        RowKey: { _: file.RowKey },
        hash: { _: file.hash }
      }, { echoContent: true });
    });
    tableSvc.executeBatch('files', batch, function (error, result, response) {
      if (error) {
        context.log.error(error);
      }

      context.log.verbose(result);
    });
  }

  context.done();
};
Let’s walk through the different pieces of the script.
Load dependencies
Start, by loading the necessary dependencies:
const axios = require('axios').default;
const crypto = require('crypto');
We’ll use axios to execute web requests to download files and trigger notifications. axios makes it way easier than using the raw HTTP calls from Node.js. We also need the crypto functions so that we can calculate the hash for the downloaded file contents.
Reference input binding
Extend the function’s function to include the Table parameter name you copied previously. This argument will contain all files that you’ve added to the storage account.
module.exports = async function (context, timer, inFilesTable) {Store information about changed files
Next, let’s define two arrays for storing information about changed files:
// array of files that have changed
const modifiedFiles = [];
// array of notifications
const modifiedFilesNotifications = [];
We need two arrays because if we’ve just added a file to the storage account, its hash (null) will not match the hash retrieved from GitHub and would result in you getting a notification that the file has changed, while it’s not quite the case. Storing information about the file that changed and files for which we should issue a notification allows avoiding the unnecessary initial notification.
Retrieve file contents
Then, let’s retrieve contents of all files we’re tracking:
// retrieve file contents
const requests = inFilesTable.map(file => {
  // if it's a github URL, make it point to the raw file to avoid comparing github UI changes
  file.rawUrl = file.url
    .replace('//github.com/', '//raw.githubusercontent.com/')
    .replace('/blob/', '/');
  return axios.get(file.rawUrl);
});
const results = await Promise.allSettled(requests);
Before we configure the web requests, we rewrite the GitHub URL. That way, we’ll download the raw file contents and won’t issue change notifications if the GitHub UI changes.
We download file contents in parallel using the Promise.allSettled function. That way, even if we can’t download some files (if they’re for example renamed, removed or there was a network error), the files that we could download will be processed without failing the whole execution.
After all promises have been completed, we’ll iterate through the results:
results.forEach(result => {
  // ...
}
Logging failed requests
The first thing we need to do is to check if the particular request succeeded or not.
if (result.status !== 'fulfilled') {
  context.log.error(result.reason.message, result.reason.config.url, context.invocationId);
  return;
}
We do this by examining the status property. If the particular request failed, we log it, so that afterward we can see that something went wrong and we have sufficient information to determine if it was something intermittent or rather the URL is no longer valid.
Retrieve matching file
Next, let’s retrieve the information about the file matching the current response. We need it to compare the new file hash as well as for passing the information to notifications we send in case the file has been modified.
const requestedUrlPath = result.value.request.path;
const matchingFile = inPagesTable.find(page => page.rawUrl.indexOf(requestedUrlPath) > -1);
if (!matchingFile) {
    context.log.error('Matching file not found in database', requestedUrlPath, context.invocationId);
    return;
}
We need to look up this information to avoid relying on the order in which promises will be resolved.
Check if the file has been modified
Now that we have contents for each of our tracked files, let’s calculate its hash and compare it to the one we retrieved previously:
const hash = crypto.createHash('sha512');
hash.update(result.value.data);
const currentHash = hash.digest('hex');

context.log.verbose('Comparing file hash', requestedUrlPath, context.invocationId)
context.log.verbose('Old hash', matchingFile.hash, context.invocationId);
context.log.verbose('Current hash', currentHash, context.invocationId);
if (matchingFile.hash !== currentHash) {
  if (typeof matchingFile.hash !== 'undefined') {
    context.log('File has changed', matchingFile.url, context.invocationId);
    modifiedFilesNotifications.push(matchingFile);
  }
  else {
    context.log('Initial hash retrieved', matchingFile.url, context.invocationId);
  }

  matchingFile.hash = currentHash;
  modifiedFiles.push(matchingFile);
}
else {
  context.log('File not changed', matchingFile.url, context.invocationId);
}
If the file hash is different from the one we stored previously, we update its hash and add it to the array of files that should be updated in the database. Additionally, if the hash has been set previously, we add the file to the array of notifications.
Notify of file changes
Once we processed all files, we’re ready to send notifications to our previously configured logic app.
// send notifications for changed files
const notificationUrl = process.env.NotificationUrl;
const notificationRequests = modifiedFilesNotifications.map(file => axios.post(notificationUrl, {
  title: file.title,
  url: file.url
}));

const notificationResults = await Promise.allSettled(notificationRequests);
notificationResults.forEach(result => {
  if (result.status !== 'fulfilled') {
    let fileChangedUrl;
    try {
      fileChangedUrl = JSON.parse(result.reason.config.data).url;
    }
    catch { }
    context.log.error(result.reason.message, result.reason.config.url, fileChangedUrl, context.invocationId);
    return;
  }
});
We start with retrieving the URL of the logic app from the NotificationUrl environment variable that’s populated by the application configuration entry we added when creating the function app.
Next, we create a POST request matching the schema configured in the logic app.
Finally, we issue all requests, again, not breaking the execution in case any of the requests failed. Instead, we log failed requests for further investigation.
Update hashes of modified files
The last thing left is to update the hashes of modified files. Unfortunately, the output Azure Table Storage binding doesn’t support updating entities, so for that, we’ll need to update it using the Azure Storage SDK.
// update modified files in the database
if (modifiedFiles.length > 0) {
  const azure = require('azure-storage');
  const tableSvc = azure.createTableService(process.env.filetracker_STORAGE);
  const batch = new azure.TableBatch();
  modifiedFiles.forEach(file => {
    batch.mergeEntity({
      PartitionKey: { _: file.PartitionKey },
      RowKey: { _: file.RowKey },
      hash: { _: file.hash }
    }, { echoContent: true });
  });
  tableSvc.executeBatch('files', batch, function (error, result, response) {
    if (error) {
      context.log.error(error);
    }

    context.log.verbose(result);
  });
}
We start by loading the SDK. We do this here since it’s a pretty expensive operation, that would unnecessarily slow down the function’s execution. Lazy-loading the SDK only when it’s needed, will help you speed up the function.
Next, we create an instance of table service, passing the connection string to the table storage with our files. The name of the Storage account connection you noted earlier when configuring the input binding in your function app.
Then we create an update batch so that we can update all entities in a single request, saving us some time. For each file to update, we specify its partition key, row key, and the new hash.
We finish, by executing the batch and logging errors if any.
Install dependencies
While the function’s code is complete, you need to install dependencies, before you will be able to run it. In our code, we referenced axios and azure-storage which we need to install in the function for the code to run without errors.
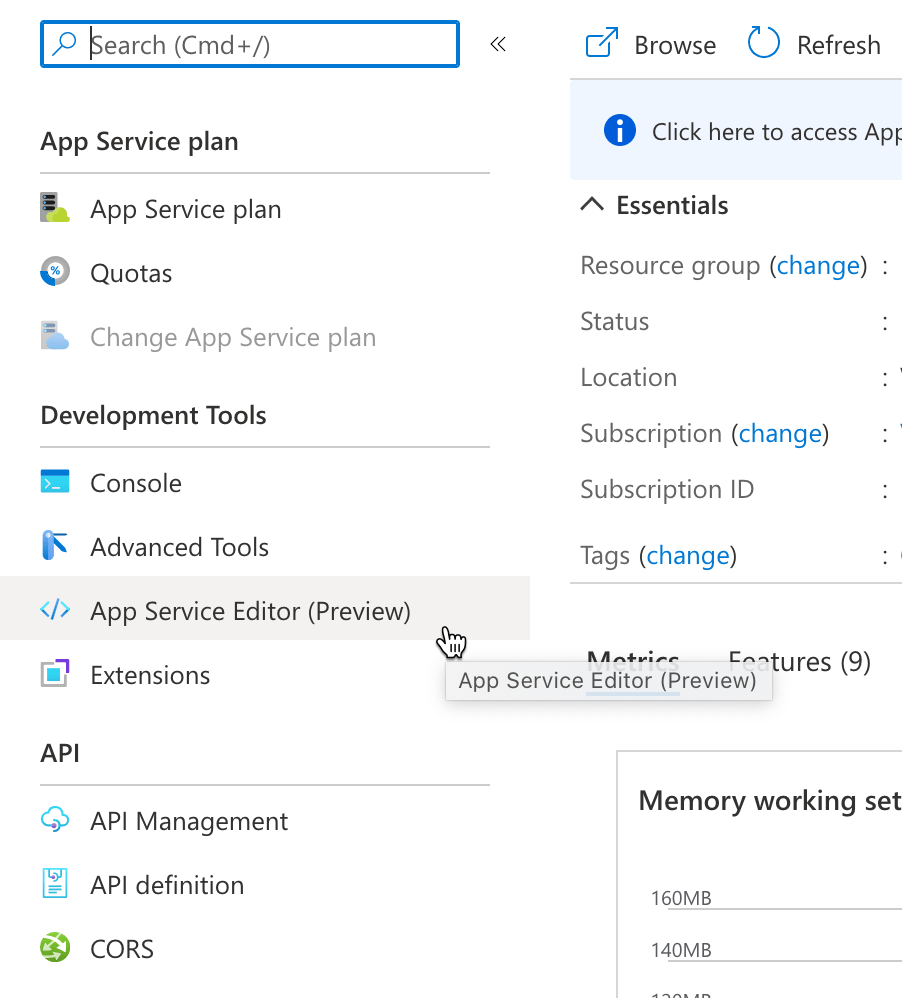
To install dependencies, from the function’s menu, select the App Service Editor.
In the App Service Editor, from the side menu, select the Open Console option.
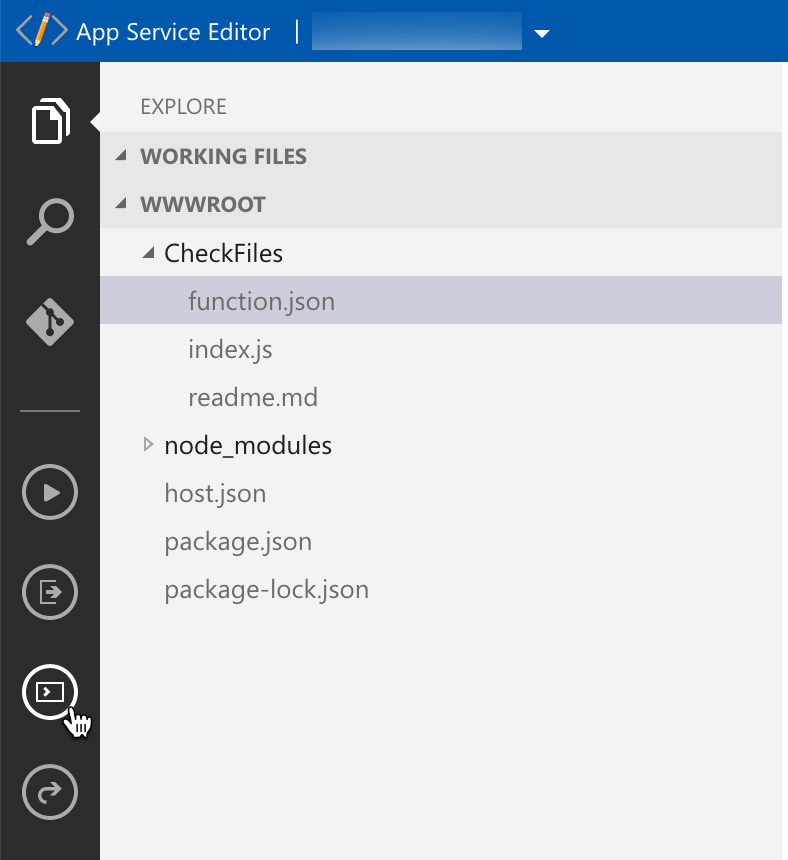
In the console execute:
npm i axios azure-storageAfter the installation is completed, you’re ready to test your function.
Summary
That’s it! With a couple of steps, you’ve built a scheduled process that runs in the cloud, monitors specified files for changes, and notifies you when they do on Microsoft Teams.
