Manage the Office 365 CDN using the Office 365 CLI
Using the Office 365 CDN, you can optimize serving static assets to your users. While this capability is disabled by default, you can easily enable and manage it using the Office 365 CLI.
Office 365 CDN
As a part of your Office 365 subscription, Microsoft offers you the Office 365 CDN: a capability that can help you improve the performance of your Office 365 portal. If your organization is distributed over multiple physical locations or your colleagues work remotely a lot, using the Office 365 is a convenient way to speed up loading static assets such as scripts or images. Office 365 CDN doesn’t offer you any advanced configuration capabilities that you would find in other dedicated CDN services. However, its operational simplicity and the fact that it’s a part of your existing subscription without any additional costs, make it a very attractive option for many organizations.
There are two types of Office 365 CDN: Public and Private.
Files published through the Office 365 Public CDN get permanent URL and are available to anonymous users. Public CDN is perfect for hosting static assets such as stylesheets, images and scripts that don’t carry any confidential information and to which you want to be able to refer to using a URL from your solutions.
Files published using the Office 365 Private CDN are meant for use in content pages in SharePoint and only users with sufficient permissions can access them. The Private CDN is perfect for publishing images that you link in the pages on your portal.
No matter which CDN type you’re using, SharePoint automatically takes care of rewriting SharePoint URLs to their CDN equivalent if the Office 365 CDN is enabled.
If your organization is using solutions built on the SharePoint Framework, starting from version 1.4.0, SharePoint Framework packages (.sppkg) by default include web parts’ and extensions’ script bundles. When deploying these packages to your tenant, these scripts will be deployed to an automatically configured location in your tenant. If you enable the Office 365 CDN, your SharePoint Framework solutions will be automatically served from the Office 365 CDN.
Managing the Office 365 CDN
By default, the Office 365 CDN is disabled and you can easily enable it using the Office 365 CLI.
Connect to Office 365
Start with connecting to your Office 365 tenant, by executing in the command line:
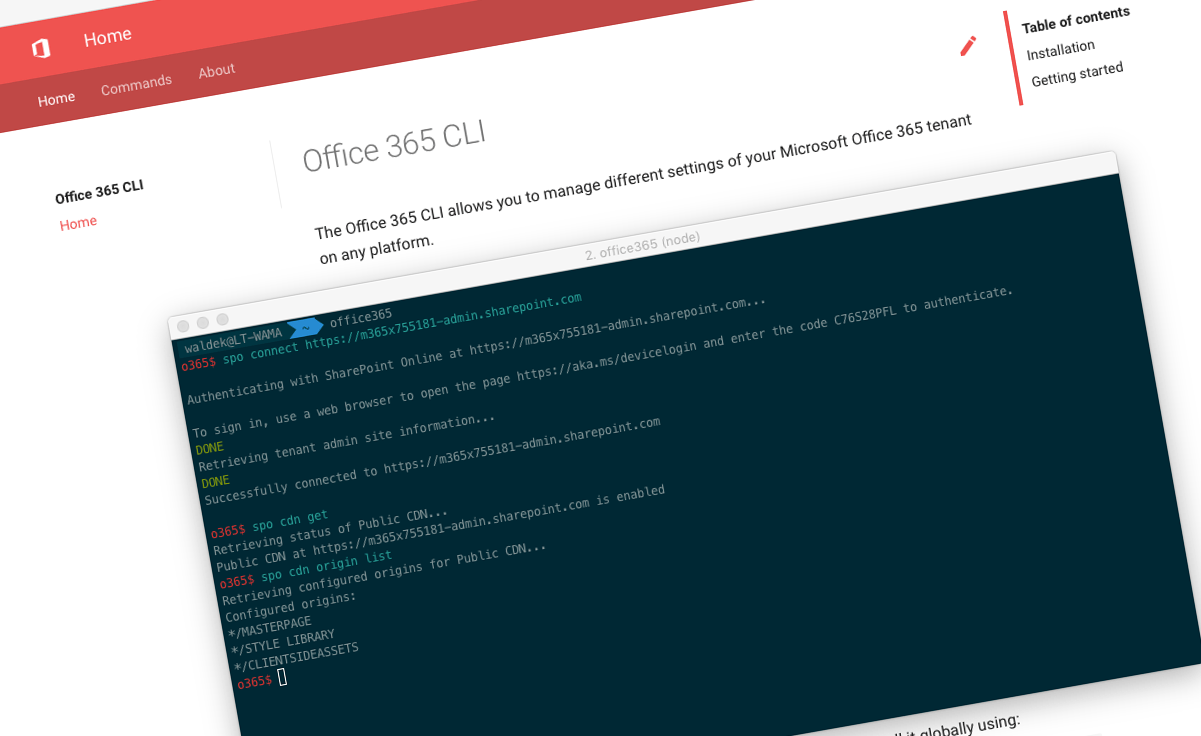
o365 spo connect https://contoso-admin.sharepoint.comWhere https://contoso-admin.sharepoint.com is the URL of your tenant-admin site.
Verify the current state of the Office 365 CDN
Tip: The following instructions are based on the Office 365 Public CDN. To manage the Private CDN, use the same commands, but set the value of the
typeoption toPrivate.
Next, verify the current state of the Office 365 CDN in your tenant. To see, if the Office 365 Public CDN is enabled, type:
o365 spo cdn get --type Publicfalse reply indicates that the CDN is disabled, whereas true indicates that it’s enabled.
A more user-friendly response is available by adding the --verbose flag:
$ o365 spo cdn get --type Public --verbose
Retrieving status of Public CDN...
Public CDN at https://contoso-admin.sharepoint.com is disabled
Enable Office 365 CDN
To enable the Office 365 Public CDN, execute in the command line:
o365 spo cdn set --type Public --enabled trueManage Office 365 CDN origins
Files from designated locations in your Office 365 tenant are published to the Office 365 CDN. These locations are referred to as origins. You can specify origins using a server-relative URL or a wildcard path. Any file stored in a SharePoint document library matching one of the origins, will be published to the Office 365 CDN.
To see what origins you have configured on your Office 365 tenant, execute:
o365 spo cdn origin list --type PublicBy default, you will see a list similar to the following:
*/MASTERPAGE
*/STYLE LIBRARY
*/CLIENTSIDEASSETS
As you can see, all these origins are defined using a wildcard path. This means, that files in the Master page gallery, Style library and the Client-side assets library in every site collection in your tenant will be published to the Office 365 Public CDN.
To add more locations to the list of origins, execute:
o365 spo cdn origin add --origin */CDN --type PublicWhere the value of the origin option is either a wildcard path or a server-relative URL matching a document library in your Office 365 tenant.
To remove a specific CDN origin, execute:
o365 spo cdn origin remove --origin */CDN --type PublicManage Office 365 CDN policies
Using the Office 365 CDN policies you can control which files are published to the Office 365 CDN.
First, using the IncludeFileExtensions policy, you can control which file extensions are published to the CDN. By default, for the Public CDN the policy is configured to include .css, .eot, .gif, .ico, .jpeg, .jpg, .js, .map, .png, .svg, .ttf, and .woff files. If you would like to register another extension, such as .html, execute in the command line:
o365 spo cdn policy set --policy IncludeFileExtensions --value CSS,EOT,GIF,ICO,JPEG,JPG,JS,MAP,PNG,SVG,TTF,WOFF,HTML --type PublicImportant: When setting the value of an Office 365 CDN policy, you replace the existing value with new one. So if you want to add to an existing value, you have to include it in the newly set value.
Next to choosing which extensions should be published to the Office 365 CDN, you can specify the classification of sites, that should be excluded from the CDN. Even if one of the configured origins would match a path inside such site, if the site is excluded due to its classification, no files from that site collection will be published to the CDN.
For example, to exclude sites classified as HBI from the Office 365 CDN, execute in the command line:
o365 spo cdn policy set --policy ExcludeRestrictedSiteClassifications --value HBI --type PublicTo see which CDN policies are currently configured in your tenant, execute:
o365 spo cdn policy list --type PublicSummary
Using the Office 365 CDN, organizations that work across different geographies can improve the performance of their Office 365 portals. With the Office 365 CLI, you will be able to quickly enable the Office 365 CDN in your tenant and manage its settings no matter if you are on Windows, macOS or Linux. For more information on using the CLI see the documentation at https://aka.ms/o365cli.
Remember, using a CDN is no performance silver bullet and you should closely evaluate if it’s beneficial for you to use it or not. For more information about the Office 365 CDN, see the official documentation.