
Mavention.nl v3: How we did it?–The authoring site
In the previous article in the Mavention.nl v3: How we did it? series I showed you the landscape of our new website built with SharePoint 2013 and which different sites we are using. Starting from this part I will tell you more about how we leveraged all the different capabilities of the SharePoint 2013 platform for all the different sites in our landscape. To begin with: how did we build our authoring site?
Planning for the authoring site
In my previous article describing the landscape of our new public-facing website I showed you that we had a separate authoring site and three publishing sites.
From the functional point of view we wanted to have a multilingual site so that the majority of our visitors, who are not necessarily Dutch-speaking, would actually be able to read the information on our website. We wanted to have an authoring site that would allow us to manage multilingual content without too much effort. Additionally, considering Search Engine Optimization, we wanted preferably to have the language-specific sites mapped to their own country code top level domains (ie. Dutch to mavention.nl and English to mavention.com). By using country code top level domains we would theoretically be able to benefit of the local search results which are mapped to specific country codes in domain names.
Authoring content for our website should be easy and intuitive. Although we are all geeks here at Mavention and consider ourselves tech-savvy, we have no dedicated team to maintain our website and we do all of that ourselves. This is exactly why editing content should be straight-forward even for those of us who do it very rarely.
Last but not least, and this is not specific to the authoring site but applies to the whole mavention.nl landscape, we wanted to have a highly-optimized website where we get the very most of the functionality that SharePoint 2013 offers for public-facing websites.
Designing for the authoring site
When designing the landscape of our new public-facing website we chose to have a separate Site Collection for content authoring. The main reason for separating content authoring from publishing is that we always try to have all the websites that we build as optimized as possible. In this context optimization means not only optimizing the code but also optimizing the site for the visitors (ie. not loading anything that they can’t use like Ribbon), for search engines (SEO), for accessibility, for performance and not to forget optimizing for the content authors which is often forgotten in the process of designing for a public-facing website on the SharePoint platform.
Optimizing for the visitors
Although the authoring site is not available to anonymous users it allowed us indirectly to optimize our new website for the visitors. Thanks to the separation of the content authoring experience from the content viewing experience we wouldn’t need to load components that are of little use to our visitors.
Optimizing for search engines
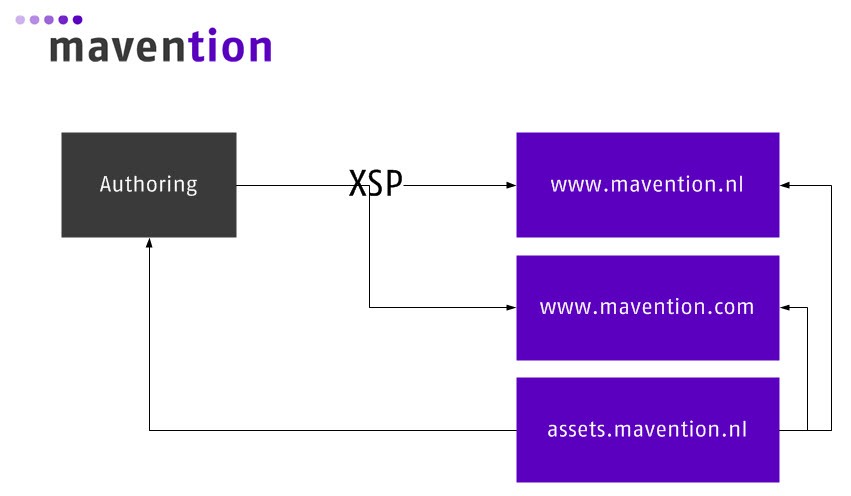
On our new website we’re using the new Cross-Site Publishing (XSP) capability. When using XSP the physical content (ie. Publishing Pages and List Items) are crawled by SharePoint Search, indexed and can be published based on the information from the search index. If we were using one and the same site for content authoring and publishing we would be having the risk that if someone managed to figure out the URL of the physical page, he would be able to open that page. While content published using XSP is displayed using the Content By Search Web Part, physical pages are displayed using Page Layouts. Those two mechanisms work differently and if you wanted to ensure that both of them look correctly for the visitors, you would have to double the efforts.
Ensuring that the content looks correctly is not the only concern when having a single authoring and publishing site when using Cross-Site Publishing. Pages displayed using Page Layouts and using XSP would have two different URLs. Should public search engines somehow discover the physical URLs they might index the same content using two different URLs what in the worst case could lead to halving the page rank.
The choice for separating out the authoring site in our scenario has been made easier for us when we decided to have Dutch and English website both mapped to their own country code top level domain. Because mavention.nl and mavention.com are separate Site Collections, having a separate authoring site allows us to have centralized content authoring environment for both languages.
Optimizing for accessibility
The authoring site is available to our team only and since none of us has any kind of disabilities that should be taken into account we didn’t have to put any additional effort for optimizing the authoring site for accessibility. The publishing site however is a whole different story.
Our public-facing website is available to everyone in the world assuming they have Internet access. It’s impossible for us to know who will visit our website, what device they will be using and what disabilities they might be having. In order to make the content of our public-facing website accessible to as broad audience as possible, we have spent some time designing for accessibility (more about that in later articles of the Mavention.nl v3: How we did it? series). The important thing to note here is that separating out the authoring site from the publishing site gave us a kind of card blanche with regard to which standard SharePoint 2013 components we have to us and which we can remove.
Optimizing for content authoring
Separating out content authoring from content publishing offers great flexibility with regard to optimizing the publishing site. One of the consequences of such separation however is the disconnect between the experience and the inability to “see” how the content is going to look like once published. With the default experience the only way for us to preview the content would be to have it published and picked up by search. And even though this is nearly instantaneously thanks to the continuous crawl it doesn’t feel like the right way to preview the content. To make it easier for us to see how the content is going to look like once published we have decided to implement a preview mode and some additional content hints in the authoring site.
Building the authoring site
From the technical perspective our authoring site is a regular Publishing Site as you know it from SharePoint 2010 or even SharePoint 2007. To support all kinds of information on our website we have created some custom Site Columns and Content Types and to be able to manage multilingual content we used Variations – nothing that you wouldn’t have done in the past.
Structure of the mavention.nl authoring site
Following is the schema that presents the structure of our authoring site.

Given the amount of content that we have on our website we decided to store all of the content in a single Pages Library (one for each language). Should the volume of our content increase we could always separate out content such as news or blog posts. The great thing is that because we are using Cross-Site Publishing changing the structure of the authoring site has no impact whatsoever on the publishing site, such as changing links and location of where content is published.
To publish the content using XSP we have published each Pages Library as catalog. Once again because all of the content is stored in a single Pages Library we only had to publish one Catalog for each language what simplifies our configuration. The great thing is that should we separate out different types of content on the authoring site in the future, we can always publish additional catalogs and have them merged into a single content source on the publishing site without too much effort.
Variation site Welcome Page
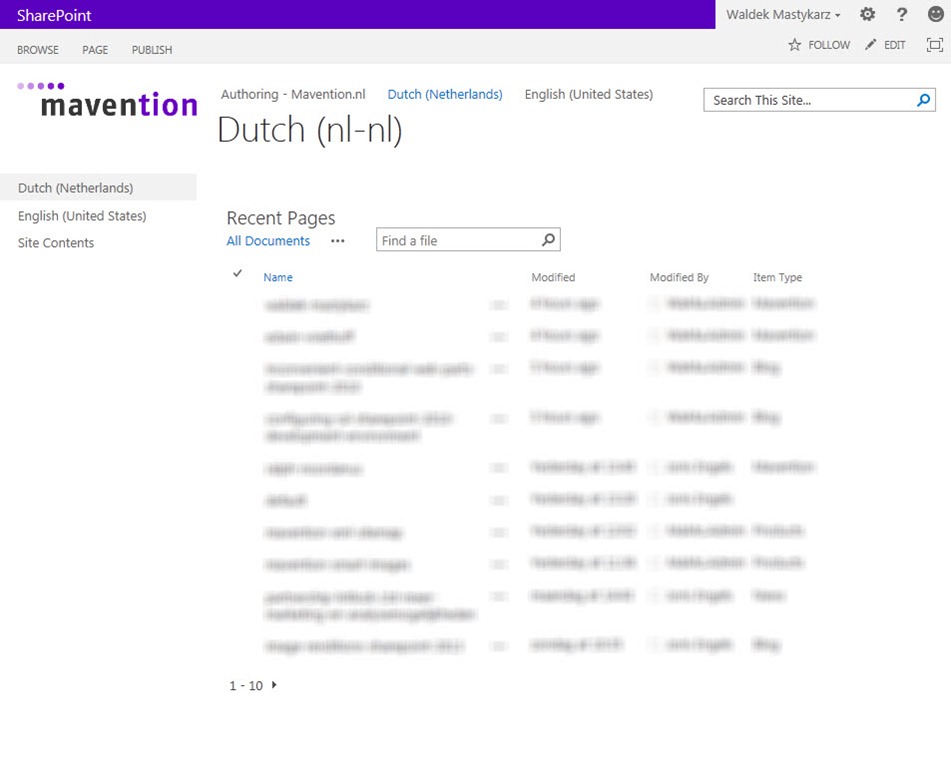
The authoring site is all about content creation and management. This is why we replaced the default content of the Welcome Page with an overview of the 10 most recently modified pages.

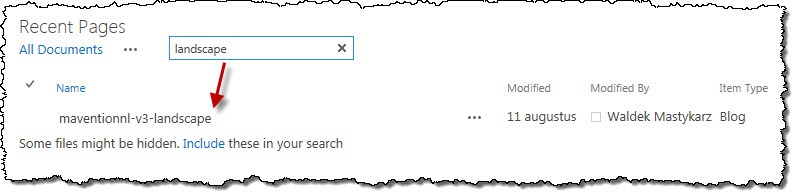
The great thing is that this is not just a static overview. Using the standard Pages Library view we can sort pages, view other pages or even look for a specific page using the search box:
All of this is available using the standard SharePoint 2013 functionality.
As I mentioned before we have no separate content management team here at Mavention but in some organizations you could turn the Welcome Page of the authoring site into a full dashboard including things like publication agenda, tasks or maybe even web analytics information.
Publishing with Publishing Pages
On our new website we’re using the Cross-Site Publishing capability. The great thing about it is that it gives you great flexibility in terms of how your content is structured in the authoring site. Even though you might be publishing content to a public-facing website when using Cross-Site Publishing all of your content on the authoring site could be as well stored as List Items in a Custom List!
For the mavention.nl website we chose to use Publishing Site with Publishing Pages in order to enrich the content editing experience. Although it’s not necessary from the XSP perspective it gave us the ability to enhance the content authoring experience. As a result all of our Content Types inherit form the standard SharePoint Page Content Type and for each one of them we created a Page Layout.
Content sections
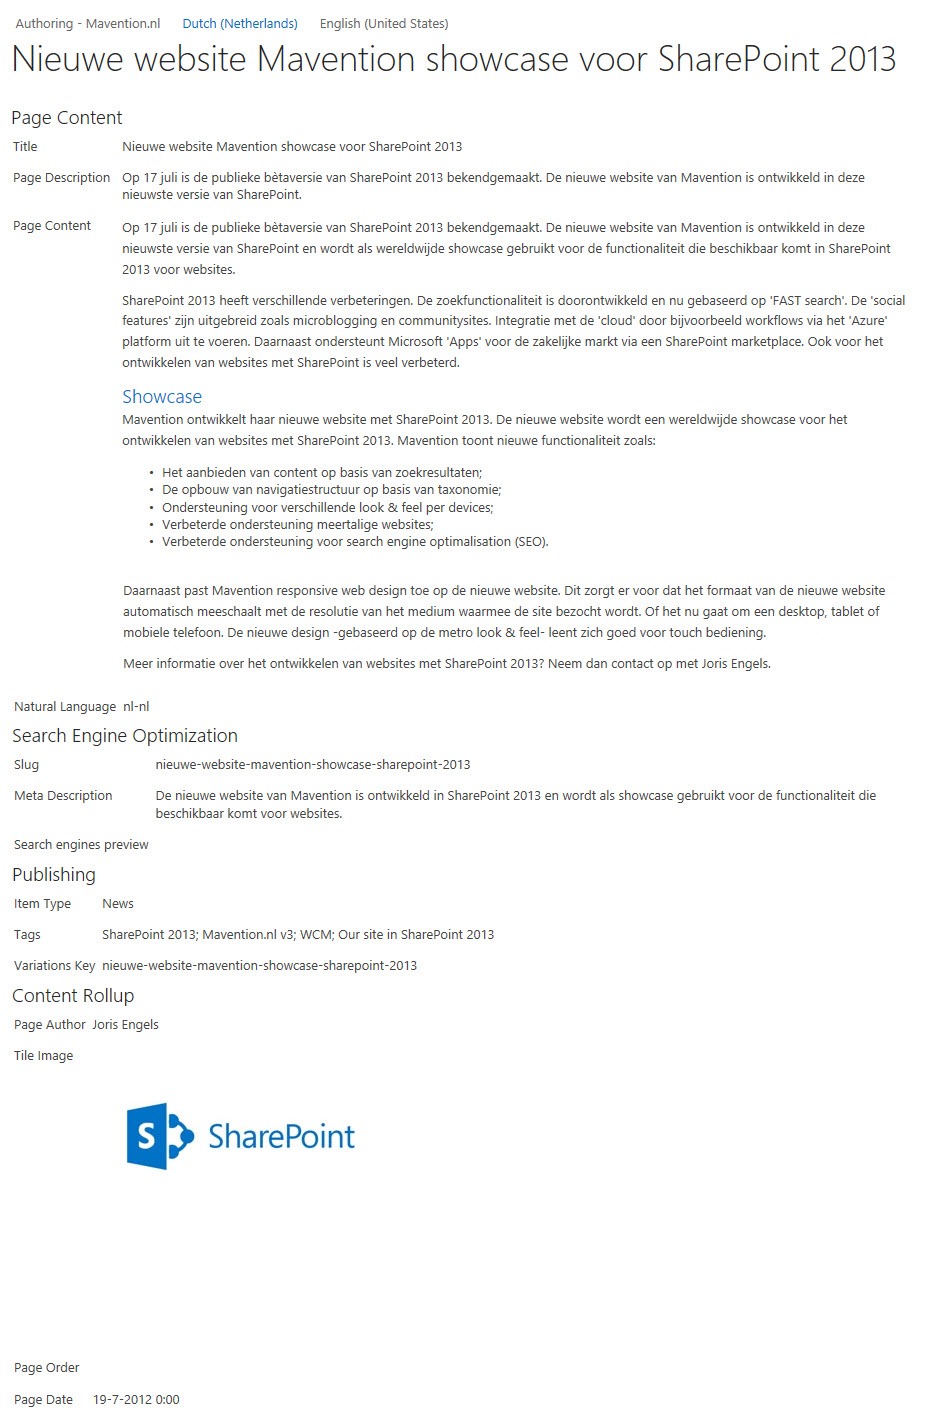
When crafting Page Layouts for our website we constantly tried to keep in mind what information would we need when creating new pages. With that we decided to put all relevant fields directly on the Page Layout so that we can quickly see the contents and the metadata of every page without editing it.
When you switch to the edit mode for the first time you will see a few sections only:
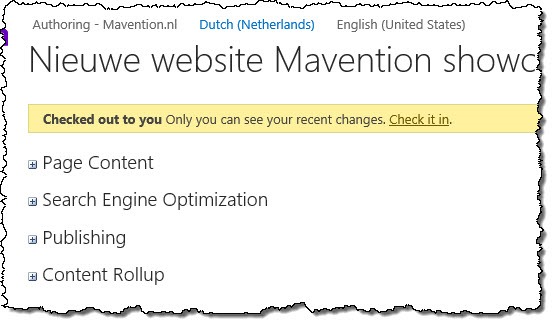
Instead of showing all input fields at once we decided to group them in sections to better keep overview of which field is for which purpose. Either by clicking on the plus icon or the section’s header you can toggle the section and see all its fields.
Using cookies we store the information about sections that were open for the last time so should you for example need to edit SEO properties of some pages every time you would go to a page and edit it, the SEO section would be open by default.
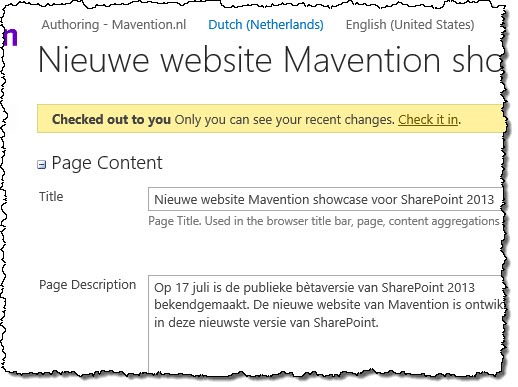
Content description
As I mentioned before we do all of content management ourselves here at Mavention and some of us do it less often than others. Additionally, especially recently and for the near future, our website has been changing a lot. So in order to keep it clear to everyone which field serves which purpose we have included some description.
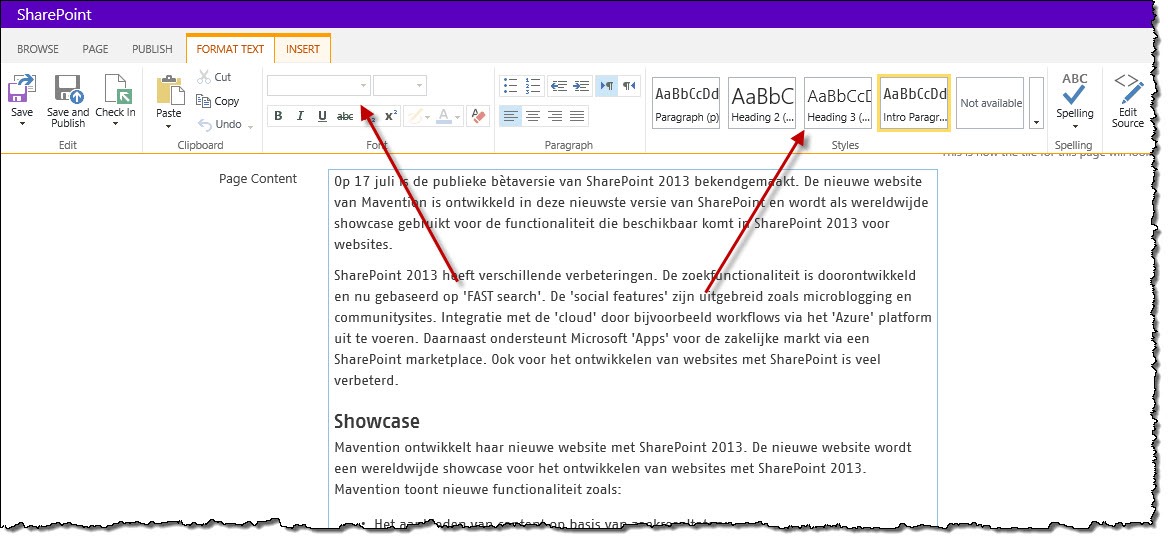
Rich Text Editor
The largest share of the content on our website is Rich HTML content. Because we have a separate authoring site but also due to our custom branding we want to ensure that the markup used in the What You See Is What You Get (WYSIWYG) editor is consistent with how the content will look like once published.
We have started with setting the width of the Rich HTML field to the width of the content area on the publishing site. Next we have removed all in-line content formatting functionality and associated our custom prefix to ensure that only our own styles that are implemented on the publishing site can be used in the editor. Following is the control snippet that reflects our Rich HTML editor:
<PublishingWebControls:RichHtmlField FieldName="PublishingPageContent" DisableInputFieldLabel="true" HasInitialFocus="True" AllowFontColorsMenu="false" AllowFontSizesMenu="false" AllowFontsMenu="false" PrefixStyleSheet="mv-" MinimumEditHeight="400px" runat="server"/>With that whenever you enter the editor you will see all in-line formatting buttons disabled and the Styles gallery contains only styles that are implemented on the publishing site.
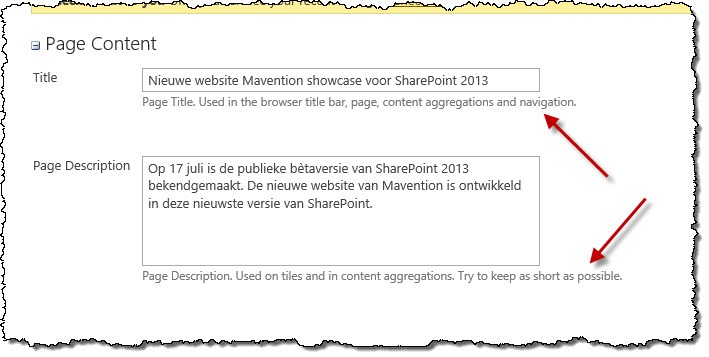
Tile preview
On our website we’re using tiles with fixed dimensions. One of the consequences of that is that we have limited amount of space to display the content there. To verify that the content fits when displayed in a tile we have included a preview mode that refreshes every time you change the Page Title or Page Description.

And although this preview is not fool-proof it allows us to quickly verify whether the content fits the standard tile area or not without having to publish the page first.
SEO preview
Similarly to the Tile preview we have included a preview for the organic search result snippet so that when we are editing content we can get a better understanding of how our content might end up in search results.
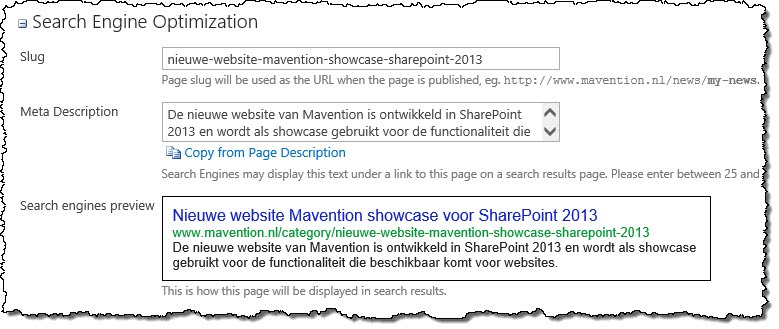
The contents of the snippet are based on the value of the Page Title, Meta Description and the Slug fields and change along with the content. Once again such preview is not fool-proof and is definitely no guarantee that search engines will display that exact content but it’s yet another tool to help us manage content.
Copying content
When editing content some metadata resemble other a lot. In our case for example Page Description and Meta Description are much alike. To simplify working with similar content we have added Copy from buttons where applicable which allow us to copy content from another field on a page with a single mouse click.

Content preview
After we’re done with editing the content we would like to preview the page to see if everything looks all right. This is especially important for us given the fact that we are using a separate authoring site that doesn’t reflect the branding of the publishing site.
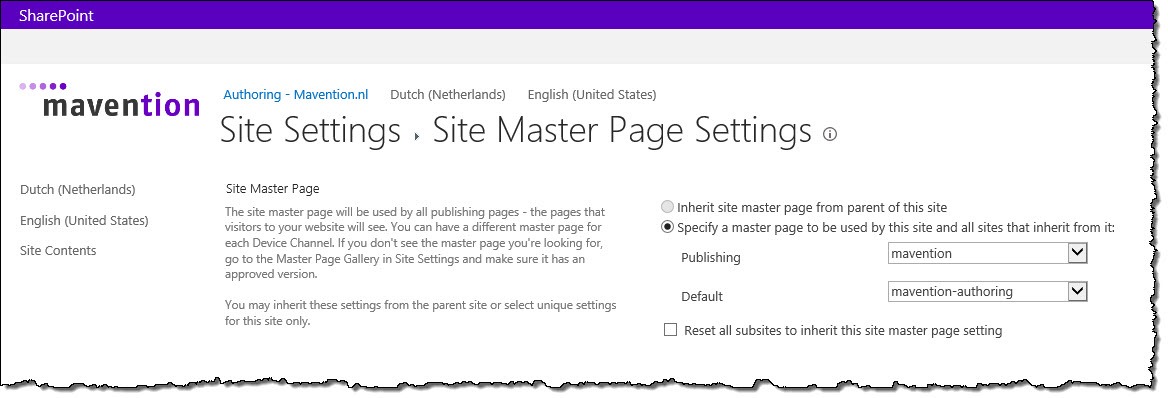
To offer the preview capability we have used SharePoint 2013 Device Channels. Next to the Default channel we have created another channel called Publishing.
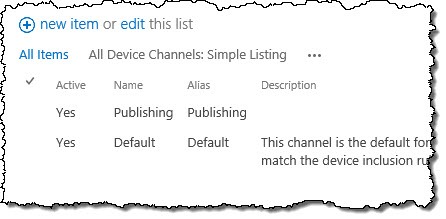
Then, in the Master Page configuration we assigned the standard SharePoint 2013 Master Page to the Default Channel and our publishing Master Page to the Publishing Channel.
Finally, in order to preview the right content, we have used Mobile Panels where the default content is wrapped in a Panel targeted at the Default Channel and the content that is displayed in the preview mode is targeted at the Publishing Channel, like:
<PublishingWebControls:MobilePanel IncludedChannels="Default" runat="server">
    <!-- Default content goes here -->
</PublishingWebControls:MobilePanel>
<PublishingWebControls:MobilePanel IncludedChannels="Publishing" runat="server">
    <!-- Preview content goes here -->
</PublishingWebControls:MobilePanel>
Whenever we want to preview a page all we have to do is to show the Ribbon, activate the Page tab and from the Page Actions group open the Preview drop-down list.
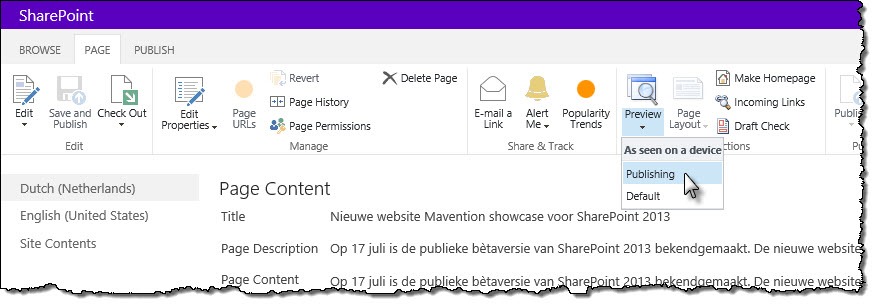
By choosing the Publishing option we can see how the content is going to look like once published.

Notice how the menu on the left and the tile on the right are replaced by placeholders. Because those areas are filled by content specific to the publishing site and which comes from Managed Navigation and Search we cannot surface it in the authoring site. However to give the content author an idea of how the page will look like we use empty blocks instead.
Summary
In this article I have showed you the different considerations that we took into account when building the authoring site for our new mavention.nl website built on the SharePoint 2013 platform. We have done quite some work ensuring that we can get the most out of the separate authoring site and be able to manage content of our website without too much effort. In the next part of the Mavention.nl v3: How we did it? series we will take a closer look at the publishing sites. Stay tuned!