The No Activation Deployment Configuration: use it or not?
If you have worked with the new Visual Studio 2010 SharePoint Developer Tools you probably know that one part of the cool pieces of the new tools is the ability to specify the steps executed while deploying SharePoint Solution Packages on your development machine. These Deployment Configurations are fully configurable: you can either use one of the two existing configurations or create a new one that fully suits your needs. By default two Deployment Configurations are available Default and No activation. The only difference between those two is that the No activation configuration doesn’t activate any Features after the solution has been deployed. If the difference is that small: why do we need two configurations?
Packaging and Deployment behind the scenes
The new Visual Studio 2010 SharePoint Development Tools simplify the process of developing SharePoint Solutions. You no longer have to manually write DDF and Manifest Files and worry about the packaging. The new tools do all of this automatically for you and all you need to do is to configure the Package and some properties and hit Package.
Packaging is not the only thing that the tools do for you. In most cases, you not only want to package your changes, but also would like to see them working in SharePoint. In order to do that you have to deploy your Package to SharePoint. After you choose Deploy from the Project menu the Visual Studio 2010 SharePoint Development Tools will build, package and deploy your project to SharePoint. During the deployment process the tools will use the Deployment Configuration that you selected: either one of the two available out of the box or a custom one that you created yourself.
By default the project is set to use the Default Deployment Configuration which retracts and removes the old Package and adds and deploys the new Package and activates all Features. What the Default configuration doesn’t state explicitly is that prior to retracting the old Package it deactivates all Features. You might wonder why this might be important to you…
All or nothing
If you worked on a medium to big scale SharePoint solution (let’s say more than one project, a Site Definition and a couple of Features), you might have noticed that the Default configuration always activates all Features from the Package. That includes Features that are hidden, stapled or meant to be activated together with a Site Definition or some other Features. Imagine that you have a custom Site Definition in your project for a subsite that ships with some custom navigation settings and home page configuration: after you use the Default configuration that Feature will be activated on the web specified in the Project Properties Site URL field – whether you want it or not. All Features get activated. This might be a good thing for small solutions but might get complex and confusing for larger ones. So what’s the alternative?
No activation: but I do want activation
Another Deployment Configuration available out of the box is the No activation configuration. As the name says: it doesn’t activate anything. So all it does is retracting and deleting the old Package and adding and deploying the new one. Sounds perfect doesn’t it? Well, not quite…
If you read carefully, you might notice that during the solution retraction the tools also deactivate all Features. So if you have a fully working site before the deployment, what you see afterwards is not what you might have expected. Let’s take a look at an example.
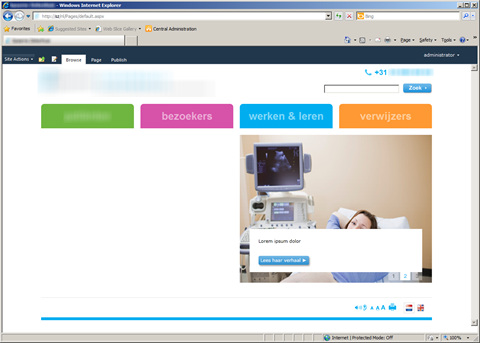
This how my site looks like before deploying a Package using the No activation Deployment Configuration:
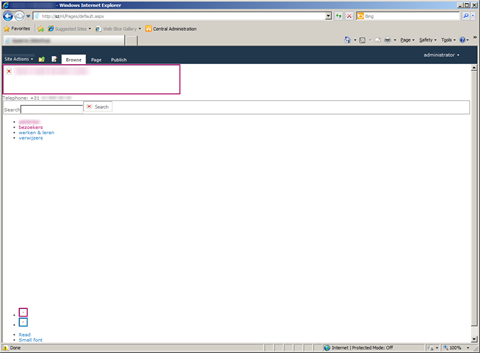
Now let’s take a look at the results after the deployment process:
As you can see the branding has been reset to default (not surprising since all the branding files were removed during the conflict resolution process). Not really what you expected, is it?
So what is the purpose of using the No activation Deployment Configuration in the first place? A good example of a scenario where the No activation configuration becomes very useful is debugging Feature Receivers. Using the No activation configuration you would deploy your Package to SharePoint, go to the Site (Collection) Features page, activate your Feature and debug the Feature Receiver.
Solution (for now)
Reading all the above you might start thinking that it’s all useless and we’re back to where we were with SharePoint 2007, meaning doing everything manually… Not quite. The great thing about the new tools is that they are configurable. If something doesn’t work as you want it to, you can change it to suit your needs. As for the Deployment Process it would be the best if you could choose which Features you want to activate upon Package deployment. Unfortunately such functionality is not available at this moment. What you could do however, is to activate your Features in the Post-Deployment Commands what would allow you to achieve the desired results.
Once again it’s not about whether what’s there out of the box is right or wrong. It’s about knowing what it does and when you can get the most of it and when you need to be creative and benefit of what the toolbox has to offer.
Technorati Tags: SharePoint 2010,Visual Studio 2010

