
Optimize your SharePoint Framework files delivery for performance
Using the standard toolchain you can easily deploy your SharePoint Framework files to Microsoft Azure. Here is what you should do next to ensure that users will load these files as quickly as possible.
It’s not in SharePoint anymore
In the past, when building SharePoint customizations, Microsoft recommended us to integrate with SharePoint as closely as possible. That way we would leverage its infrastructure and services. However, when building SharePoint Framework solutions, things look differently.
SharePoint Framework solutions consist of two main parts: a package with a manifest, deployed to the App Catalog and scripts and asset files deployed to a web server. The manifest contains a URL that points to the location where the web part files are stored. And these files can be stored anywhere: from an Apache server under your desk to a specialistic CDN.
As a part of the toolchain, the SharePoint Framework offers you the ability to deploy your web part files to Microsoft Azure Blob Storage. As it’s supported out of the box, this hosting option is extremely convenient to use. What’s more, with a few additional configuration settings, you will ensure that your web parts load quicker and your costs for using the Azure Blob Storage are lower.
Loading files from the Azure Blob Storage
When uploading files to the Azure Blob Storage, you can configure the container to be publicly accessible. Every file in that container gets a URL, such as https://yourstorageaccount.blob.azure.com/yourcontainer/yourfile.js, that you can use in the browser to load the file. This is the setup for use with SharePoint Framework solutions.
Optimize how files from Azure Blob Storage are served
By default, Azure blob storage just serves your files the way they have been uploaded. But did you know that there are settings that you can configure, to change how your files are served?
Configure far future expiration
When building web applications, one of the frequent recommendations is to allow browsers to cache your application files for as long as possible. The first time the user opens your application, the necessary application files are downloaded and stored for a long period of time in the local cache. If done properly, the next time user opens your application, the web browser won’t even issue a request to the web server to check if the files have been updated, it will simply load the files that it has already stored on the disk, and that’s fast.
Using far future expiration on your static files offers you a number of benefits. First of all, your application loads significantly faster, because the web browser doesn’t need to download any files from the web server. Then, you decrease the costs for using your web server, because fewer requests are issued and fewer files are served. Finally, you decrease the bandwidth usage because fewer files have to be downloaded by the web browser. But there are some challenges too.
If the browser never contacts the web server to check for updates, how do you update your application? There are a number of ways you can go around it. No matter which one you use, the premise is, that file contents never change. And when they do, it’s a different file, with a different URL. This is exactly why, whenever you change the code of your SharePoint Framework solution, the generated bundle has a different hash attached to its file name.
You can configure how long browser should cache your files using the Cache-Control response header. The value of that header can be set in Azure Blob Storage on each file separately, which gives you granular control of the configuration of your application. The CacheControl value can be set directly when uploading a file to Azure Blob Storage, but since the SharePoint Framework gulp task doesn’t do it, you need to do it yourself.
There are a number of ways in which you can set the value of the CacheControl property on a file in Azure Blob Storage. One not mentioned in the docs, is using the Azure Storage Explorer. After connecting to your storage account, open your container, click right on the file you want to update, and from the context menu choose Properties…

In the dialog window, scroll down until you see the CacheControl property and enter as its value public, max-age=31536000.
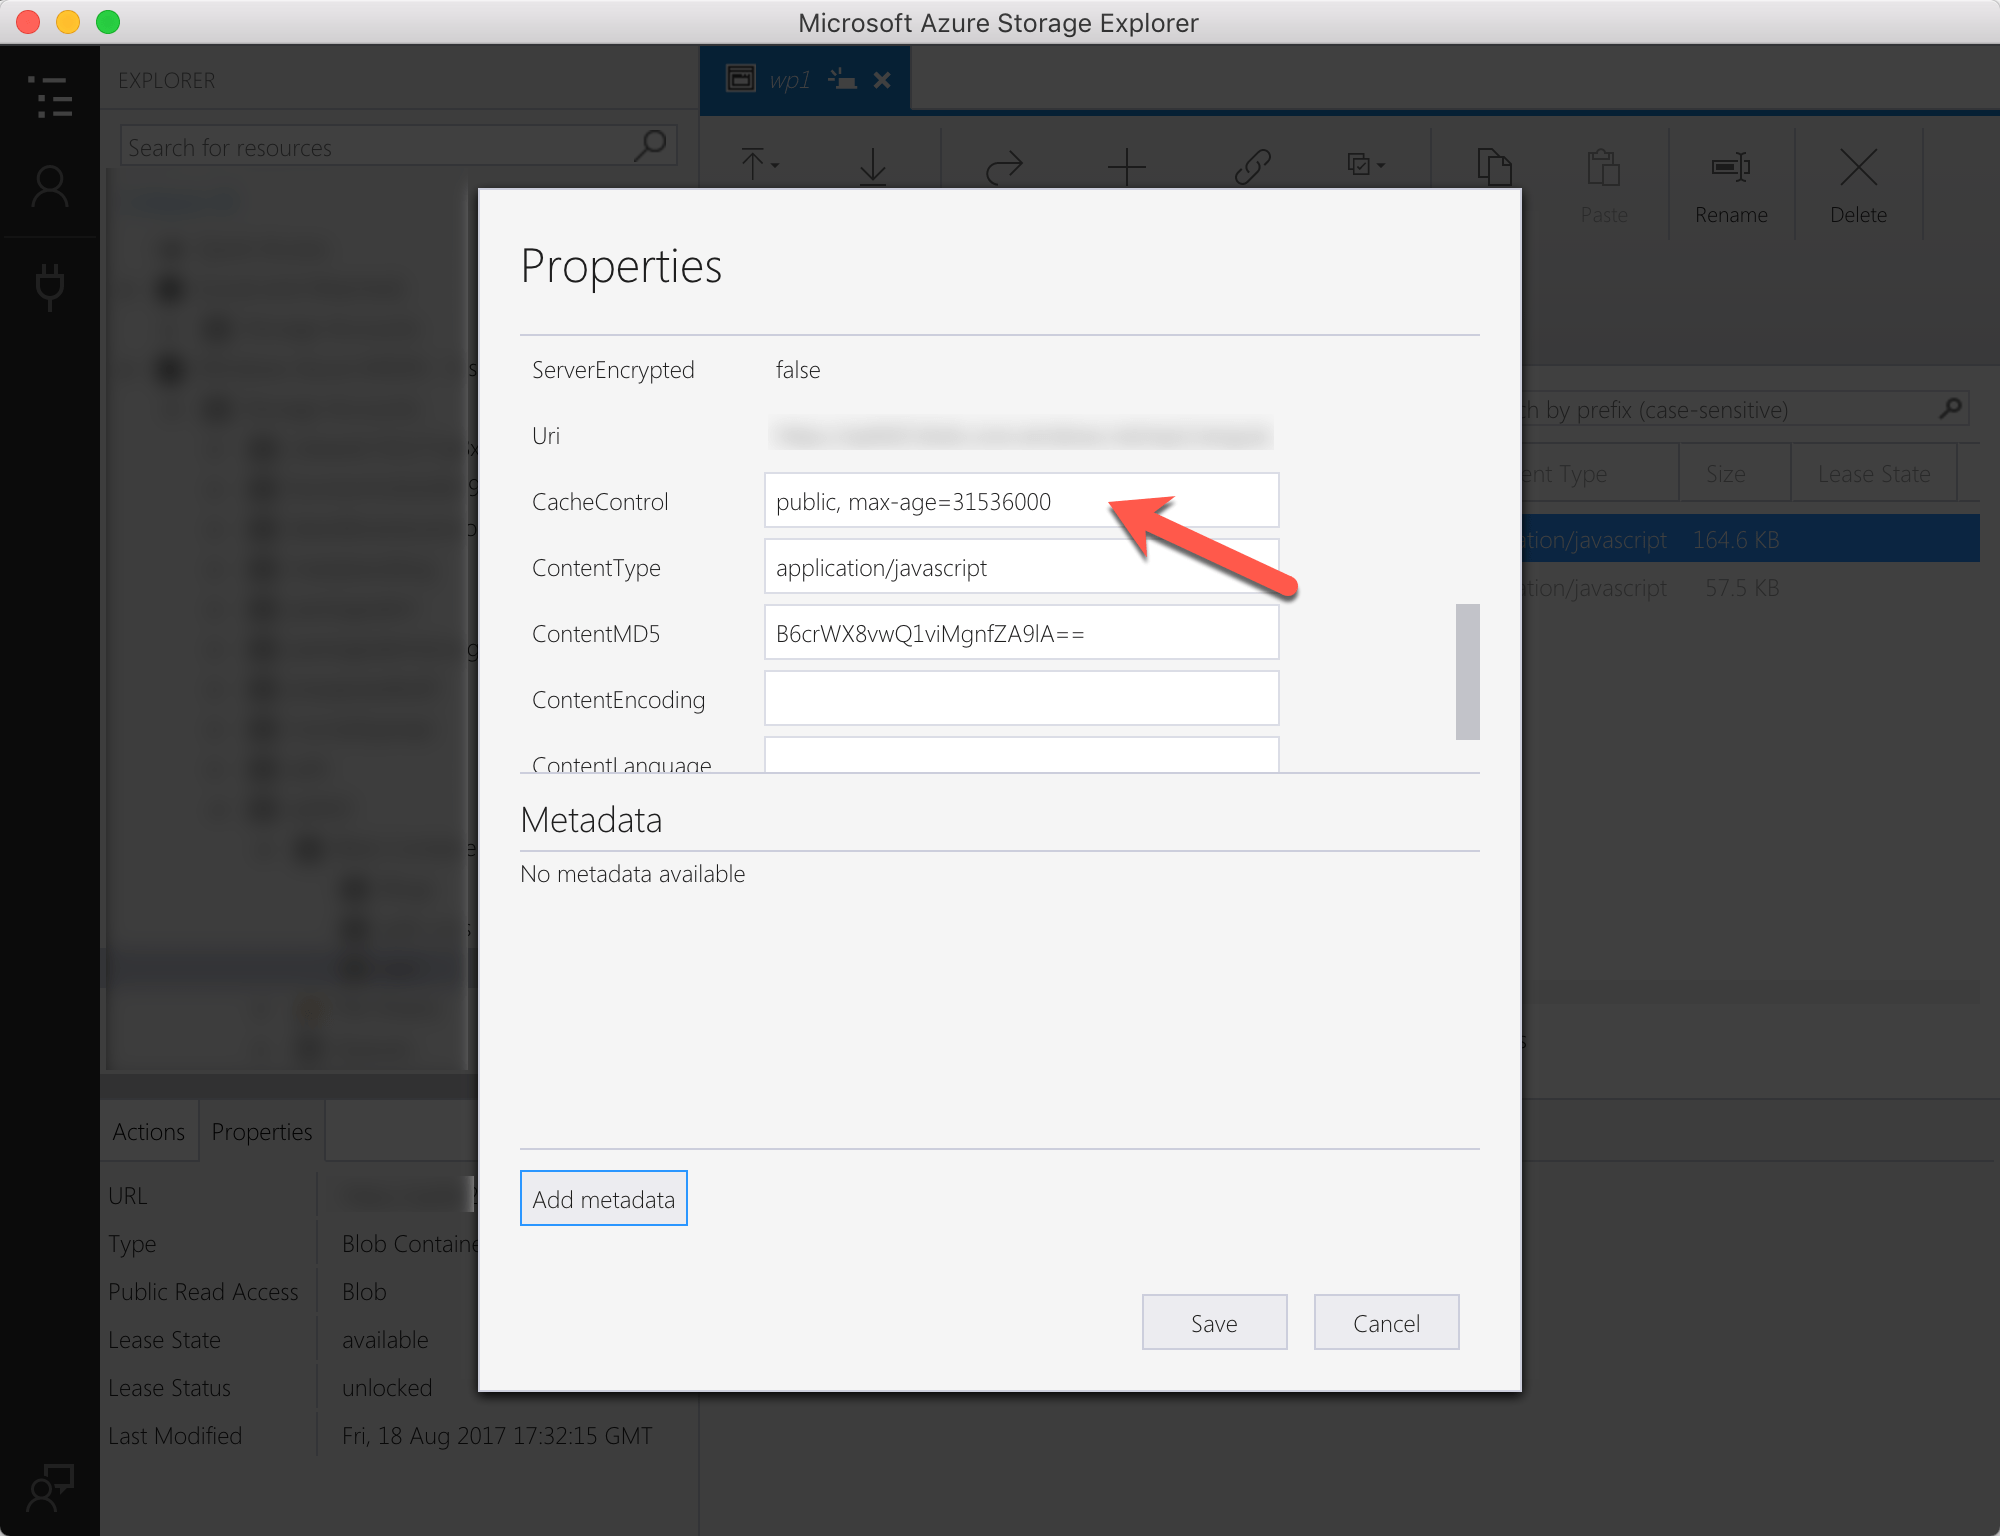
This value will make your file be cached for a year (31.536.000 seconds).

Oh, and it will be also cached by proxy servers. Speaking of which…
Allow your files to be cached by proxies
Many organizations use a proxy server in their network to control network traffic between the internal and public networks. When configuring caching settings for files, you can choose if they should be allowed to be cached by proxy servers or not. There might be cases, when you want users to always download the latest files from your server. But when optimizing SharePoint Framework solutions for performance, you want to allow proxy servers to cache your files. This will help you improve performance of your solutions even further.
Previously I told you how the user would download files from your web server on the first visit, and load them from the local cache afterwards. When another user would open your application, or if the user cleared their local cache, they would again download the files from your web server. Not so, if your files are cached by your organization’s proxy server! In that case, the first time the files are requested, they will be downloaded to the user’s computer and stored in the local cache. But if the proxy supports it, it will also store a copy of the file. The next time, someone requests one of these files, the proxy server will immediately return a copy without ever contacting your server. This offers you a significant improvement of your performance and a further decrease of your hosting costs.
If you want to allow proxy servers to cache your files, include public in the CacheControl property. If you want your files only to be cached in the browser, use private instead.
Enable CORS
When executing your customizations, SharePoint Framework dynamically loads the main script file from the URL specified in the solution manifest. However, when you try to dynamically load another script yourself from within your SPFx customization, using for example the standard SPComponentLoader, you might see an error similar to the following:
My page.aspx:1 XMLHttpRequest cannot load https://contoso.blob.core.windows.net/hello-world/dynamicscript.js. No 'Access-Control-Allow-Origin' header is present on the requested resource. Origin 'https://contoso.sharepoint.com' is therefore not allowed access.

VM449:4 Uncaught (in promise) Error: Error loading https://contoso.blob.core.windows.net/hello-world/dynamicscript.js
	XHR error loading https://contoso.blob.core.windows.net/hello-world/dynamicscript.js
    at XMLHttpRequest.o (eval at <anonymous> (sp-pages-assembly_en-us_9f357385afd7eb976c2adeba619872d3.js:911), <anonymous>:4:14084)
In order to dynamically load your scripts, SharePoint Framework requires your server to support Cross-Origin Resource Sharing (CORS). When enabling CORS you can specify a number of settings such as which origins (domains) are allowed to load your scripts. This can help you protect from unauthorized use of your scripts.
Keep in mind that if your scripts are available to anonymous users, there is nothing stopping them from downloading them and hosting them on their own servers. They just won’t be able to load them directly from your server.
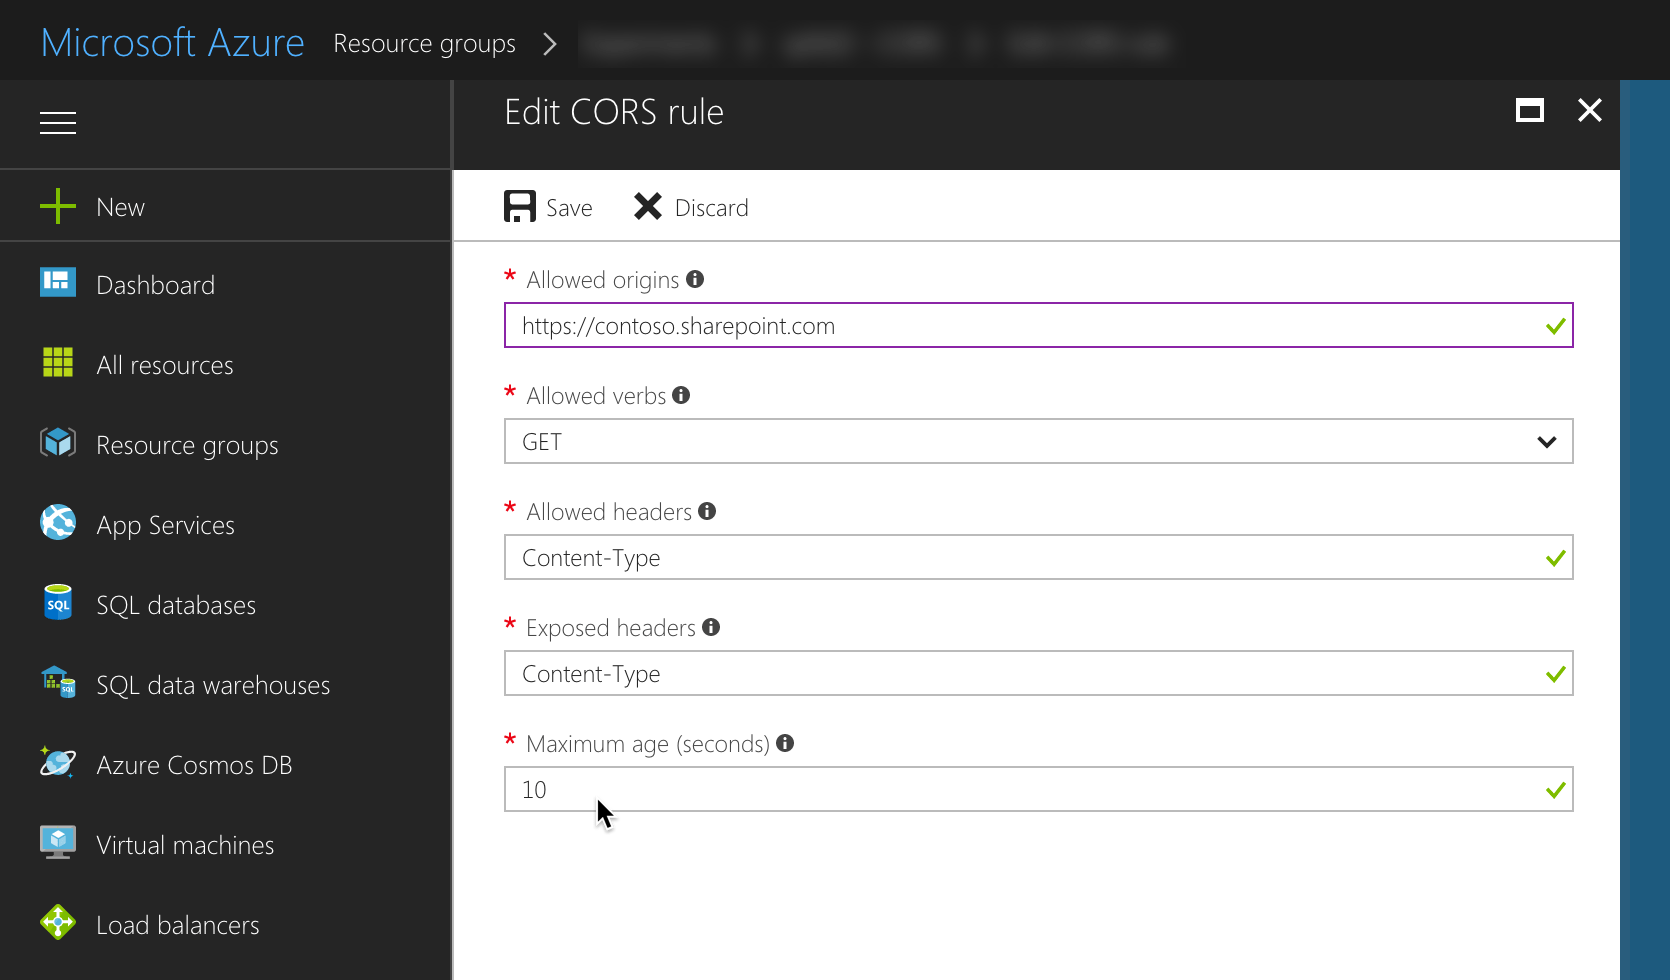
By default, Azure Blob Storage has CORS disabled, but you can easily turn it on, by opening your storage account’s settings and from the Blob service group, choosing the CORS option. On the CORS blade, click the Add button and specify the configuration values.
Compress your files
Azure Blob Storage serves your files exactly how you upload them. It doesn’t for example support dynamic compression which can significantly speed up downloading your files. To compare: an uncompressed version of a minified version of AngularJS 1.6.5 is 168KB. The same file gzipped is only 58KB.
While Azure Blob Storage doesn’t automatically gzip your files, it can notify the browser when it serves one. As long as you compress the file yourself, Azure will deliver the file correctly to the browser.
There a number of ways in which you could gzip a file. In the SharePoint Framework you could consider writing a custom gulp task using code similar to following:
const zlib = require('zlib');
const fs = require('fs');
const buf = fs.readFileSync('./angular.min.js');
zlib.gzip(buf, (err, res) => {
fs.writeFile('./gzip/angular.min.js', res);
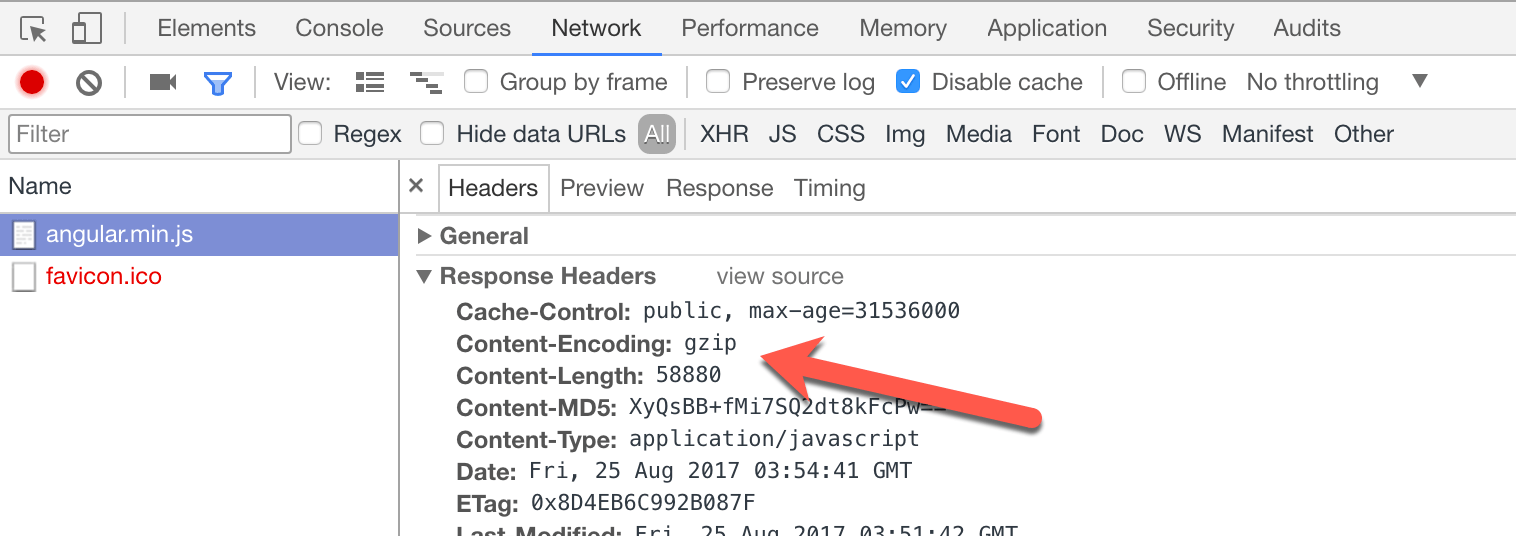
});Having your task run after bundling, you could have gulp automatically gzip all static files for you. To instruct Azure Blob Storage, that these files are gzipped, you would also have to set the value of the ContentEncoding property to gzip.

When requested in the browser, you will see that the file is delivered compressed and the browser automatically decompresses it, speeding up downloading and saving bandwidth.
Before you implement such task, read on, as you might find the alternative more compelling.
There are a few more things which you should consider, to simplify the management of your SharePoint Framework solutions and optimizing their delivery for performance. However they require enabling Azure CDN on your Blob Service. Azure CDN infers additional costs which are quite low comparing to the benefit they offer you.
Optimize how files from Azure Blob Storage are served using Azure CDN
To further optimize how your files stored in Azure Blob Storage are served, you can enable Azure CDN on your Blob Service. CDNs are beneficial when your users are spread across different geographies. CDNs are capable of detecting from which location on the planet the request has been issued, and serve the requested resource from the physically closest location shortening the distance between the user and the server. Even if your users are located in the same city or country, Azure CDN offers you some performance improvements that you should consider.
Whenever you enable CDN, your files are served using a different URL similar to https://yourcdnprefix.azureedge.net/yourcontainer/yourfile.js. Because you can still request your files using the original Blob Storage URL, you can easily compare the benefits of using CDN or only the Blob Storage.
Deliver files faster with HTTP/2
HTTP/2 is a newer version of the HTTP protocol that allows you to deliver a number of smaller files quicker to the browser. Where with HTTP and HTTP1.1 it was a common practice to combine multiple files into one, this is no longer necessary with HTTP/2. If your solution consists of a number of relatively small files which your are loading dynamically, you could see performance improvements from using HTTP/2.
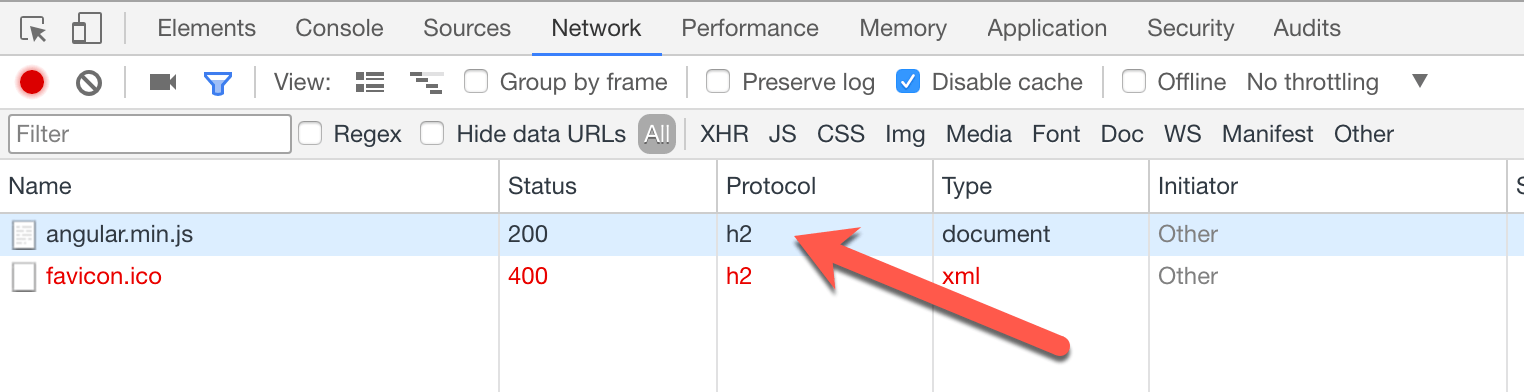
All major web browsers support HTTP/2 and they will use it automatically, if the server is capable of serving files using it. Otherwise, they will fall back to HTTP1.1.
Azure CDN uses HTTP/2 by default and doesn’t require any configuration on your part.
Enable dynamic compression
When working with Azure Blob Storage, if you wanted to serve your files compressed, you had to compress them yourself. Azure CDN used on top of Azure Blob Storage supports dynamic compression, so you can upload your files to Blob Storage using the standard SharePoint Framework gulp task and have the Azure CDN automatically compress files for you.
To enable dynamic compression of files in Azure CDN, open the Azure CDN blade, and from the Settings group, choose the Compression option. On the Compression blade switch the Compression toggle to On and verify that the list of mime types contains all types of files you want Azure CDN to automatically compress for you.

Summary
When building SharePoint Framework solutions, you have to deploy your script files and other assets to a web server. You could technically upload them to a Document Library in SharePoint, but you will probably get better performance from a properly configured Apache server under your desk. Then again, you don’t want to be that guy who is called by the CEO when the intranet stops working. With a proper configuration, Azure Blob Storage offers you great results for a good price. Oh, and did I mention it’s supported out of the box by the SharePoint Framework?
No matter where you decide to put your SharePoint Framework scripts, don’t forget to scan them with the Rencore SharePoint Framework Script Check. Maybe there’s still some room for improvement.