
Extending SharePoint Framework build process with custom tasks
When building solutions using the SharePoint Framework you might need to execute additional tasks during the project build process. Here is how to do it.
SharePoint Framework - open source but quite different
The recently released SharePoint Framework is built on top of an open-source toolchain. It uses for example SystemJS to load scripts, Webpack to bundle source code, Yeoman for scaffolding the project structure and Gulp for running tasks.
If you’ve worked with Gulp before, you might find confusing at first how the SharePoint Framework uses it. For instance, looking at the gulpfile.js provided with a SharePoint Framework project you won’t find any Gulp tasks:
'use strict';

const gulp = require('gulp');
const build = require('@microsoft/sp-build-web');

build.initialize(gulp);
Although SharePoint Framework relies on open-source tooling internally, its build process is based on a custom Gulp-based task system. Since there are no separate Gulp tasks defined in gulpfile.js you might start wondering if you can extend the build process at all. It turns out you can and it’s quite simple as well.
Why you might need a custom build task
Imagine that you’re building a Web Part that communicates with a REST API. In different stages of the development process that endpoint is located at a different URL. Since you don’t want to expose the service URL as configurable property to the user and Web Parts currently don’t offer any build-time configuration mechanism, one way to solve it, is to include a token in Web Part’s source code and have it replaced with the correct URL of the REST endpoint.
Replacing tokens in the source files. Really?
You could consider replacing the token directly in the .ts file before the build runs. You would define a separate Gulp task that you could call, to replace the token and you could even chain it to the standard SharePoint Framework build tasks. While this approach is definitely something you could consider for your build server, if used in a development environment you would have to pay extra attention that you don’t commit the change along with other code changes, replacing the token in your Web Part permanently and breaking release builds.
Hack it!
Another approach, that you could think of, would be to apply the necessary changes directly in the SharePoint Framework build tasks in the node_modules folder. While it might work on your machine, if any of your colleagues, or even the build server, would clone the repository and run $ npm i to restore dependencies your change wouldn’t be there. You might think about solving this problem by adding the whole node_modules folder to source control, but it’s a bad idea and you simply shouldn’t do it.
Luckily, the custom task system used by the SharePoint Framework offers us an easier way to include additional tasks in the build process.
Extending SharePoint Framework build process with custom tasks
To include additional tasks in the custom build pipeline used by the SharePoint Framework you have to do two things: define the task and register it with the build pipeline. Here is how it works.
Building custom task
The build pipeline used by the SharePoint Framework is built using TypeScript. While it’s generally a good idea to use TypeScript instead of plain JavaScript, for the sake of simplicity in this example we will build the sample task using JavaScript. When your organization is going to start using the SharePoint Framework for larger projects and you will want to extend its build pipeline to meet your needs, it would be a good choice to benefit of TypeScript and use it to build reusable tasks, that you can define as a dependency in all your projects.
Custom build tasks for use with the SharePoint Framework’s build pipeline are objects that implement the following interface:
export interface IExecutable {
  execute: (config: IBuildConfig) => Promise<void>;
  name?: string;
  isEnabled?: () => boolean;
  getNukeMatch?: (config: IBuildConfig, taskConfig?: {}) => string[];
}
The execute function contains the logic of your task and takes as a parameter project configuration such as paths to build folders. This is useful if you want to manipulate files during the build process.
The name property specifies the name of the task.
The isEnabled function returns a boolean value determining whether the task should run or not.
Finally, the getNukeMatch function returns an array of file matches to clean up when using the gulp nuke task.
Translating the interface to plain JavaScript, at minimum your task should look like this:
var myTask = {
  execute: (config) => {
    return new Promise((resolve, reject) => {});
  },
  name: 'my-task'
};
While the name property is not required, it’s a good idea to name your task.
Registering the custom task with the build pipeline
After the task is defined, it has to be registered with the SharePoint Framework build pipeline so it can be executed after the source code has been transpiled from TypeScript. Registering a custom build task is done by calling the build.addBuildTasks() function and passing the reference to the task (or an array of tasks if you have multiple):
'use strict';

const gulp = require('gulp');
const build = require('@microsoft/sp-build-web');
const myTask = {
  execute: (config) => {
    return new Promise((resolve, reject) => {});
  },
  name: 'my-task'
};

build.addBuildTasks(myTask);
build.initialize(gulp);
Updating Web Part code file contents during the build process
To see how it works in practice, let’s get back to our example of replacing a token with a URL of the service in Web Part’s code. The sample code used in this article is available on GitHub at https://github.com/waldekmastykarz/spfx-sample-additionalbuildtask.
Defining the token for the service URL in Web Part’s code
Let’s start by defining the service URL using a token in the Web Part’s code file:
import {
  BaseClientSideWebPart,
  IPropertyPaneSettings,
  IWebPartContext,
  PropertyPaneTextField
} from '@microsoft/sp-client-preview';

import styles from './HelloWorld.module.scss';
import * as strings from 'mystrings';
import { IHelloWorldWebPartProps } from './IHelloWorldWebPartProps';

export default class HelloWorldWebPart extends BaseClientSideWebPart<IHelloWorldWebPartProps> {
  private static get serviceUrl(): string { return '$SERVICE_URL$'; }

  public constructor(context: IWebPartContext) {
    super(context);
  }

  public render(): void {
    // omitted for brevity
  }

  // omitted for brevity
}We want the $SERVICE_URL$ token to be replaced with the URL of the service passed to the build using an argument, like $ gulp bundle --serviceurl https://contoso.com/api/service, so that we can communicate with different instances of the service in different stages of the development process.
Defining the custom build task to replace the service URL token with the URL passed in the command line argument
Next, let’s define our task that will replace the token with the URL passed in the argument. For clarity, we define the task in a separate file:
'use strict';
var fs = require('fs'),
    argv = require('yargs').argv,
    error = require('gulp-core-build').error,
    log = require('gulp-core-build').log;

var SetServiceUrl = {
  execute: (config) => {
    return new Promise((resolve, reject) => {
      if (!argv.serviceurl) {
        error('Service URL not set. Not going to replace in code');
        reject();
        return;
      }

      var webPartCodePath = `${config.libFolder}/webparts/helloWorld/HelloWorldWebPart.js`;
      var webPartCode = fs.readFileSync(webPartCodePath, 'utf-8');
      webPartCode = webPartCode.replace('$SERVICE_URL$', argv.serviceurl);
      fs.writeFile(webPartCodePath, webPartCode, (err) => {
        if (err) {
          error(err);
          reject(err);
          return;
        }

        log(`Service URL successfully set to ${argv.serviceurl}`);
        resolve();
      })
    });
  },
  name: 'set-service-url'
};
exports.default = SetServiceUrl;We start by loading dependencies used by the task. Because we are going to update the contents of the Web Part file we need access to the file system (require('fs')). To access arguments passed in the command line we load yargs (require('yargs').argv). Finally we load two more references to log messages to the output (require('error') and require('log')).
Next, we proceed with defining our task. In the execute function we first verify if the URL of the service has been passed using the serviceurl argument. Then, we specify the path to the Web Part file. From the project’s config we get the path to the lib folder, where the intermediate files generated after TypeScript transpilation are stored, and append to it the path to our Web Part file. Notice, how we’re referring to a .js file rather than a .ts file which we edit in the src folder. Next, we read the file contents, replace the token with the service URL and update the file. Finally, we resolve the promise to continue the execution of the build pipeline. Because our task is defined in a separate file we define it as default export so that we can load it in gulpfile.js.
Registering the custom build task with SharePoint Framework’s build pipeline
Now that our task is defined, we have to inject it into SharePoint Framework’s build pipeline. We do this in gulpfile.js:
'use strict';

const gulp = require('gulp');
const build = require('@microsoft/sp-build-web');
const setServiceUrl = require('./setServiceUrl');

build.addBuildTasks(setServiceUrl);
build.initialize(gulp);First, we load our custom task into gulpfile.js and then inject it into the SharePoint Framework build pipeline by passing the reference to the task using the build.addBuildTasks() function.
With everything in place, let’s build the project to verify that everything is working as expected.
When bundling our SharePoint Framework project we still use the standard gulp bundle task but this time we extend it with the serviceurl argument specifying the URL of our service to be used by the Web Part:
$ gulp bundle --serviceurl https://contoso.com/api/service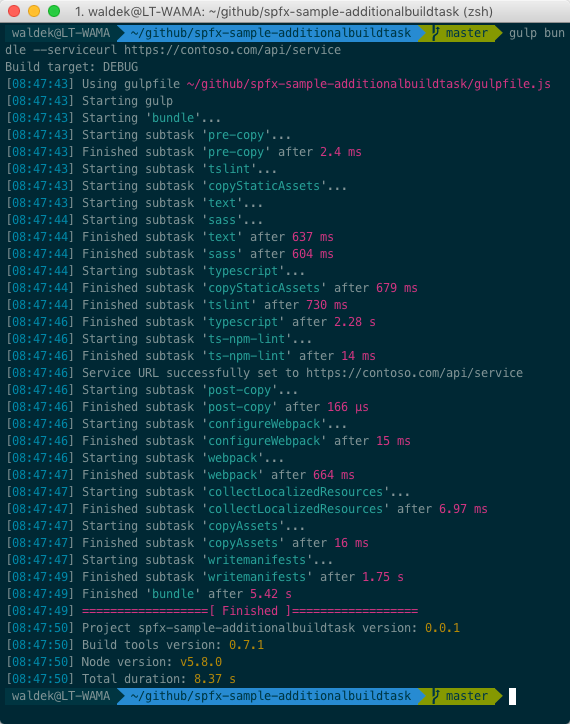
In the build output we can see that our task ran correctly, and we can verify that the URL has been correctly set in the intermediate files:

Also looking at the generated bundle we can confirm that the correct URL has been set there as well:

Summary
When building solutions using the SharePoint Framework you might need to execute additional tasks during the project build process. Even though SharePoint Framework uses a custom Gulp-based task system for its build pipeline, it allows us to easily include additional tasks that we can use to extend the build process to match our specific needs.
Check out the sample project with a custom build task on GitHub at https://github.com/waldekmastykarz/spfx-sample-additionalbuildtask.