
Simplify code reviews and improve consistency with custom eslint rules
If you review pull requests or build software in a team, custom eslint rules can save you a lot of time. Here’s how.
Team consistency > personal preference
Spaghetti code. We all heard it at least once in our career. Code that’s such a mess that it’s impossible to make any sense out of it. Even if it turns out that it was us who wrote it.
The complexity of programming is not the only problem development teams experience. You see, development is a craft, it’s very personal. Over time, we all develop our personal preferences how we name variables, indent our code, or where we put braces. And as soon as you start working with some else, these preferences can cause a lot of trouble and make you waste a lot of precious time.
If each developer on the team, gets to commit code written following their preference, you end up with a mess that’s hard to maintain. Reviewing code and fixing something in code written by someone else costs more and more time. Documenting the application becomes a nightmare. And so the whole codebase becomes a nightmare that no one wants to touch with a stick.
Some teams come up with coding guidelines, which is a great first step towards consistency. But if it’s a document you need to enforce manually, it will quickly end up on a shelf covered in cobwebs. Coding guidelines are great but you need to be able to enforce them automatically. Let’s be realistic, no one will go through your whole codebase after refactoring to verify everything is consistent. Especially, if you’re on a tight deadline.
If you build apps using JavaScript/TypeScript, eslint is a great way to enforce your coding styles. As you type, you get instant notifications about what’s off and how to fix it. There are many presets with rules that you can use as a starting point. But you truly benefit when you implement your team’s specific guidelines into eslint.
Code consistency in practice: CLI for Microsoft 365
I’m one of the maintainers of CLI for Microsoft 365 - an open-source command-line tool that helps you manage Microsoft 365 and SharePoint Framework projects on any platform. It’s built-in TypeScript and runs on Node.js.
We’ve been working on CLI for Microsoft 365 for 3.5 years. With weekly beta releases, we shipped a lot of code. Almost 6,500 files of it. We also gathered some technical debt that we clean up with each major release. All to ensure that it works consistently for our users.
CLI for Microsoft 365 is an open-source project and we have some great contributors. They all come from different organizations, teams and have coding different preferences. But it’s our - maintainers’ job, to ensure that whatever changes they submit, they’re in sync with our codebase. Over time, we’ve seen some of our contributors come and go. We - the maintainers, are here to stay and maintain the project. Often we, or others, need to get back to some else’s code and change something. And since it’s an open-source project that many of us work on in our spare time, we need to do it quickly.
Initially, we started with a checklist to verify for each PR. We still use it. It covers the most important things that we need to check for each PR. But it doesn’t cover everything. And if the PR is a huge refactoring, we kind of assume it’s all good if it builds and tests pass. Realities of life. So to fix this, we decided to use eslint.
We decided to use eslint for two main reasons. We wanted to increase code consistency with formatting and naming, and automate code reviews against our PR checklist. For the former, we used the standard rules provided with eslint configured to our needs. For the latter though, we built our own rules. Here’s how.
Build a custom rule for eslint
eslint is a linter that uses rules to validate specific aspects of your code. It’s perfect for providing you with real-time feedback for the code you’re writing and ensuring it’s consistent with your coding guidelines. You can also include it in your CI/CD pipe to ensure that all PRs align with your guidelines too.
The basics of custom rules are explained on the eslint website. Here are some things I’ve learned when I built custom rules for CLI for Microsoft 365.
Validate CLI for Microsoft 365 command class name
To see if it’s viable to use eslint in CLI for Microsoft 365, we took one of the first checks that we do in our PR review process: ensure that the command’s class name follows the naming convention ServiceCommandNameCommand, for example, AadAppAddCommand. Command files in CLI for Microsoft 365 are organized in folders and we determine the correct class name for each command based on the location of its files.

Setup an eslint plugin with custom rules
eslint supports custom rules through plugins. An eslint plugin is an npm package. And this was the first quirk we needed to solve. We saw no added value in maintaining a separate npm package with a set of rules specific to CLI for Microsoft 365 that no one else would use. Luckily, it turns out, that it’s perfectly fine to create the package in a subfolder and in the root project, install the npm package from that folder.

As we’ll likely add more rules over time, we decided to organize rules so that each rule is in a separate file.

Following eslint requirements, each rule is then exported in the rules variable in the index.js file.
module.exports.rules = {
  'correct-command-class-name': require('./rules/correct-command-class-name'),
  'correct-command-name': require('./rules/correct-command-name')
};
index.js is specified as the main entry point of the plugin package in package.json:
{
  "name": "eslint-plugin-cli-microsoft365",
  "version": "1.0.0",
  "main": "lib/index.js"
}
The last thing left to plug the rule in to eslint, was to add it to the rules collection in .eslintrc.js in the root project:
module.exports = {
  // [...] trimmed for brevity
  "plugins": [
    "@typescript-eslint",
    "cli-microsoft365"
  ]
  "rules": {
    "cli-microsoft365/correct-command-class-name": "error"
    // [...] trimmed for brevity
  }
  // [...] trimmed for brevity
}
This was the hardest part to set everything up and see the custom rule being applied in the linting process. Once this was done, I moved on to building the actual rule.
Define rule selector
When building eslint rules, you need to tell them which node in the code file they should examine. You do this by specifying a selector.
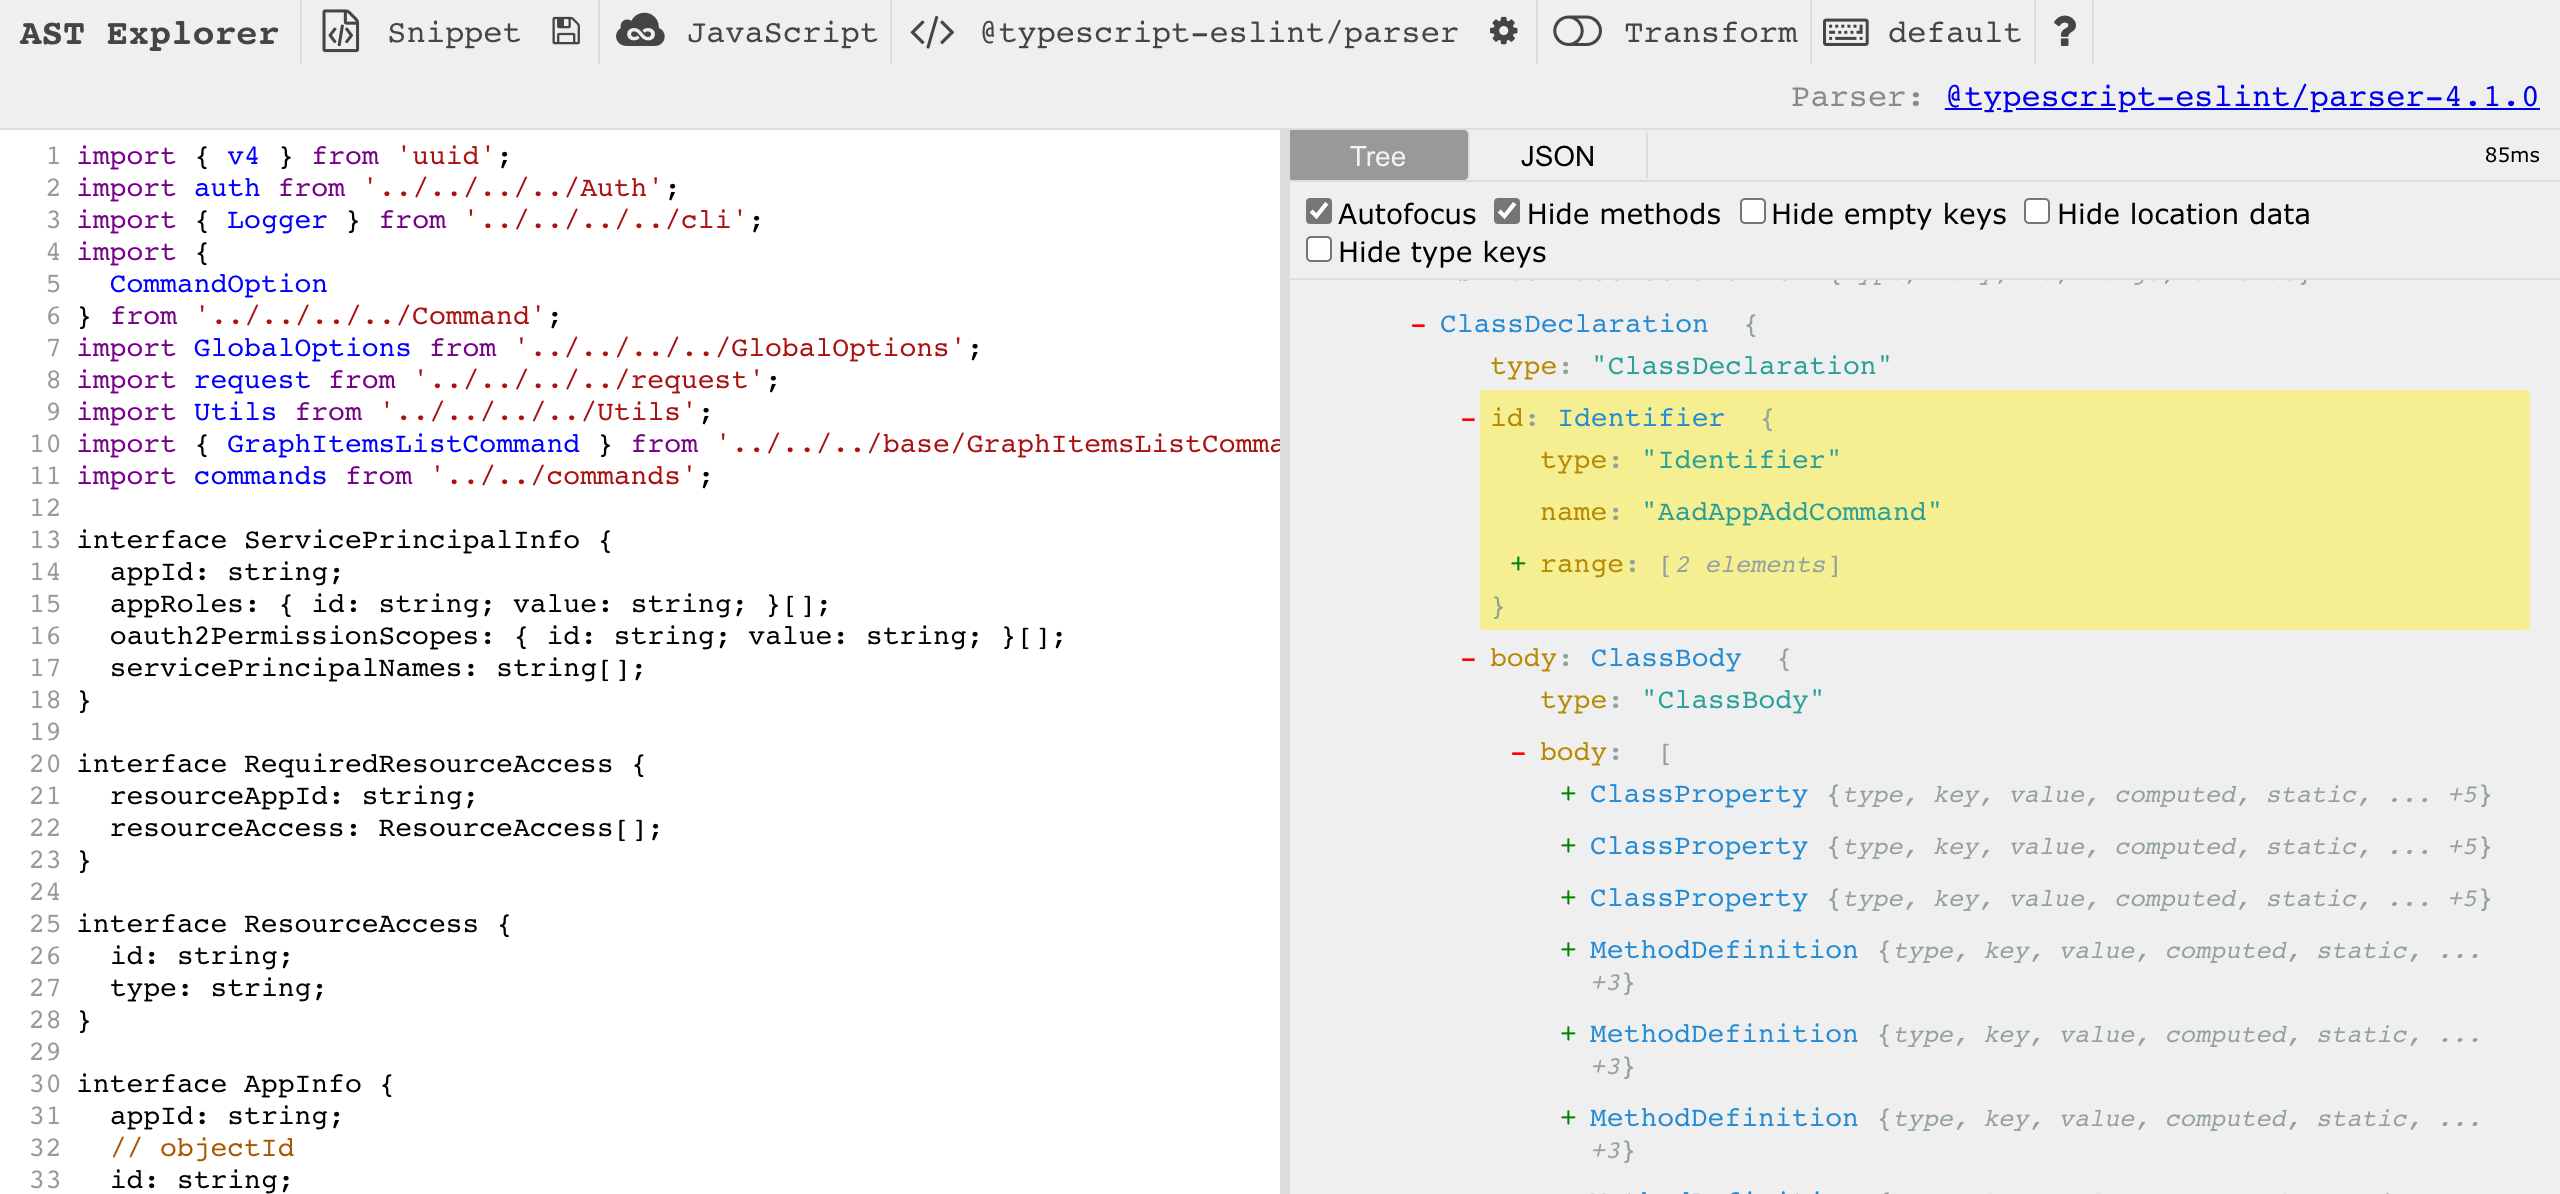
For the rule that checks the name of the command class, I used ClassDeclaration. For another rule, that checks the name of the const that contains the actual name of the command, I needed a more complex selector: MethodDefinition[key.name = "name"] MemberExpression > Identifier[name != "commands"]. Using selectors isn’t trivial and requires you to understand how code translates to abstract syntax trees. AST Explorer is a great resource to see how your code is translated to AST by eslint.
Choosing the right selector is important because it will allow you to minimize the amount of code necessary to examine the node. You also need to remember, that the selector will be applied to the whole file. If eslint will find multiple matches, it will run the rule on each match.
Make your rule fixable
When building custom eslint rules, you should make them automatically fixable. When we introduced the command class naming rule in the CLI, we discovered that we had tens of commands using inconsistent names. Rather than having to fix them manually one by one, we used eslint to fix those names for us!
To let eslint know that your rule is fixable, in the rule’s metadata set the fixable property to code.
module.exports = {
  meta: {
    type: 'problem',
    docs: {
      description: 'Incorrect command class name',
      suggestion: true
    },
    fixable: 'code'
    // [...] trimmed for brevity
  }
  // [...] trimmed for brevity
}
Then, in the rule’s code, when you found that the rule was broken, report the actual node that should be fixed. This can be tricky!
When checking the class name of the command, I used the ClassDeclaration selector, which gives me access to the class declaration node with information such as class name, parent class, whether the class is abstract, and so on. But if I were to report this whole node as the location to be fixed, eslint would replace the whole class block with just the correct class name! So instead, when reporting the fault node, I need to specify node.id which is the node that contains the name of the class.
if (actualClassName !== expectedClassName) {
  context.report({
    node: node.id,
    messageId: 'invalidName',
    data: {
      actualClassName,
      expectedClassName
    },
    fix: fixer => fixer.replaceText(node.id, expectedClassName)
  });
}
Summary
If you work on a project with other devs, keeping your codebase consistent will help you work faster. The larger your organization is, and the more developers you have, the more important it is to have your code consistent. If you’re building apps using JavaScript or TypeScript, the standard set of eslint rules is a great place to start. By adding custom rules that match your team’s guidance, will truly help you to automate code reviews, save time and ensure consistency in your code.
Photo by Glenn Carstens-Peters Unsplash