How to use Masonry in SharePoint Framework client-side web parts
Masonry is a popular library frequently used in JavaScript customizations. Here is how you can use it in SharePoint Framework.
Masonry - Cascading grid layout library
If you ever built a client-side solution that shows a number of cards - be it images or text, there is a chance you’ve used Masonry. Masonry is a JavaScript library that allows you to easily lay out elements on the page similarly to how you would fit bricks in a wall.

Using Masonry is a great solution if you want to display a number of elements of varying sizes next to each other and want to make an optimal use of the available screen estate.
In the past similar effect was used by Delve which just recently switched to a fixed-height card format.

Using Masonry in client-side solutions
The basic usage of Masonry in client-side solution is relatively simple. All you need to do is to reference the Masonry script (either directly from the CDN or from your own location) and provide some basic configuration. Masonry will then automatically take care of the necessary plumbing and will lay out your elements next to each other.
If you’re using jQuery the setup is very similar. The difference is that you retrieve the target element using jQuery and instantiate Masonry directly on that element.
So is using Masonry in SharePoint Framework solutions just as easy as it is in client-side solutions?
Using Masonry in SharePoint Framework client-side web parts
In contrary to client-side solutions you might have built in the past, SharePoint Framework encapsulates its solutions into modules to prevent them from conflicting with other elements on the page. Rather than just adding libraries directly to the page, you register them with the SharePoint Framework API which loads them and makes them available for use in the solution.
Depending on whether you want to use Masonry with jQuery there are different things that you have to take into account.
Sample SharePoint Framework solution illustrating using Masonry with and without jQuery is available on GitHub at https://github.com/waldekmastykarz/spfx-masonry
Using Masonry in SharePoint Framework client-side web parts using vanilla JavaScript
Masonry is published as a set of modules combined into a single script file that you can reference directly from CDN. To use it in your SharePoint Framework web part you first have to register it as an external resource in the config/config.json file by adding to the externals section:
"masonry": "https://unpkg.com/masonry-layout@4.1.1/dist/masonry.pkgd.min.js"Next, in your web part, you load Masonry by adding a require statement:
const Masonry: any = require('masonry');At this moment there are no TypeScript typings available for Masonry so you have to use it without a specific type.
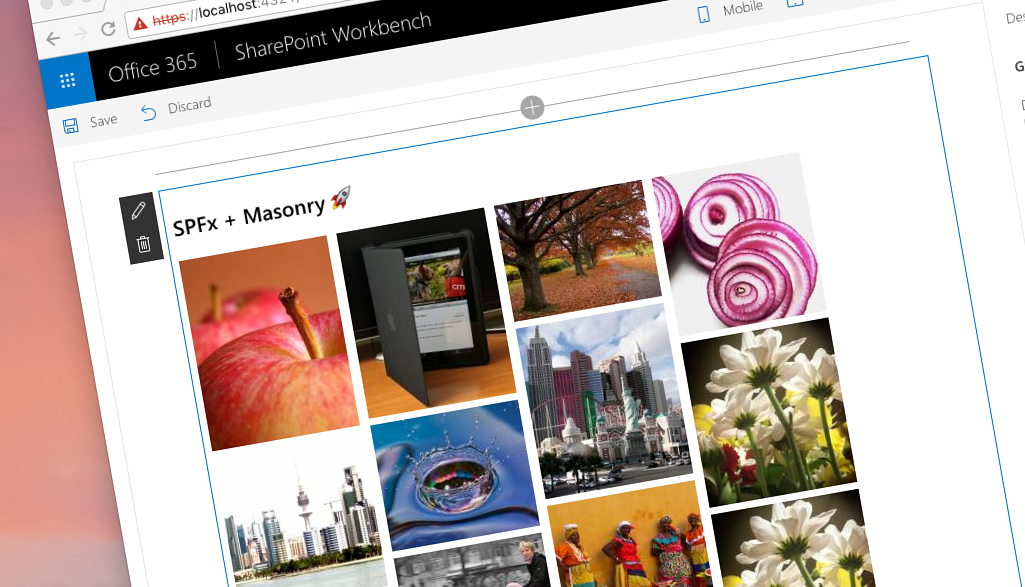
Assuming you wanted to display a number of random images in your web part, you might have a render method similar to following:
export default class ImagesWebPart extends BaseClientSideWebPart<IImagesWebPartProps> {
  public render(): void {
    this.domElement.innerHTML = `
      <h2>${this.properties.description}</h2>
      <div class="${styles.images}"></div>`;

    for (let i: number = 0; i < 15; i++) {
      const img: Element = document.createElement('img');
      const height: number = Math.floor(Math.random() * (200 - 100 + 1)) + 100;
      img.setAttribute('src', `http://lorempixel.com/150/${height}/?d=` + new Date().getTime().toString());
      img.setAttribute('width', '150');
      img.setAttribute('height', height.toString());
      this.domElement
        .querySelector(`div.${styles.images}`)
        .appendChild(img);
    }
  }
}To apply Masonry to it, you would add to the end of the render method:
if (this.renderedOnce) {
  this.masonry.destroy();
}

this.masonry = new Masonry(this.domElement.querySelector(`div.${styles.images}`), {
  itemSelector: 'img',
  columnWidth: 150,
  gutter: 10
});If the web part has already been rendered, the existing instance of Masonry should be destroyed. This is important to clean old references after updating the web part to reflect the latest changes to web part properties. Then a new instance of Masonry, with new images should be created storing the reference in the class variable in case it needs to be refreshed.

Using Masonry in SharePoint Framework client-side web parts using jQuery
If you’re using Masonry with jQuery in your client-side solution, that you want to migrate to the SharePoint Framework, things are a bit more complicated. This has to do with how Masonry is packaged and how the different modules that build up Masonry are defined.
Start by defining jQuery and Masonry as external resources that should be loaded from CDN by adding to the config/config.json file the following entries:
"jquery": "https://code.jquery.com/jquery-3.1.1.min.js",
"masonry": "https://unpkg.com/masonry-layout@4.1.1/dist/masonry.pkgd.min.js",
"jquery-bridget/jquery-bridget": "https://unpkg.com/masonry-layout@4.1.1/dist/masonry.pkgd.min.js"Next to jQuery and Masonry you also need to add a reference to jquery-bridget/jquery-bridget which is a library used by Masonry to register itself as a jQuery plugin.
Next, in your web part, load all resources by adding in the top section of your web part:
import * as $ from 'jquery';
const Masonry: any = require('masonry');
const jQueryBridget: any = require('jquery-bridget/jquery-bridget');
jQueryBridget('masonry', Masonry, $);First, you load jQuery. Then you load Masonry and jQueryBridget. Even though both scripts are served from the same file, you have to load them explicitly as they are defined as modules and need to be loaded separately. Finally, you call the jQueryBridget function to register Masonry as a jQuery plugin.
Similarly to when using vanilla JavaScript you instantiate Masonry on the container element. To support web part rendering you remove the previously created instance of Masonry if any.
export default class ImagesWithJQueryWebPart extends BaseClientSideWebPart<IImagesWithJQueryWebPartProps> {
  private $masonry: any = undefined;

  // ...

  public render(): void {
    this.domElement.innerHTML = `
      <h2>${this.properties.description}</h2>
      <div class="${styles.imagesWithJQuery}"></div>`;

    const $container: JQuery = $(`.${styles.imagesWithJQuery}`, this.domElement);
    for (let i: number = 0; i < 15; i++) {
      const height: number = Math.floor(Math.random() * (200 - 100 + 1)) + 100;
      $container.append(`<img src="http://lorempixel.com/150/${height}/?d=${new Date().getTime().toString()}" width="150" height="${height}" />`);
    }

    if (this.renderedOnce) {
      this.$masonry.masonry('destroy');
    }

    this.$masonry = ($container as any).masonry({
      itemSelector: 'img',
      columnWidth: 150,
      gutter: 10
    });
  }
  // ...
}
Summary
Masonry is a popular library frequently used in client-side solutions. With Masonry you can easily lay out elements in a wall-like fashion making optimal use of the available screen estate. While using Masonry with the SharePoint Framework is relatively easy, there are some additional considerations if you want to use Masonry with jQuery.
Check out sample solution illustrating using Masonry with SharePoint Framework on GitHub at https://github.com/waldekmastykarz/spfx-masonry