Creating parameterized Deployment Steps for Visual Studio SharePoint development tools
One of the extensibility points of the new Visual Studio SharePoint development tools are the Deployment Steps: tasks that are executed during the Deployment Process in Visual Studio. The tools allow you not only to specify different Deployment Configurations using available Deployment Steps but also to create your own steps like for example executing a PowerShell script. While creating custom Deployment Steps isn’t difficult, it can get challenging when you want to make them support user definable parameters.
The challenge
The challenge with creating parameterized Deployment Steps is, that there is little out of the box support for adding parameters to the Deployment Steps in the current release of the Visual Studio SharePoint development tools.
First of all there is no out-of-the-box available User Interface that would allow you to provide parameters for your Deployment Step in the Deployment Configuration window. Additionally there is no event that occurs when a Deployment Step is being added to a Deployment Configuration, so you cannot prompt the user to specify the parameters for your Deployment Step right after it has been selected. Another challenge is that the IDeploymentStep doesn’t have any kind of support for storing and persisting additional information about the Deployment Step.
The gems
While the situation might seem very bad, the team that developed both Visual Studio SharePoint development tools and Visual Studio included a couple of gems that can make creating parameterized Deployment Steps happen.
UI for providing parameters
Thinking about the User Interface that would allow users to specify parameters for your custom Deployment Steps you might consider the following: every time a Deployment Step would get executed, it would check whether the parameters have been specified. If not it would present a dialog using which the user could specify the values for the parameters. The next time it would execute it would already have the values so the user wouldn’t get prompted again.
One of the problems with such approach is, that the values of the parameters wouldn’t be visible anywhere in Visual Studio. You would have to create a separate extension which would allow you to view and edit the existing values.
While looking at the API of the Visual Studio SharePoint development tools I stumbled upon the ISharePointProjectService.ProjectPropertiesRequested event and the SharePointProjectPropertiesRequestedEventArgs.PropertySources property.
It turns out that the ProjectPropertiesRequested event occurs every time you select a SharePoint Project in the Solution Explorer when the Properties Window is visible. Additionally the event handler of that event contains a reference to the PropertySources property which allows you to add custom entries to the Properties Window. Seems like a perfect combination!
Adding custom entries to the Properties Window is really straight forward. First of all you need a custom Project Extension which will allow you to hook up to the ProjectPropertiesRequested event. Then using the PropertySources.Add() method you can add the entry to the Properties Window:
[Export(typeof(ISharePointProjectExtension))]
public class ParameterizedDeploymentStepsProjectExtension : ISharePointProjectExtension
{
    public void Initialize(ISharePointProjectService projectService)
    {
        projectService.ProjectPropertiesRequested += new EventHandler<SharePointProjectPropertiesRequestedEventArgs>(projectService_ProjectPropertiesRequested);
    }

    void projectService_ProjectPropertiesRequested(object sender, SharePointProjectPropertiesRequestedEventArgs e)
    {
        e.PropertySources.Add(new
        {
            MyProperty = ""
        });
    }
}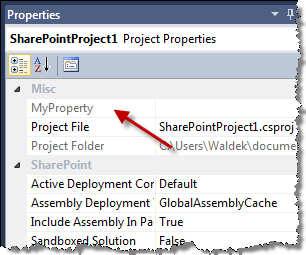
While the sample above shows you how to add a custom property to the Properties Window, the reality is a little bit more complex than that as you need to persist the value of the property somewhere. An anonymous type, like the one used in the sample above doesn’t provide you with a notification when the value of the property has been requested/changed. In order to do that you have to make use of the TypeDescriptor with a custom TypeDescriptionProvider. Using a custom TypeDescriptionProvider allows you to turn a list of values into an object. This approach is also being used for SharePoint Explorer Extension for displaying the properties of a node in the Properties Window. Using the IExplorerNodeContext.CreatePropertySourceObject method you can convert an IDictionary<string, string> into an object that can be displayed in the Properties Window.
Storing the values of the custom properties
As I already mentioned the IDeploymentStep interface doesn’t provide you with any means of persisting additional information. If you want to work with parameterized Deployment Steps you need to fall back to some other mechanism available in the context of a custom Deployment Step.
The first candidate is the ISharePointProject.ProjectUserFileData property. This property is an IDictionary<string, string> that allows you to store persisted properties in the context of a SharePoint Project. Every property you set will get stored in the .user file. While this using this method is very simple and involves no custom code at all, there is a serious downside. Because the properties are being stored in the .user file they won’t be shared across your development team, as every user has his own local copy of the .user file. Depending on your Deployment Step this might or might not be something you want to use to store the values of your Deployment Steps’ parameters.
There is also another way to store custom data in the Visual Studio project system and it’s provided by the MSBuild API. Using the Project.GetPropertyValue() method you can retrieve the value of a property stored in the project file (.csproj for C# projects) and with the Project.SetProperty() you can store a value in the project file. Using this approach you can write to and read from the project file allowing your users to share the values of your Deployment Steps’ parameters.
Good Practice for the PropertyDescriptor
Using a custom PropertyDescriptor you can convert any object into a property than can be displayed in the Properties Window. No matter the base object that you use, there are a few things worth keeping in mind while working with a custom PropertyDescriptor in combination with parameterized Deployment Steps and storing values in the project file using the MSBuild API.
Creating Unique Keys
A Deployment Step can be used multiple times in many Deployment Configurations. In order to correctly store the values of every single Deployment Step you have to be able to distinguish between different steps and different configurations. When you generate the internal name for the parameter it is therefore useful to include the name of the Deployment Configuration and the number of the Deployment Step that the parameter applies to in the property name.
Escaping Names
If you chose to store the parameters in the project file using the MSBuild API, you have to keep in mind, that these files are XML files and every property will be stored as an XML element, such as <PropertyName>PropertyValue</PropertyName>. It is your responsibility to escape all characters that are invalid in a XML element name and all characters that are not allowed as a value.
Putting the properties into right categories
While creating a custom PropertyDescriptor you might want to make your custom properties be displayed in custom categories, just so that they are easier to find and to distinguish. The PropertyDescriptor has the Category property which can be used to set the name of the Category that the property belongs to. Unfortunately, no matter the value that you set in the Category property, your custom properties will end up in the Misc category in the Properties Window.
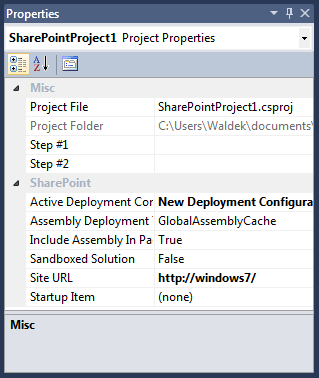
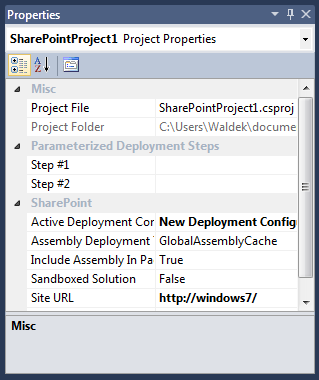
Instead of overriding the Category property you need to use the CategoryAttribute class, wrap it in an Attribute[] array and pass it to the base constructor. This will make the Properties Window display the custom properties in the right categories as expected:
Putting it all together
Getting the plumbing done is not really difficult but consists of a few different pieces that you have to know about. Explaining the whole concept without an example can be difficult. That’s why I suggest that you take a look at the sample project I created.
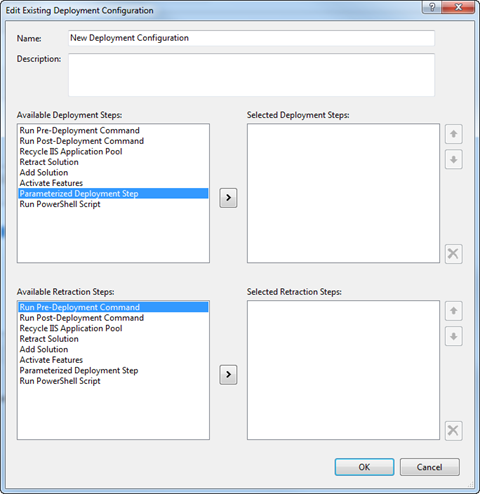
The project contains a sample parameterized Deployment Step called Parameterized Deployment Step. After you open the project in Visual Studio and hit F5, an Experimental Instance of Visual Studio will start with the extension already loaded. Then, when you create a new SharePoint Project and go to the Deployment Configurations, you should see the Parameterized Deployment Step available:
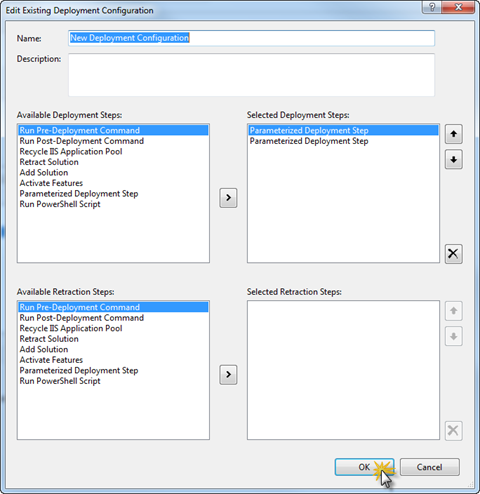
You can add a few of them to your Deployment Configuration and confirm the configuration with the OK button.
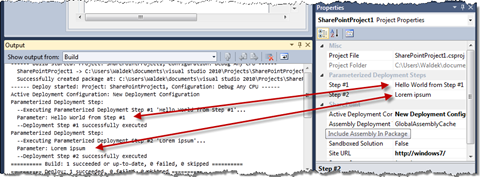
Now, when you select the newly created Deployment Configuration as the Active Deployment Configuration and in the Solution Explorer select the SharePoint Project, a property will be displayed for every Parameterized Deployment Step you have added to your Deployment Configuration.
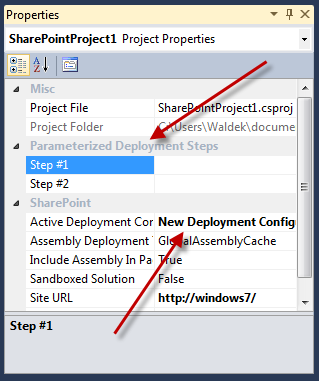
You can now provide some values for each property.
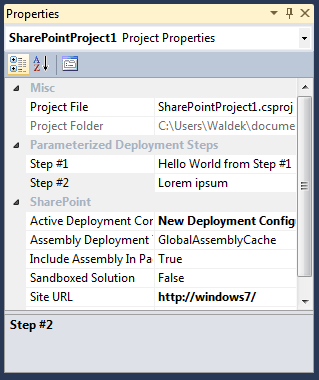
**Important **Please note, that changing the value of a property causes the project file to change. In order for the changes to be reflected in the Deployment Process you need to save the project.
Now when you choose Deploy from the SharePoint Project menu, the Deployment Process will start and in the Output Window you should see the values that you entered in the Properties Window:
The solution
The solution consists of two projects: the VSIX project that is responsible for packaging the extension and the .Implementation project that contains the code of the extension.
You could start exploring the project from the ParameterizedDeploymentStepsProjectExtension.cs file. This is the place where the properties are being added to the Properties Window every time the SharePoint Project’s properties are being requested.
The ParameterizedDeploymentStep.cs file contains the code of the Parameterized Deployment Step. You can use this file as a start point to create your own parameterized Deployment Steps.
The ProjectFileDataDescriptionProvider.cs, ProjectFileDataPropertyDescriptor.cs and ProjectFileDataTypeDescriptor.cs contain the plumbing required to display custom properties in the Properties Window. The ProjectFileDataPropertyDescriptor.cs file contains the code that described the behavior of the property including reading and writing the values of the properties from the project file.
The ProjectFileDataPropertyInfo.cs file is a wrapper class used to represent a property. It contains properties like Name (id), DisplayName and Category which are used to render the property in the Properties Window. To make reading and writing the values of the property easier, it also contains a reference to the current Project (ISharePointProject) object.
Download: Sample Parameterized Deployment Step (82KB, ZIP)
Technorati Tags: SharePoint 2010,Visual Studio 2010
