Extending Content Query Web Part XSLT with custom functions
It’s probably a common knowledge by now, that the CQWP uses XSLT for creating the presentation layer for the queried data. The default set of the functions provided with XSLT is limited. While the ddwrt namespace adds some very useful functionality to the CQWP there are still many situations when you might need something else that isn’t there like Regular Expressions for example. Many SharePoint developers I know would decide to create a custom Web Part at this point. Knowing how great the CQWP performs I would extend the standard functionality instead.
If you want to extend the Content Query Web Part XSLT transformations with extra functionality, there are several points where you need to hook into:
- the Content Query Web Part, to make the custom methods available in the XSLT
- custom class to define the methods
- the XSL file (ItemStyle.xsl, ContentQueryMain.xsl and/or Header.xsl) to make it aware of the custom functions
Getting Started
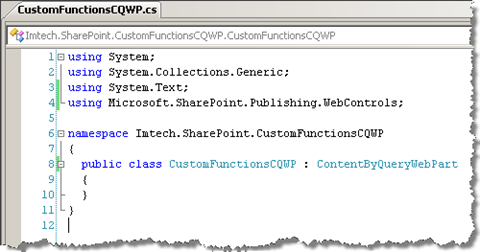
The very first thing you want to do is to extend the Content Query Web Part to leverage the custom functionality and in my case to setup the project.
As I don’t use anything else than MSBuild I have added a custom action to the build tasks of the project to make it create a WSP for me using the DDF file from the Solution directory.
After getting the first build up and running, and confirming that the extended version of the Content Query Web Part is available in SharePoint, we can proceed with expanding the functionality of the CQWP.
Defining the custom functions
The next step is defining and programming the various functions you want to make available in the XSLT used by the Content Query Web Part. Please note that you can define virtually unlimited number of custom functions and namespaces, so be wise with splitting them in various namespace to keep it all maintainable. For the brevity I will create just one function in this article: generating a random number.
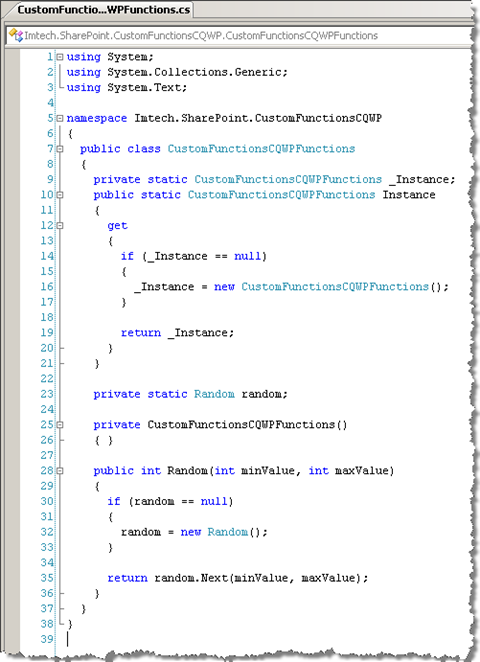
Let’s start off with programming the .NET method containing the logic for the XSLT function.
As already mentioned I have defined only one custom function for this example which returns a random number from the given range. While adding your custom functions to the Content Query Web Part you need to pass an instance of the class which contains the custom functions. To keep yourself from constantly re-instantiating the functions class, you can use the Singleton pattern to store the reference to the once instantiated class – just as I did in the example code above.
Adding the functions to the Content Query Web Part
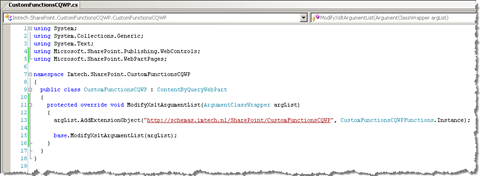
After having defined and programmed the custom functions it is time to make the CQWP aware of them. To add your custom functions to the Content Query Web Part you need override the ModifyXsltArgumentsList method – the same which we used earlier to add some custom parameters. This time for a change you will be using the ArgumentClassWrapper.AddExtensionObject method to define the link between the CQWP and the class which contains the custom functions.
As the parameters you have to pass the namespace: unique value which will identify your custom class and a reference to the instance of the class.
Half way there
By completing the steps I’ve mentioned above you’re done with custom coding. The last thing you need to do is to make the XSLT files actually use your custom functions.
Test Content
Let’s say you want to display a random article on each reload of a page. What you need to do is to retrieve all the articles that you’re interested in and pick one random page to be displayed. As you might suspect: the first part can be done using the standard CQWP. In order to pick the random page you will use the custom function you have just created.
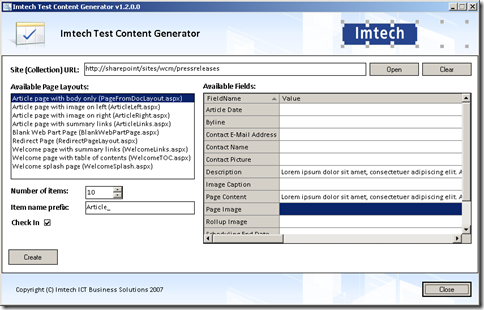
Let’s start with adding a few pages to be able to test the extended CQWP. I have used the Imtech Test Content Generator for this purpose but doing it manual is ok too.
Modifying XSLT
Now it’s time to make the custom functions we have created available in the XSLT. First of all let’s create a copy of the existing ItemStyle.xsl and ContentQueryMain.xsl files. You can find them either in /Style Library/XSL Style Sheets of your Publishing Site Collection or in the 12\TEMPLATE\FEATURES\PublishingResources directory on your web server.
Please notice that in a regular scenario you would modify the ItemStyle.xsl only as it’s the file that contains item-level formatting. In our situation however, first of all you want to select one item only and the apply the formatting to it. The ContentQueryMain.xsl is the place where you can intercept applying formatting to the different items.
Let’s now define a custom prefix for our functions which will allow us to call the functions in CustomContentQueryMain.xsl:
There are two things you need to do here. First of all you need to define the prefix which you will use to call your custom functions. Then, to simplify working with your custom prefix, you will exclude the prefix from the output.
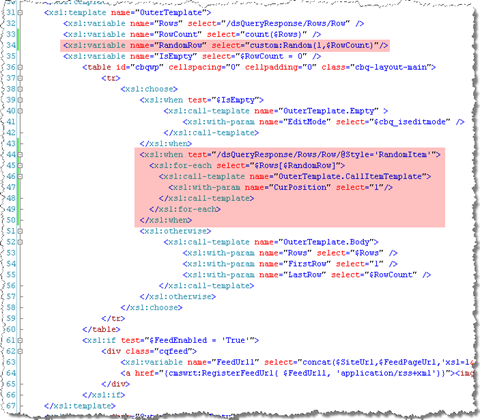
As I mentioned before: CustomContentQueryMain.xsl is responsible for iterating through all retrieved results and applying formatting to them. If you want to change the default behavior, this is the place where it can be done. Modify the standard ContentQueryMain.xsl file as shown on the picture below:
The first change (line 34) defines a new variable which contains a random number between 1 and the number of pages retrieved by the Content Query Web Part. The second modification (lines 44 – 50) apply template to the randomly selected item.
In this scenario we will focus on using the custom functions in XSLT rather than customizing the formatting of items. All you need to do in the CustomItemStyle.xsl file is to make a copy of the Default template and give it a new name, for example: RandomItem. You will use it to help the CQWP determine whether it should display all items as returned by the query or a single – randomly chosen item only.
After you have done the above modifications it’s time to upload both XSL files to the /Style Library/XSL Style Sheets directory on your Site Collection. You can do this either by uploading the files or by using a Feature. In a real life scenario you would provision these file alongside other files from your solution.
Displaying random item in the Content Query Web Part
By default the Content Query Web Part uses the ItemStyle.xsl and the ContentQueryMain.xsl files. Unfortunately there is no interface to make the CQWP use different resources. You can do this however by adding an instance of the CustomFunctionsCQWP on the page, exporting it to XML, changing the values and importing it on the page again. This process has been described in detail in the How to: Customize the Content Query Web Part using Custom Properties article on MSDN.
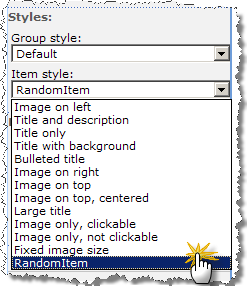
After re-importing the Web Part don’t forget to set the Item Style to RandomItem (or whatever name you have chose). This will make the Content Query Web Part display a randomly chosen item.
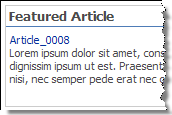
If you’ve followed the instructions above correctly you should see something similar to this on your page:
Every time you reload the page the Web Part should display another article.
Summary
The Content Query Web Part shipped with Microsoft Office SharePoint Server 2007 is a very powerful content aggregation solution. It not only aggregates content in a very performing way but it also provides you advanced caching mechanisms which make it perfect for many different scenarios. By extending the Content Query Web Part with custom XSL functions, you can make it more suitable to your challenges and make even more benefit of using it within your solutions.
Technorati Tags: SharePoint, SharePoint 2007, MOSS 2007, WCM
